| Skip Navigation Links | |
| Exit Print View | |

|
Oracle Solaris 10 9/10 Installation Guide: Solaris Live Upgrade and Upgrade Planning |
| Skip Navigation Links | |
| Exit Print View | |

|
Oracle Solaris 10 9/10 Installation Guide: Solaris Live Upgrade and Upgrade Planning |
Part I Upgrading With Solaris Live Upgrade
1. Where to Find Solaris Installation Planning Information
2. Solaris Live Upgrade (Overview)
3. Solaris Live Upgrade (Planning)
4. Using Solaris Live Upgrade to Create a Boot Environment (Tasks)
5. Upgrading With Solaris Live Upgrade (Tasks)
6. Failure Recovery: Falling Back to the Original Boot Environment (Tasks)
7. Maintaining Solaris Live Upgrade Boot Environments (Tasks)
8. Upgrading the Solaris OS on a System With Non-Global Zones Installed
Guidelines for Using Solaris Live Upgrade With Non-Global Zones (Planning)
Creating a Boot Environment When a Non-Global Zone Is on a Separate File System
Creating and Upgrading a Boot Environment When Non-Global Zones Are Installed (Tasks)
Upgrading With Solaris Live Upgrade When Non-Global Zones Are Installed on a System (Tasks)
Upgrading a System With Non-Global Zones Installed (Example)
Upgrading With Solaris Live Upgrade When Non-Global Zones Are Installed on a System
Administering Boot Environments That Contain Non-Global Zones
To View the Configuration of a Boot Environment's Non-Global Zone File Systems
To Compare Boot Environments for a System With Non-Global Zones Installed
Using the lumount Command on a System That Contains Non-Global Zones
9. Solaris Live Upgrade (Examples)
10. Solaris Live Upgrade (Command Reference)
Part II Upgrading and Migrating With Solaris Live Upgrade to a ZFS Root Pool
11. Solaris Live Upgrade and ZFS (Overview)
12. Solaris Live Upgrade for ZFS (Planning)
13. Creating a Boot Environment for ZFS Root Pools
14. Solaris Live Upgrade For ZFS With Non-Global Zones Installed
B. Additional SVR4 Packaging Requirements (Reference)
Starting with the Solaris Solaris 10 8/07 release, you can upgrade or patch a system that contains non-global zones with Solaris Live Upgrade. If you have a system that contains non-global zones, Solaris Live Upgrade is the recommended program to upgrade and to add patches. Other upgrade programs might require extensive upgrade time, because the time required to complete the upgrade increases linearly with the number of installed non-global zones. If you are patching a system with Solaris Live Upgrade, you do not have to take the system to single-user mode and you can maximize your system's uptime. The following list summarizes changes to accommodate systems that have non-global zones installed.
A new package, SUNWlucfg, is required to be installed with the other Solaris Live Upgrade packages, SUNWlur and SUNWluu. This package is required for any system, not just a system with non-global zones installed.
Creating a new boot environment from the currently running boot environment remains the same as in previous releases with one exception. You can specify a destination disk slice for a shared file system within a non-global zone. For more information, see Creating and Upgrading a Boot Environment When Non-Global Zones Are Installed (Tasks).
The lumount command now provides non-global zones with access to their corresponding file systems that exist on inactive boot environments. When the global zone administrator uses the lumount command to mount an inactive boot environment, the boot environment is mounted for non-global zones as well. See Using the lumount Command on a System That Contains Non-Global Zones.
Comparing boot environments is enhanced. The lucompare command now generates a comparison of boot environments that includes the contents of any non-global zone. See To Compare Boot Environments for a System With Non-Global Zones Installed.
Listing file systems with the lufslist command is enhanced to list file systems for both the global zone and the non-global zones. See To View the Configuration of a Boot Environment's Non-Global Zone File Systems.
The Solaris Zones partitioning technology is used to virtualize operating system services and provide an isolated and secure environment for running applications. A non-global zone is a virtualized operating system environment created within a single instance of the Solaris OS, the global zone. When you create a non-global zone, you produce an application execution environment in which processes are isolated from the rest of the system.
Solaris Live Upgrade is a mechanism to copy the currently running system onto new slices. When non-global zones are installed, they can be copied to the inactive boot environment along with the global zone's file systems.
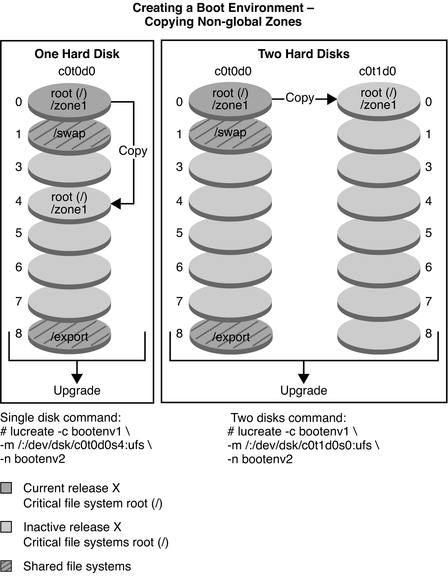
Figure 8-1 shows a non-global zone that is copied to the inactive boot environment along with the global zone's file system.
Figure 8-1 Creating a Boot Environment – Copying Non-Global Zones

In this example of a system with a single disk, the root (/) file system is copied to c0t0d0s4. All non-global zones that are associated with the file system are also copied to s4. The /export file system and /swap volume are shared between the current boot environment, bootenv1, and the inactive boot environment, bootenv2. The lucreate command is the following:
# lucreate -c bootenv1 -m /:/dev/dsk/c0t0d0s4:ufs -n bootenv2
In this example of a system with two disks, the root (/) file system is copied to c0t1d0s0. All non-global zones that are associated with the file system are also copied to s0. The /export file system and /swap volume are shared between the current boot environment, bootenv1, and the inactive boot environment, bootenv2. The lucreate command is the following:
# lucreate -c bootenv1 -m /:/dev/dsk/c0t1d0s0:ufs -n bootenv2
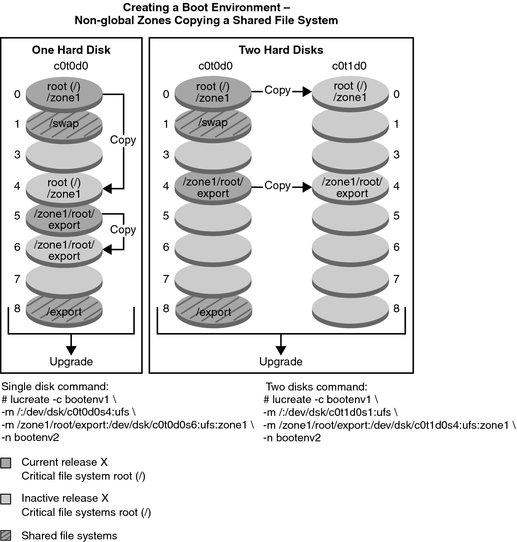
Figure 8-2 shows that a non-global zone is copied to the inactive boot environment.
Figure 8-2 Creating a Boot Environment – Copying a Shared File System From a Non-Global Zone

In this example of a system with a single disk, the root (/) file system is copied to c0t0d0s4. All non-global zones that are associated with the file system are also copied to s4. The non-global zone, zone1, has a separate file system that was created by the zonecfg add fs command. The zone path is /zone1/root/export. To prevent this file system from being shared by the inactive boot environment, the file system is placed on a separate slice, c0t0d0s6. The /export file system and /swap volume are shared between the current boot environment, bootenv1, and the inactive boot environment, bootenv2. The lucreate command is the following:
# lucreate -c bootenv1 -m /:/dev/dsk/c0t0d0s4:ufs \
-m /zone1/root/export:/dev/dsk/c0t0d0s6:ufs:zone1 -n bootenv2
In this example of a system with two disks, the root (/) file system is copied to c0t1d0s0. All non-global zones that are associated with the file system are also copied to s0. The non-global zone, zone1, has a separate file system that was created by the zonecfg add fs command. The zone path is /zone1/root/export. To prevent this file system from being shared by the inactive boot environment, the file system is placed on a separate slice, c0t1d0s4. The /export file system and /swap volume are shared between the current boot environment, bootenv1, and the inactive boot environment, bootenv2. The lucreate command is the following:
# lucreate -c bootenv1 -m /:/dev/dsk/c0t1d0s0:ufs \
-m /zone1/root/export:/dev/dsk/c0t1d0s4:ufs:zone1 -n bootenv2