| Oracle® Argus Insight Cognos Administrator's Guide, Release 6.0 E18252-01 |
|
 Previous |
 Next |
This chapter provides information about using the Argus Insight administration tools and includes discussions of the following:
General Usage Information
Using Administration Tools
Schema Creation
Configurable Excel Version for Cognos Reports
Before using the Administration Tools, you should be aware of information about the following:
Multibyte Character Support
Support for Multiple LDAP Servers
Schema Creation
Configurable Excel Version for Cognos Reports
In 5.1 of Argus the database has been converted to accommodate multibyte characters.
The Argus J structure will be merged into Argus Safety 5.1 that includes Argus field conversion from VARCHAR to CLOB data type. To ensure that Argus Insight 5.1 is compatible with Argus Safety 5.1, these field changes need to be supported in Insight as follows:
Schema Creation and Validation - Include VARCHAR to CLOB changes.
ETL (Initial & Incremental) - Change transformation logic.
Database upgrade - Include VARCHAR to CLOB changes.
Reports & Dashboards - Validate/modify reports.
Cubes and drill-through Reports - Validate/modify cubes and drill-through reports.
Report Writer - Design (queries) and model changes.
Power Queries - Validate/modify QBE/Filters/Advanced Conditions.
The system performs authentication against more than one LDAP server. If there is more than one LDAP server, each with a disparate set of users, Insight must authenticates to either one, and the user has access to both the BO and CO servers locally.
Assumptions
The customer assumes responsibility for usernames and passwords being entered in the proper LDAP server.
The ETL will import all the configured LDAP servers from Safety and populate them in the LDAP List Maintenance in Insight.
The Safety LDAP server configurations will be write-protected in Insight.
Actor: Insight User
Pre-condition
The user has been configured to use LDAP authentication
The user has been assigned to a specific LDAP server
Process:
The user navigates to the Argus Insight home page.
The system checks the name of the LDAP server which has been configured for this user and attempts to authenticate the user against that LDAP server.
The system authenticates he usere and executes the business feature.
The system retires all of the existing LDAP profile switches and inserts a new LDAP List maintenance item.
The description text for the UI for this switch will be "This switch allows the user to configure the LDAP authentication servers for Insight."
Create another screen to enter Cognos LDAP Name Space Information
Create a new item in List Maintenance Items - LDAP
There are two attributes of this item
LDAP Configuration
The Description text for this item shall be "This attribute allows the user to define particular LDAP servers for authentication."
Cognos LDAP Name Space Configuration- This attribute is only visible if Reporting Tool is COGNOS
The Description text for this item shall be "This attribute allows the user to define the Cognos name space that is associated with the LDAP."
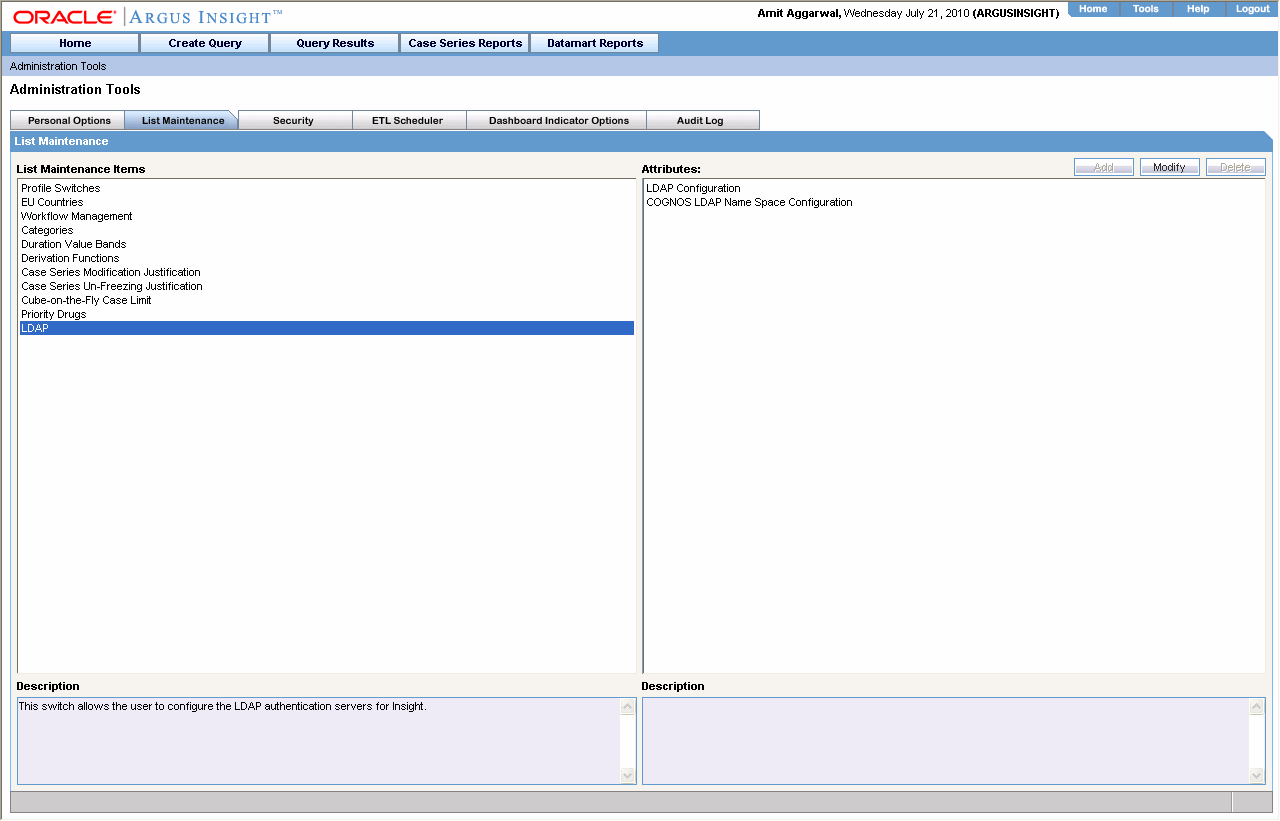
Click the Cognos LDAP Name Space Configuration and click Modify.
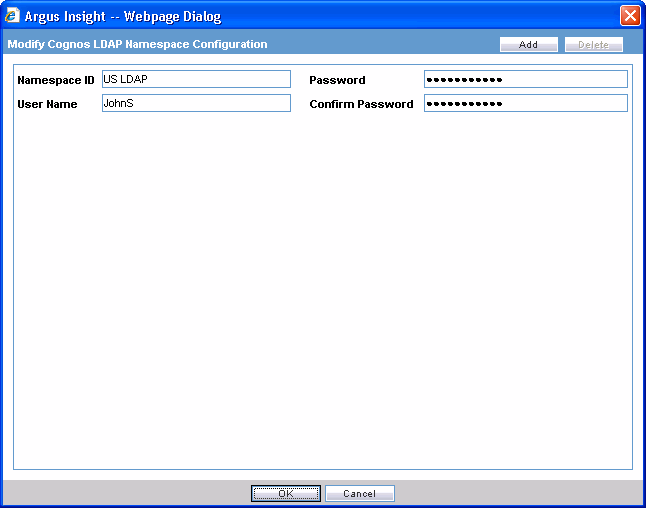
Enter data for all configured LDAP Name Spaces in Cognos
Every Cognos LDAP Name space provides data for its Administrator User since can be different administrators for different domains
Click the LDAP Configuration in Attributes.
If Reporting Tool is in Cognos, you will see a new dropdown populated with values of Name Space ID as provided in Cognos LDAP Name Space Configuration.
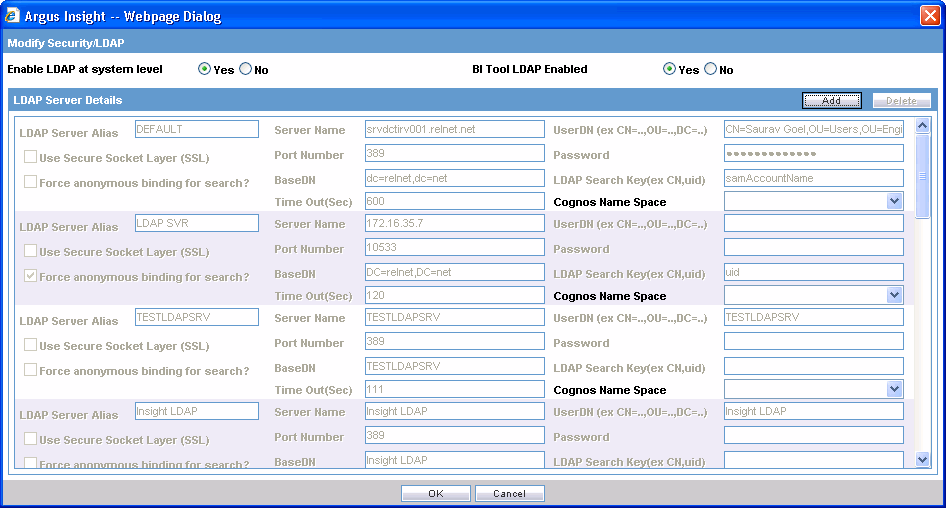
The system displays a popup that enables the user to configure the LDAP servers.
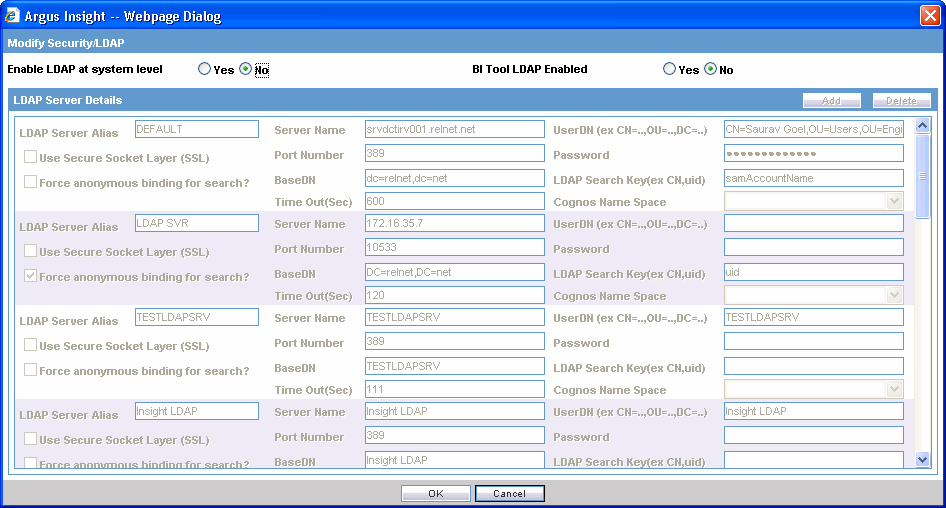
The opportunity to configure additional servers is available only if the Enable System LDAP is set to "Yes".
If the ETL imports an LDAP configuration with a name that matches a currently configured name in Insight, the system prefixes the Safety entry with "Safety" and saves it.
If Enable System LDAP is set to "No," the ETL imports the Safety configured LDAP, but cannot configure any additional LDAP servers.
Selecting a row enables the Delete button and the system presents the user with following message:
Are you sure you want to delete - '<LDAP Server Alias>'?
The user can click Yes or No. If the user clicks "Yes" the system deletes the row; if "No," the system cancels the action.
When the user selects the LDAP Configuration option in the profile switch, the system displays all configured LDAP servers and enables the user to enter a new LDAP server.
The following available fields enable the user to enter a new LDAP server.
| Field Label | Field Type | Purpose | Comments |
|---|---|---|---|
| LDAP Server Alias | Text Box | Provides the unique LDAP Server Viewable name. | 30 characters in length |
| Use Secure Socket Layer | Check Box | When clicked, indicates that the server uses SSL. | |
| Force Anonymous binding for search? | Check Box | Indicates whether access will be via the Anonymous user or through an authenticated user. | |
| UserDN | Textbox | The DN that the LDAP user binds to. | 100 characters long |
| Password | Textbox | The password used to access the LDAP server. | 30 characters long |
| Server Name | Textbox | The DNS name or IP address of the directory server. | 100 characters long |
| Port Number | Textbox | The port number used to access the server. Commonly 389 or 636. | 10 characters |
| BaseDN | Textbox | The Base DN from which to search for the authenticating user. | 100 characters long |
| Timeout (Sec) | Textbox | The timeout value used before the connection is no longer attempted. | 10 characters long |
| LDAP Search Key | Textbox | 10 characters long |
During upgrade for users who already have an LDAP Server configured, the system places a default LDAP Alias as "<Default>"
The default is for ALL users who are LDAP enabled within the Console Access Management users.
When the user clicks Save, the system saves the information in the database.
When a user is added, the system presents a new drop-down to the right of the "Enable LDAP Login" checkbox.
When the user clicks "Enable LDAP Login," the system actives a new drop down menu to enable the user to select an LDAP server name from the drop down. The default value of the drop down will be empty/none.
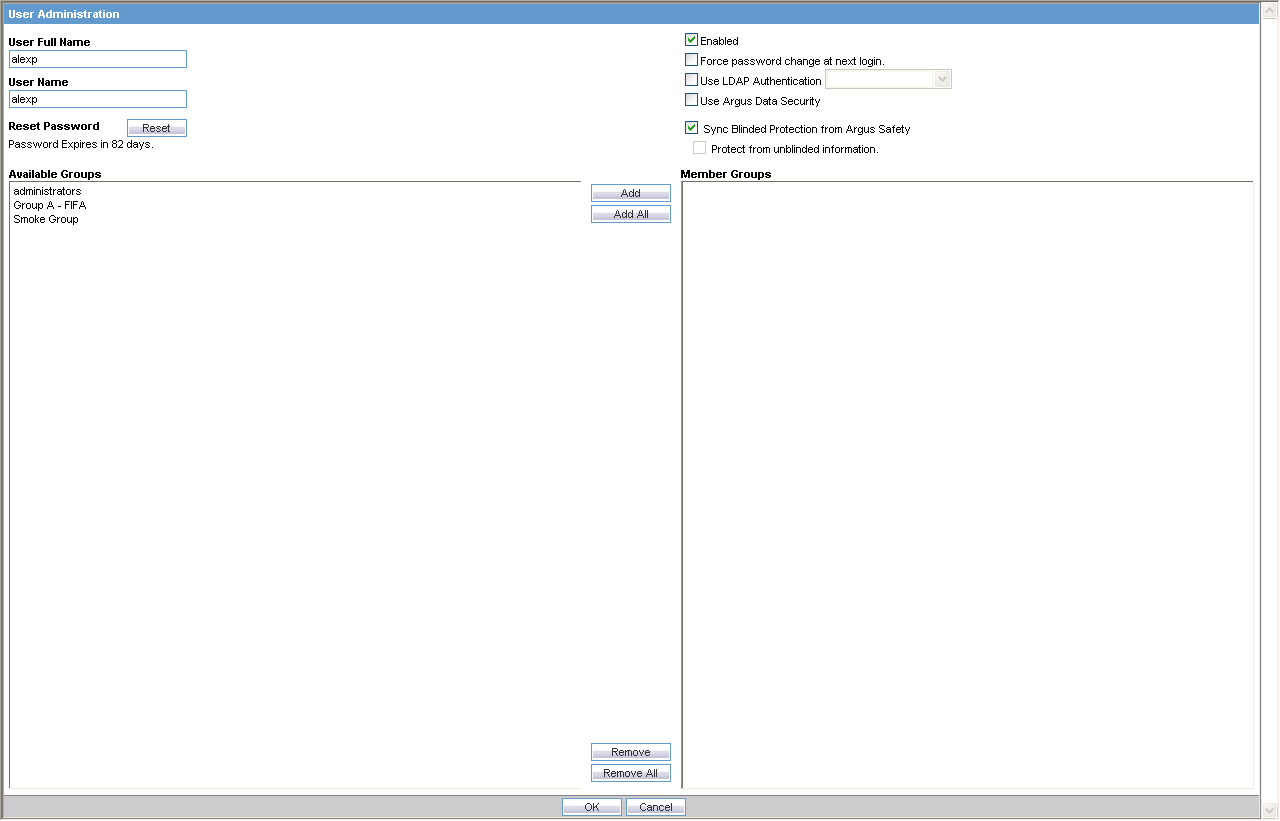
| Field Label | Field Type | Purpose | Comments |
| LDAP Server Name | Drop Down | Display the LDAP Server Names entered in the "LDAP Server Name" field in item 2 above as well as those that were configured in Safety. This field will default to "<Blank>" | This will be grayed out unless the existing "Enable LDAP Login" check box has been checked |
The Audit Log tracks user configuration changes made directly in the Insight application. Changes via the ETL or SSO, these changes are not tracked in the audit log.
Alternate Flow 1: LDAP Server Not Found
The system cannot find the LDAP server which has been configured for the user.
The system displays the message:
"Unable to locate LDAP server : <<Configured LDAP Server Name>>
Be aware of the following:
As part of Insight schema creation, the system creates a read-only user on Argus Safety Database.
This User has controlled access to Argus tables, and the database link from Insight database to Argus database uses this user to connect to Argus Safety Database.
Currently this user is created by running a separate batch file.
As part of Insight schema creation, the system creates a database link from Argus to Insight.
This database link is required for single sign-on functionality.
Currently the database link is created by running a separate batch file.
The Insight Schema creation tool creates the read only user and database link from the UI using is done using batch and SQL scripts. Existing SQL scripts are used (with modification to accept input from UI).
User interfaces capture all the required information.
Existing SQL scripts are modified to accept input from the UI.
Additional buttons on the main schema creation screen can be used to start the respective process
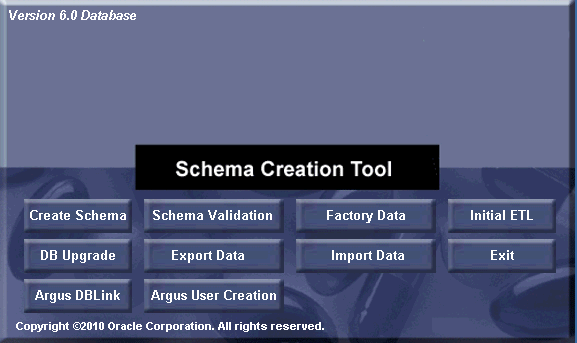
A new screen to create/select the new RO user lists all the roles and users on the system.
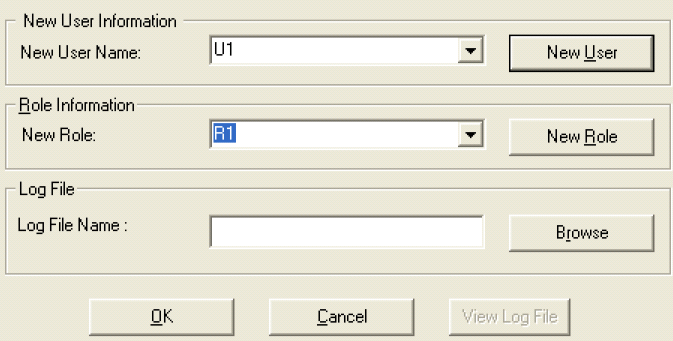
The user can create a new user/role.
Using existing user/roles is permitted with appropriate warning.
Clicking OK starts the SQL script in a command shell
Once the process is complete, the user can click view log file to view the log file
Additional screen to create the database link.
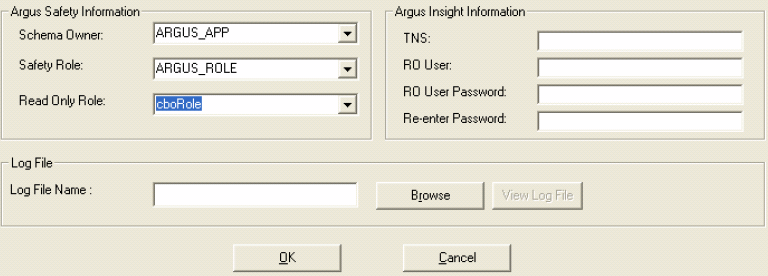
Click OK to start the SQL script in a command shell
Once the process is complete, click View Log file to view the log file.
The Cancel button changes to a Close button after execution is complete.
Click "Close' button to close the window.
Be aware of the following:
To enable Excel 2002 and Excel 2007 to provide proper support for Cognos reports execution from the Argus Insight application, the system provides an option to the user using configurable switch.
Excel can be configured from Argus Insight application for Cognos reports execution.
Excel 2000 Single sheet is the current version used in Insight. This version is independent of excel version on the client machine. Other two versions of excel require similar version of excel on client machine.
Excel 2002 and Excel 2007 should be installed on the client machine.
A new switch, "COGNOS EXCEL VERSION" is available in the Argus Insight list maintenance.
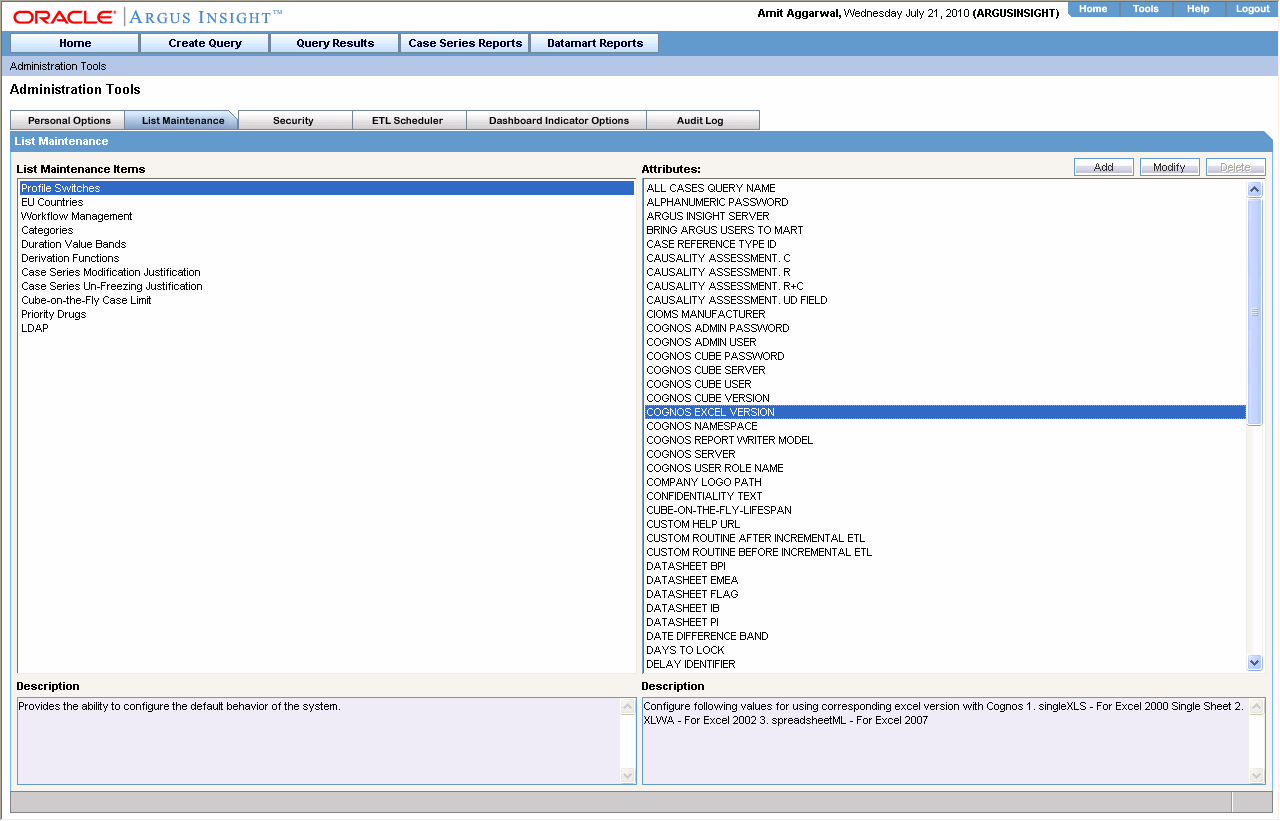
This switch shall contain following values:
singleXLS - For Excel 2000 Single Sheet
XLWA - For Excel 2002
spreadsheetML - For Excel 2007
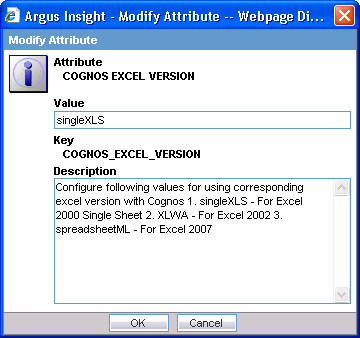
This switch is visible only when BITool selected is COGNOS8 from Admin Tools -> List Maintenance.
Excel 2002 and Excel 2007 support multisheet formats.
Depending upon the value selected in LM, Insight determines the Excel version to us to open Cognos reports.
This chapter explains how to use the Argus Insight administration tools. Use the following procedure to access the administration tools, click the Admintab in the upper-right corner of the Argus Insight main page. The Administration Tools page appears.
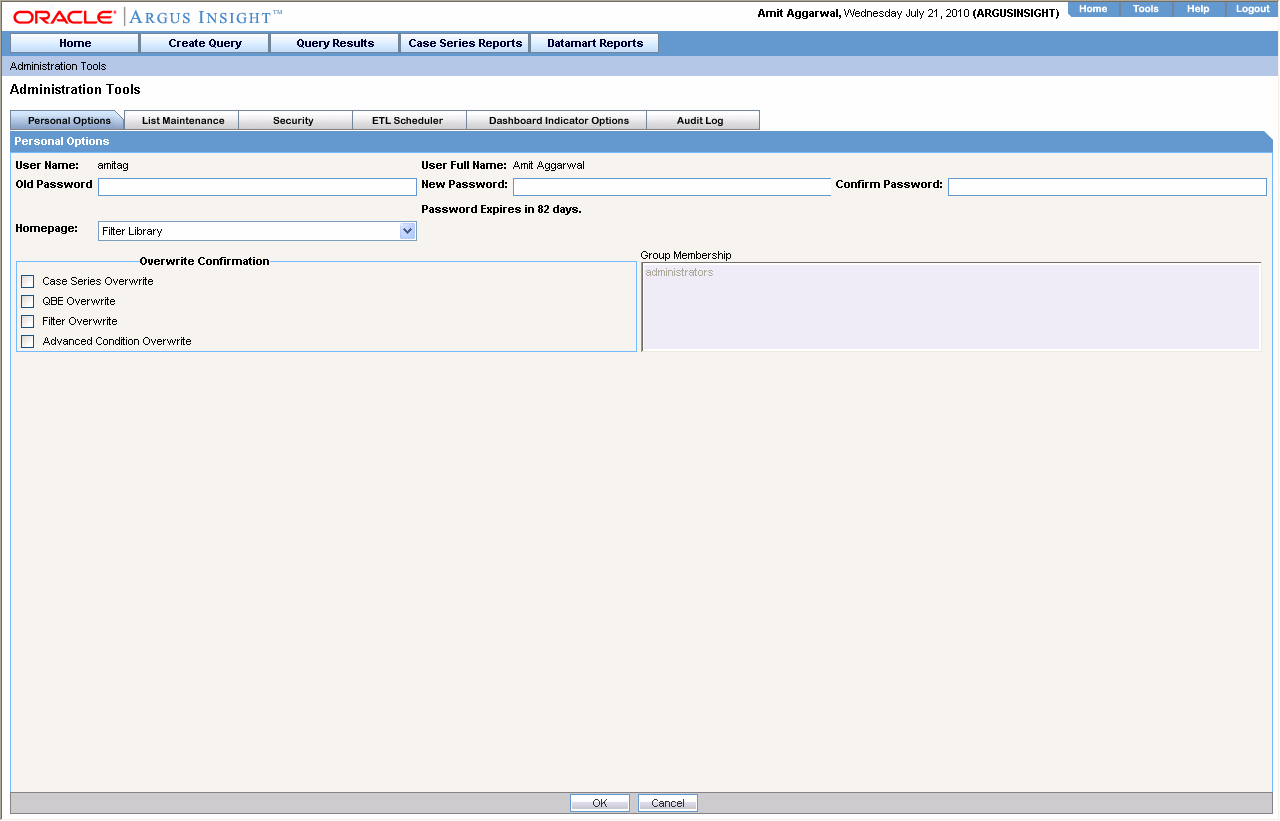
You can use the various tabs in the Administration Tools page to perform these tasks:
Configuring Personal Options
Maintaining Argus Insight Lists
Configuring User Groups and Accounts
Scheduling the ETL
Configuring Dashboard Indicators
Viewing the Audit Log
Use the Personal Options tab page to change the password for an account, change the home page, set overwrite confirmation, and view group membership.
The Personal Options tab page is the default page that appears when you access the Administration Tools page. This page is available to all users.

The description of tasks that you can perform from this tab page follows.
| Task | Description |
|---|---|
| Changing the password for an account |
|
| Changing the Home Page | The default Argus Insight home page is the FilterLibrary page. Use the following procedure to change the default home page:
|
| Configuring overwrite confirmation | When you save any modifications you make to an existing Case Series, QBE, Filter, or Advanced Condition, Argus Insight saves the changes directly without prompting you to confirm whether you want to overwrite the existing one.
You can have Argus Insight display an overwrite confirmation dialog box by checking these checkboxes, as appropriate:
|
| Viewing group memberships | The Group Membership list shows the names of the groups to which the currently logged in user belongs. Group memberships can be managed from theSecuritytab page. Only an administrator can manage users and groups. |
Use the List Maintenance page to configure the various List Maintenance items and their attributes. The topics that follow describe the various List Maintenance items and explain how to configure them. Consult your company's policies and the terminology used before configuring Argus Insight lists.
Use the List Maintenance page for:
Configuring Profile Switches
Configuring EU Countries
Workflow Mapping
Configuring Categories
Configuring Duration Value Bands
Configuring Derivation Functions
Configuring Case Series Modification Justification
Cube-on-the-Fly Case Limit
Configuring Priority Drugs
The profile switches are used to control the behavior of the Argus Insight application. Use the following procedure to configure profile switches, you specify a certain value for a switch. Depending on the type of profile switch, the values can either be pre-defined or based on user input. While certain profile switches can only be configured through direct SQL statements, many profile switches can be updated from the List Maintenance page. You can also add new profile switches to Argus Insight from the List Maintenance page.
|
Note: See the CMN_PROFILE document for detailed information about all the profile switches. This document also has a sample SQL for inserting profile switches and updating their values in the database. All profile switch values are case sensitive |
The following table lists the profile switches included in the factory data:
| Profile Switch | Description |
|---|---|
| ALPHANUMERIC PASSWORD | This value will force user to enter alphanumeric password. 1-Alphanumeric and 0-Non Alphanumeric. |
| ARGUS INSIGHT SERVER | Host Name or IP Address of Argus Insight Server. This is used for cube view save functionality with Cognos series 7. This value can be left blank if Cognos series 7 is not used for cubes. |
| BITOOL LDAP ENABLED | LDAP Enabled at BITool level. BITool could be Cognos or Business Objects. 1 - LDAP is enabled in Cognos or Business Objects, 0 - LDAP is not enabled in Cognos or Business Objects. |
| BRING ARGUS USERS TO MART | Flag to bring User information (name, password) from Argus Safety if it does not exist in Argus Insight. Default value - 1. |
| CASE REFERENCE TYPE ID | This key is used for populating RPT_CASE.FIRST_REF_NO column. |
| CAUSALITY ASSESSMENT.C | Used in Standard Reports for Company Defined Causality. Please refer cmn_profile document for the report list. |
| CAUSALITY ASSESSMENT.R | Used in Standard Reports for Reporter Defined Causality. Please refer cmn_profile document for the report list. |
| CAUSALITY ASSESSMENT.R+C | Used in Standard Reports for Reporter and Company Defined Causality. Please refer cmn_profile document for the report list. |
| CAUSALITY ASSESSMENT.UDFIELD | Used in Standard Reports for User Defined Field to determine Causality. Please refer cmn_profile document for the report list. |
| CIOMS MANUFACTURER | Allows the user to configure the Manufacturer information to be printed on the CIOMS Report. |
| COGNOS ADMIN PASSWORD | This is the password for COGNOS admin user. If the password is incorrect, access to Cognos administration for additional security will be denied. |
| COGNOS ADMIN USER | Cognos user having admin privileges. This user will be used for admin activities like security management on Cognos from Argus Insight application. |
| COGNOS CUBE PASSWORD | Password for Cognos Cube User. If it does not match the Cognos Cube Password that was configured at the time of cubes configuration, then application access to cubes will fail. |
| COGNOS CUBE SERVER | IP Address or Host Name of Cube Server. This is used by Argus Insight to identify the Cognos Cube server to be used. |
| COGNOS CUBE USER | User name used for interaction between Argus Insight and Power play Enterprise server. This is the user name defined in the Access Manager Administration on Cognos Cube server. |
| COGNOS CUBE VERSION | Version of Cubes used in the application. The values are either SERIES7 or COGNOS8. |
| COGNOS NAMESPACE | Name of Cognos Namespace to be used for user authentication. PowerReports is the default namespace for custom java authentication. If you are using Active Directory or LDAP authentication in Cognos, please specify the namespace name used on Cognos server. |
| COGNOS REPORT WRITER MODEL | Cognos Report Writer Model Name. If this value is incorrect, Report Writer functionality will not work. Default value - ReportWriter |
| COGNOS SERVER | IP Address or Name of COGNOS8 Web Server. This is used to identify the Cognos server to be used. Specify the port number of Cognos along with server name in the format <COGNOS SERVER NAME>:<Port Number> |
| COGNOS USER ROLE NAME | This is Cognos Role name in which all Insight users will be added for accessing reports and cubes. |
| COMPANY LOGO PATH | For Cognos - Logo File Name with full URL path of company logo on the local server. This will appear in header of reports. File types - .jpg, .gif, .bmp. For BO - Logo File Name with directory path of the images on the BO server. This will appear in header of reports. File types - .tiff, .bmp. |
| CONFIDENTIALITY TEXT | Confidential Text entry which will appear in the footer of reports. Default value - Confidential |
| CUBE-ON-THE-FLY-LIFESPAN | The default lifespan (in days) for the cubes created on the fly based on a case series. |
| CUSTOM HELP URL | Allows the user to configure the Custom Help URL. This must be a valid URL otherwise a 404 - Page Not Found error will be displayed to the user. |
| CUSTOM ROUTINE AFTER INCREMENTAL ETL | This is the full path of the custom routine (Oracle stored procedure) to be executed after Incremental ETL. If the routine fails or is not found, an email is sent to the administrator. |
| CUSTOM ROUTINE BEFORE INCREMENTAL ETL | This is the full path of the custom routine (Oracle stored procedure) to be executed before Incremental ETL. If this routine fails or is not found, then the ETL will not be run and an email will be sent to the administrator. |
| DATASHEET BPI | Allows the user to configure the user Defined fields for assessment of BPI Datasheet on the product tab. Please refer cmn_profile document for the report list. |
| DATASHEET EMEA | Allows the user to configure the user Defined fields for assessment of EMEA Datasheet on the product tab. Please refer cmn_profile document for the report list. |
| DATASHEET FLAG | Flag used during Incremental ETL for populating data based on four Datasheet Fields for all cases or modified cases. 0 - Modified cases, 1 - ALL cases. Four Datasheet fields as defined in the LM (Datasheet BPI, Datasheet EMEA, Datasheet IB, Datasheet PI). |
| DATASHEET IB | Allows the user to configure the user Defined fields for assessment of IB Datasheet on the product tab. Please refer cmn_profile document for the report list. |
| DATASHEET PI | Allows the user to configure the user Defined fields for assessment of PI Datasheet on the product tab. Please refer cmn_profile document for the report list. |
| DATE DIFFERENCE BAND | Allows the user to configure the highest value of the Dimensions which are having Date Difference columns as data source in Administration Statistics and Submission Statistics Cube. |
| DAYS TO LOCK | Allows user to configure Days to Lock for a Case. Please refer cmn_profile document for the report list. |
| DELAY IDENTIFIER | Specify the delay text which will be used to extract routing comment. It is used by ETL to populate RPT_FOLLOWUP.CORE_DELAY_ROUTING_COMMENT. This field is used in Supplier Performance Report and Process Performance - Workflow Report. |
| DOSE CATEGORY UNITS | Dose units to be categorized separately in the Cubes, such as 'mg','ml'. |
| ENABLE COMPANY HOLIDAY | Company holiday calendar in due date calculation of Data Entry Performance Over Time Report (0 = Disable and 1 = Enable). A value of 1 will include COMPANY holidays in the calculations. A value of 0 will not include COMPANY holidays in calculations. |
| ETL DATA EXCLUSION | IGNORE - Continue the ETL but skip cases with erroneous data, ABORT - Abort the ETL if it encounters cases with erroneous data. |
| ETL EMAIL RECEIVER ADDRESS | If this field is left blank then an email will not be sent. Otherwise this field should contain the comma separated addresses of the administrators monitoring the ETL. |
| ETL EMAIL SENDER ADDRESS | If this field is left blank then email will not be sent. Otherwise it will contain the address on whose behalf the email should be sent. |
| ETL EMAIL SETUP | 0 = Not Configured 1 = Send Email on Initial/Incremental ETL failure 2 = Send Email on Initial/Incremental ETL success 3 = Send Email on Initial/Incremental ETL Success or Failure. |
| FOLLOW-UP ACTION CODE | Allows user to configure Code considered for requiring a follow-up. Please refer cmn_profile document for the report list. |
| INVESTIGATIONAL DATASHEET | Allows the user to configure the Investigational Datasheet for the Event Listedness dimension in the Clinical Trial Analysis Cube. |
| LDAP ANONYMOUS | Set to 1 if Anonymous Bind is enabled on LDAP Server else 0. Default value - 1. |
| LDAP AUTHENTICATION | System wide indicator for LDAP Authentication usage. |
| LDAP BASE DN | LDAP Distinguished Name |
| LDAP SEARCH KEY | Name of LDAP column for User ID. For e.g. Value for SUN ONE LDAP = uid and Value for ADS = SAMAccountName. In some scenarios it can be CN. |
| LDAP SEARCH PASSWORD | Password for configured LDAP search user (LDAP_USER). |
| LDAP SEARCH USER DN | This is the user ID having rights to search in LDAP directory. Provide the complete distinguish name (DN) for search user. |
| LDAP SERVER NAME | Name or IP Address of LDAP Server. |
| LDAP SERVER PORT | Port Number of LDAP Server. |
| LDAP SSL | Set to 1 if SSL is enabled on LDAP Server else 0. Default value - 0. |
| LDAP TIME OUT | LDAP Time out in Seconds. Default value - 120. |
| MARKETED DATASHEET | Allows the user to configure the Marketed Datasheet for the Event Listedness dimension in Medical Analysis and Overdose/Pregnancy/Interaction Cubes. |
| MEDWATCH MANUFACTURER | Allows the user to configure the Manufacturer information to be printed on the MedWatch Report. |
| PASSWORD EXPIRATION | Days before password expires. |
| PASSWORD LENGTH | The minimum length of the Password. It will restrict users from having password length less than the configured limit. |
| POPULATE AFFILIATE DATA | 0 = No Affiliate data will be brought into the Datamart, 1 = Affiliate data will be brought into the Datamart. |
| POPULATE BLOB DATA | 0 = No BLOB data will be brought into the Datamart, 1 = BLOB data will be brought into the Datamart. All Binary LOB (BLOB) data type columns of Argus Owner schema tables and Interchange Schema Owner tables. |
| POPULATE CUBES FACT DATA | 0 = No FACT Table will be populated, 1 = FACT Tables for Business Objects Cubes will be populated, 2 = FACT Tables for Cognos Cubes will be populated, 3 = All FACT Tables will be populated. |
| POPULATE DLL SLL REPORTS TABLE DATA | 0 = Table RPT_CASE_EVENT_PRODUCT required for DLL and SLL Reports will NOT be populated, 1 = Table RPT_CASE_EVENT_PRODUCT required for DLL and SLL Reports will be populated. |
| POPULATE INTERCHANGE CLOB DATA | 0 = No Interchange CLOB data will be brought into the Datamart, 1 = Interchange CLOB data will be brought into the Datamart. |
| POPULATE INTERCHANGE DATA | 0 = No Interchange data will be brought into the Datamart, 1 = All Interchange data will be brought into the Datamart, 2 = Only SAFETYREPORT, MESSAGES and EDI_INFO tables data will be brought into the Datamart. |
| POPULATE WHO Drug C DATA | 0=Do Not Populate WHO Drug C Tables, 1=Populate WHO Drug C Tables. |
| PRODUCT LOGO PATH | Logo File Name with full URL path of product logo. This will appear in header of reports. Please refer cmn_profile document for the report list. |
| REPORT FOOTER LOGO PATH | Logo File Name with full URL path of report footer logo. This will appear in footer of reports. Please refer cmn_profile document for the report list. |
| REPORT PROMPTS | User Interface to allow a user to add new report prompts and modify existing report prompts. |
| REPORTING TOOL | This is the name of reporting tool/BI tool used with Argus Insight application. Following could be the possible values for reporting tool: BOXI - For Business Objects as BI Tool, COGNOS8 - For Cognos 8 as BI Tool. |
| RESET PASSWORD | Default value used when resetting a User's password. |
| UDN Column for SUPPLIER NAME | User Defined Number column of Argus table CASE_MASTER used for SUPPLIER NAME value. |
| WHO DRUG BROWSER FORMAT | WHO Drug Browser Format. Possible values: 1. B - All the WHO Drug browsers in the application will show B Format. 2. C - All the WHO Drug browsers in the application will show C Format. |
|
Note: Any part of the application, which is dependent on WHO Drug B tables remains blank as the underlying tables are not populated if WHO Drug C format is used.Before running the initial ETL, update the WHO_DRUG_C_POPULATION entry in the CMN_Profile table. 0 = Do not populate WHO Drug C tables. 1 = Populate the WHO Drug C tables. Before running the incremental ETL, set the WHO DRUG C POPULATION entry to 0. |
Use the following procedure to modify the value of an existing profile switch.
In the List Maintenance page, select the Profile Switches item from the List Maintenance Items list. The Attributes list displays the names of the default profile switches.

From the Attributes list, select the profile switch you want to modify.
Click Modify. The Modify Attribute dialog box appears.
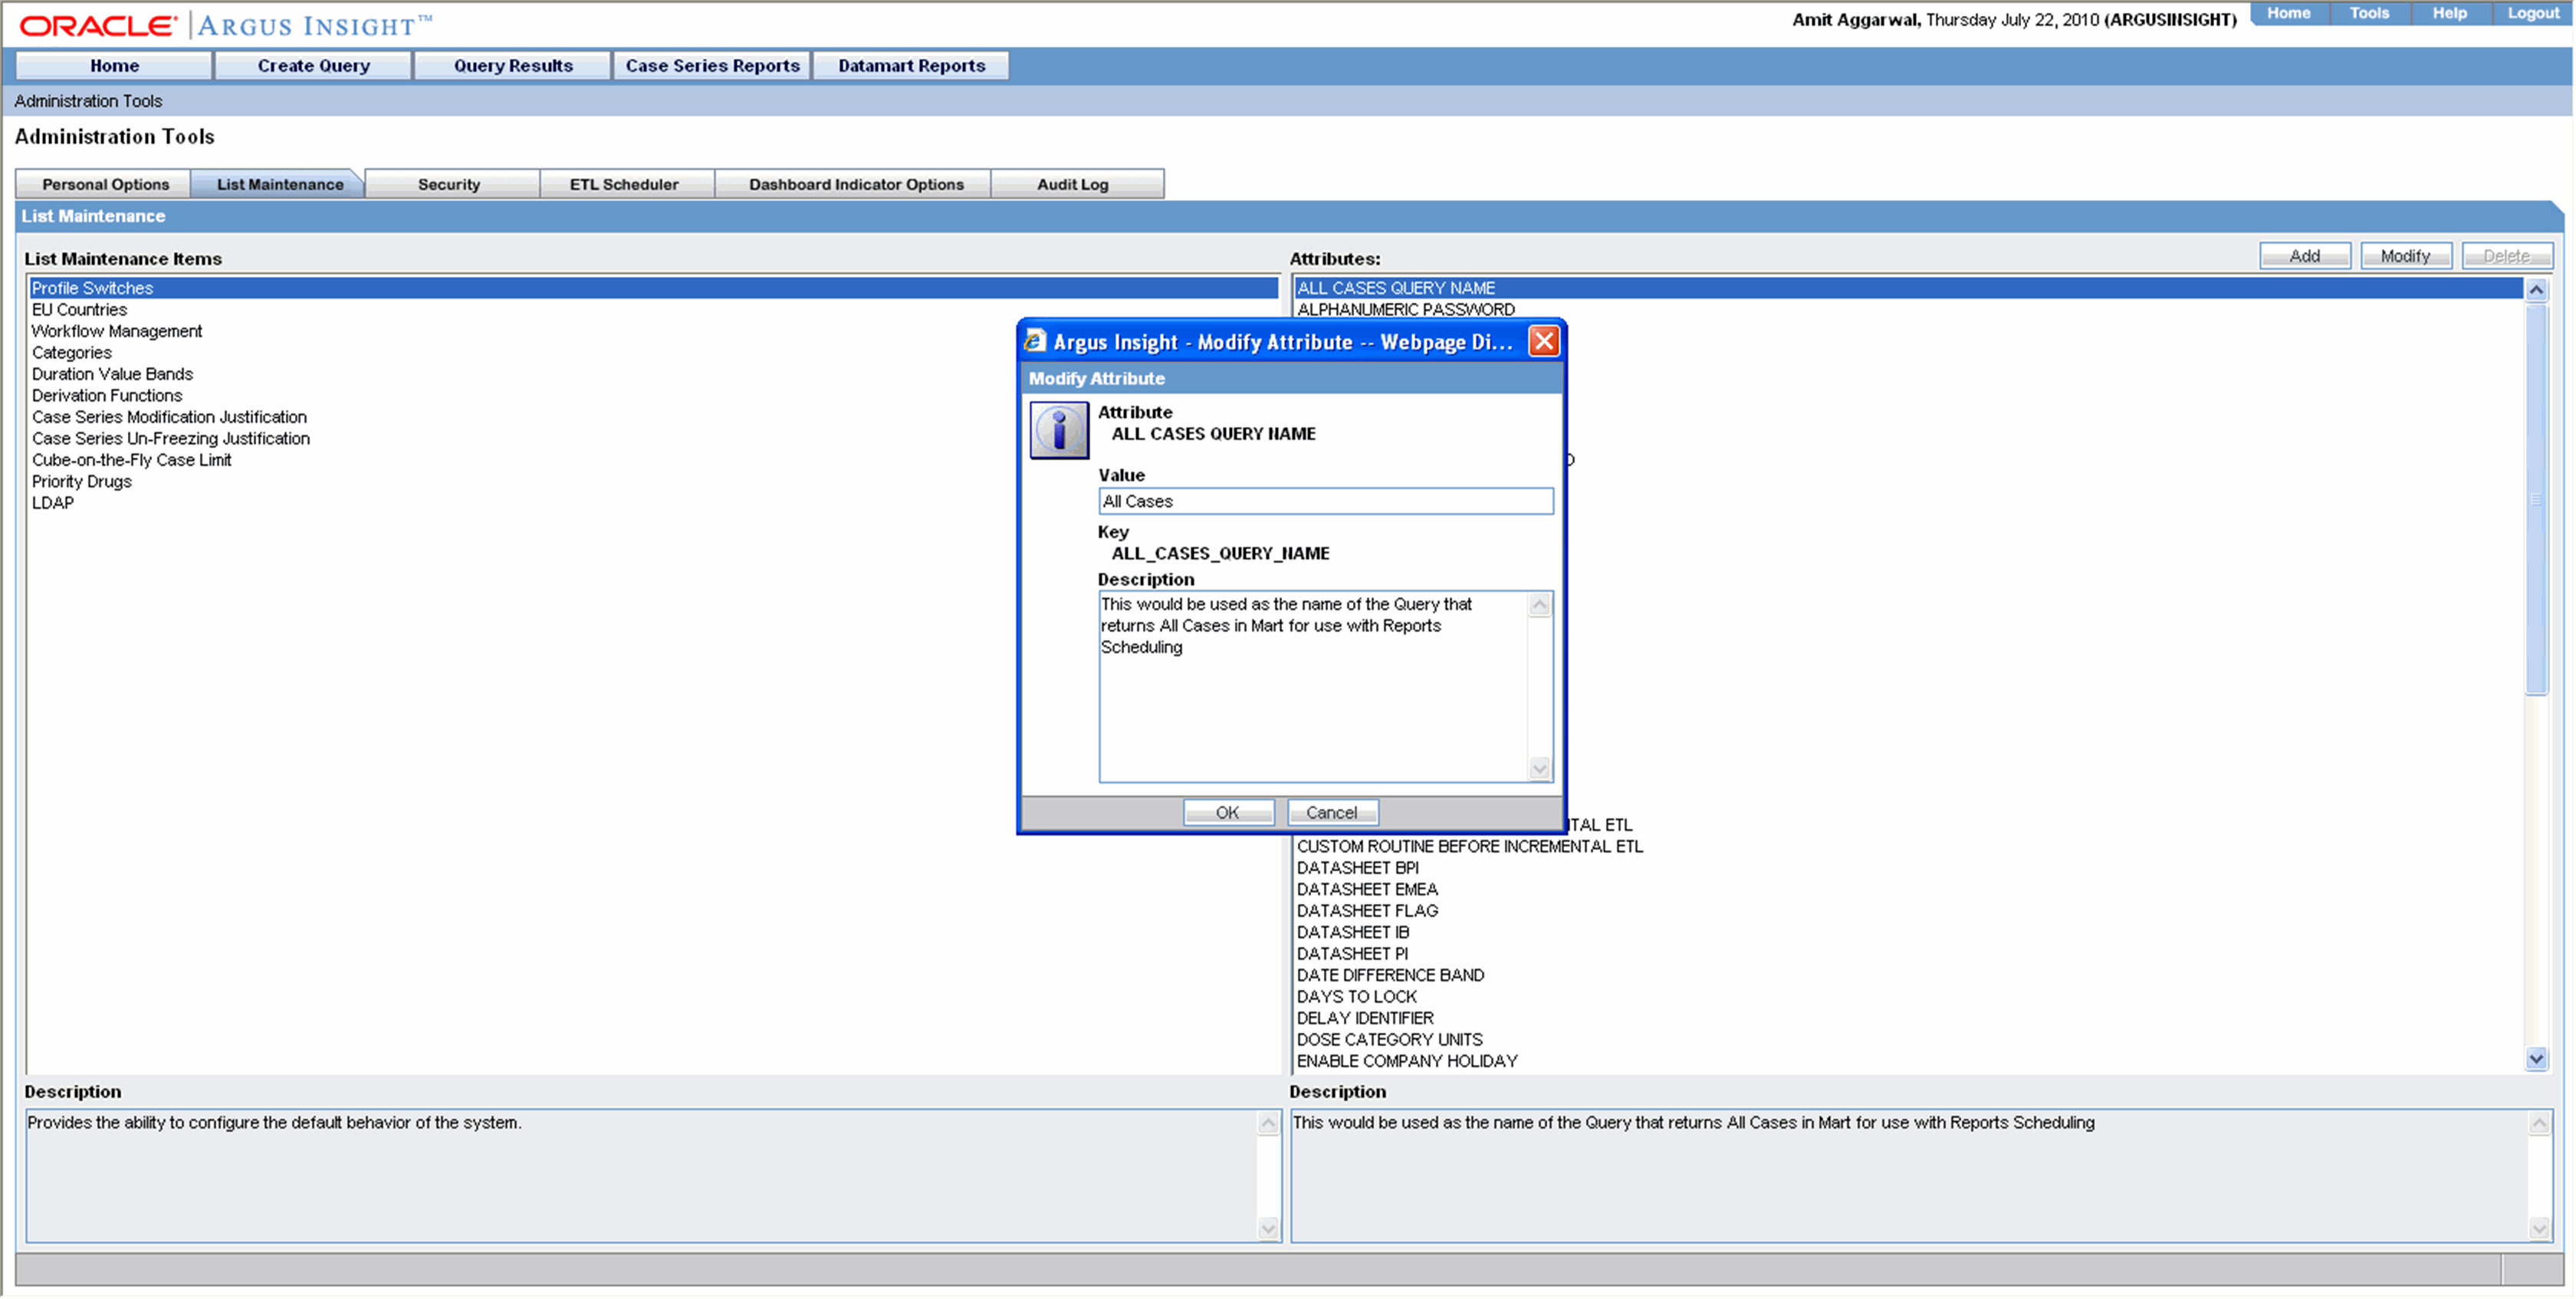
Modify the values, as appropriate.
Click OK. The profile switch is updated.
Use the following procedure to add a new profile switch.
In the List Maintenance page, select the Profile Switches item from the List Maintenance Items list. The Attributes list displays the names of the default profile switches.
Click Add. The Add New Attribute dialog box appears.
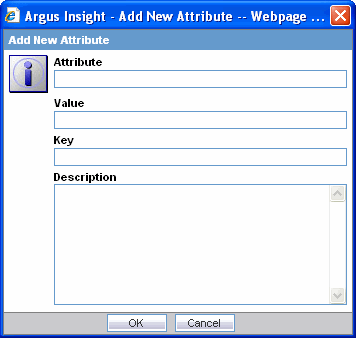
Enter the profile switch name, key, and, values, as appropriate
Click OK. The profile switch is added to the system.
From the List Maintenance page, you can configure the list of European Union countries for reporting purposes. The countries can be added and removed as required.
The following lists the European Union countries included in the factory data:
| Austria | Hungary | Norway |
| Belgium | Iceland | Poland |
| Bulgaria | Ireland | Portugal |
| Cyprus | Italy | Romania |
| Czech Republic | Latvia | Slovakia (Slovak Republic) |
| Denmark | Liechtenstein | Slovenia |
| Estonia | Lithuania | Spain |
| Finland | Luxembourg | Sweden |
| France | Malta | Switzerland |
| Germany | Netherlands | United Kingdom |
| Greece |
In the List Maintenance page, select EU Countries from the List Maintenance Items list. The Attributes list displays the existing EU country names.
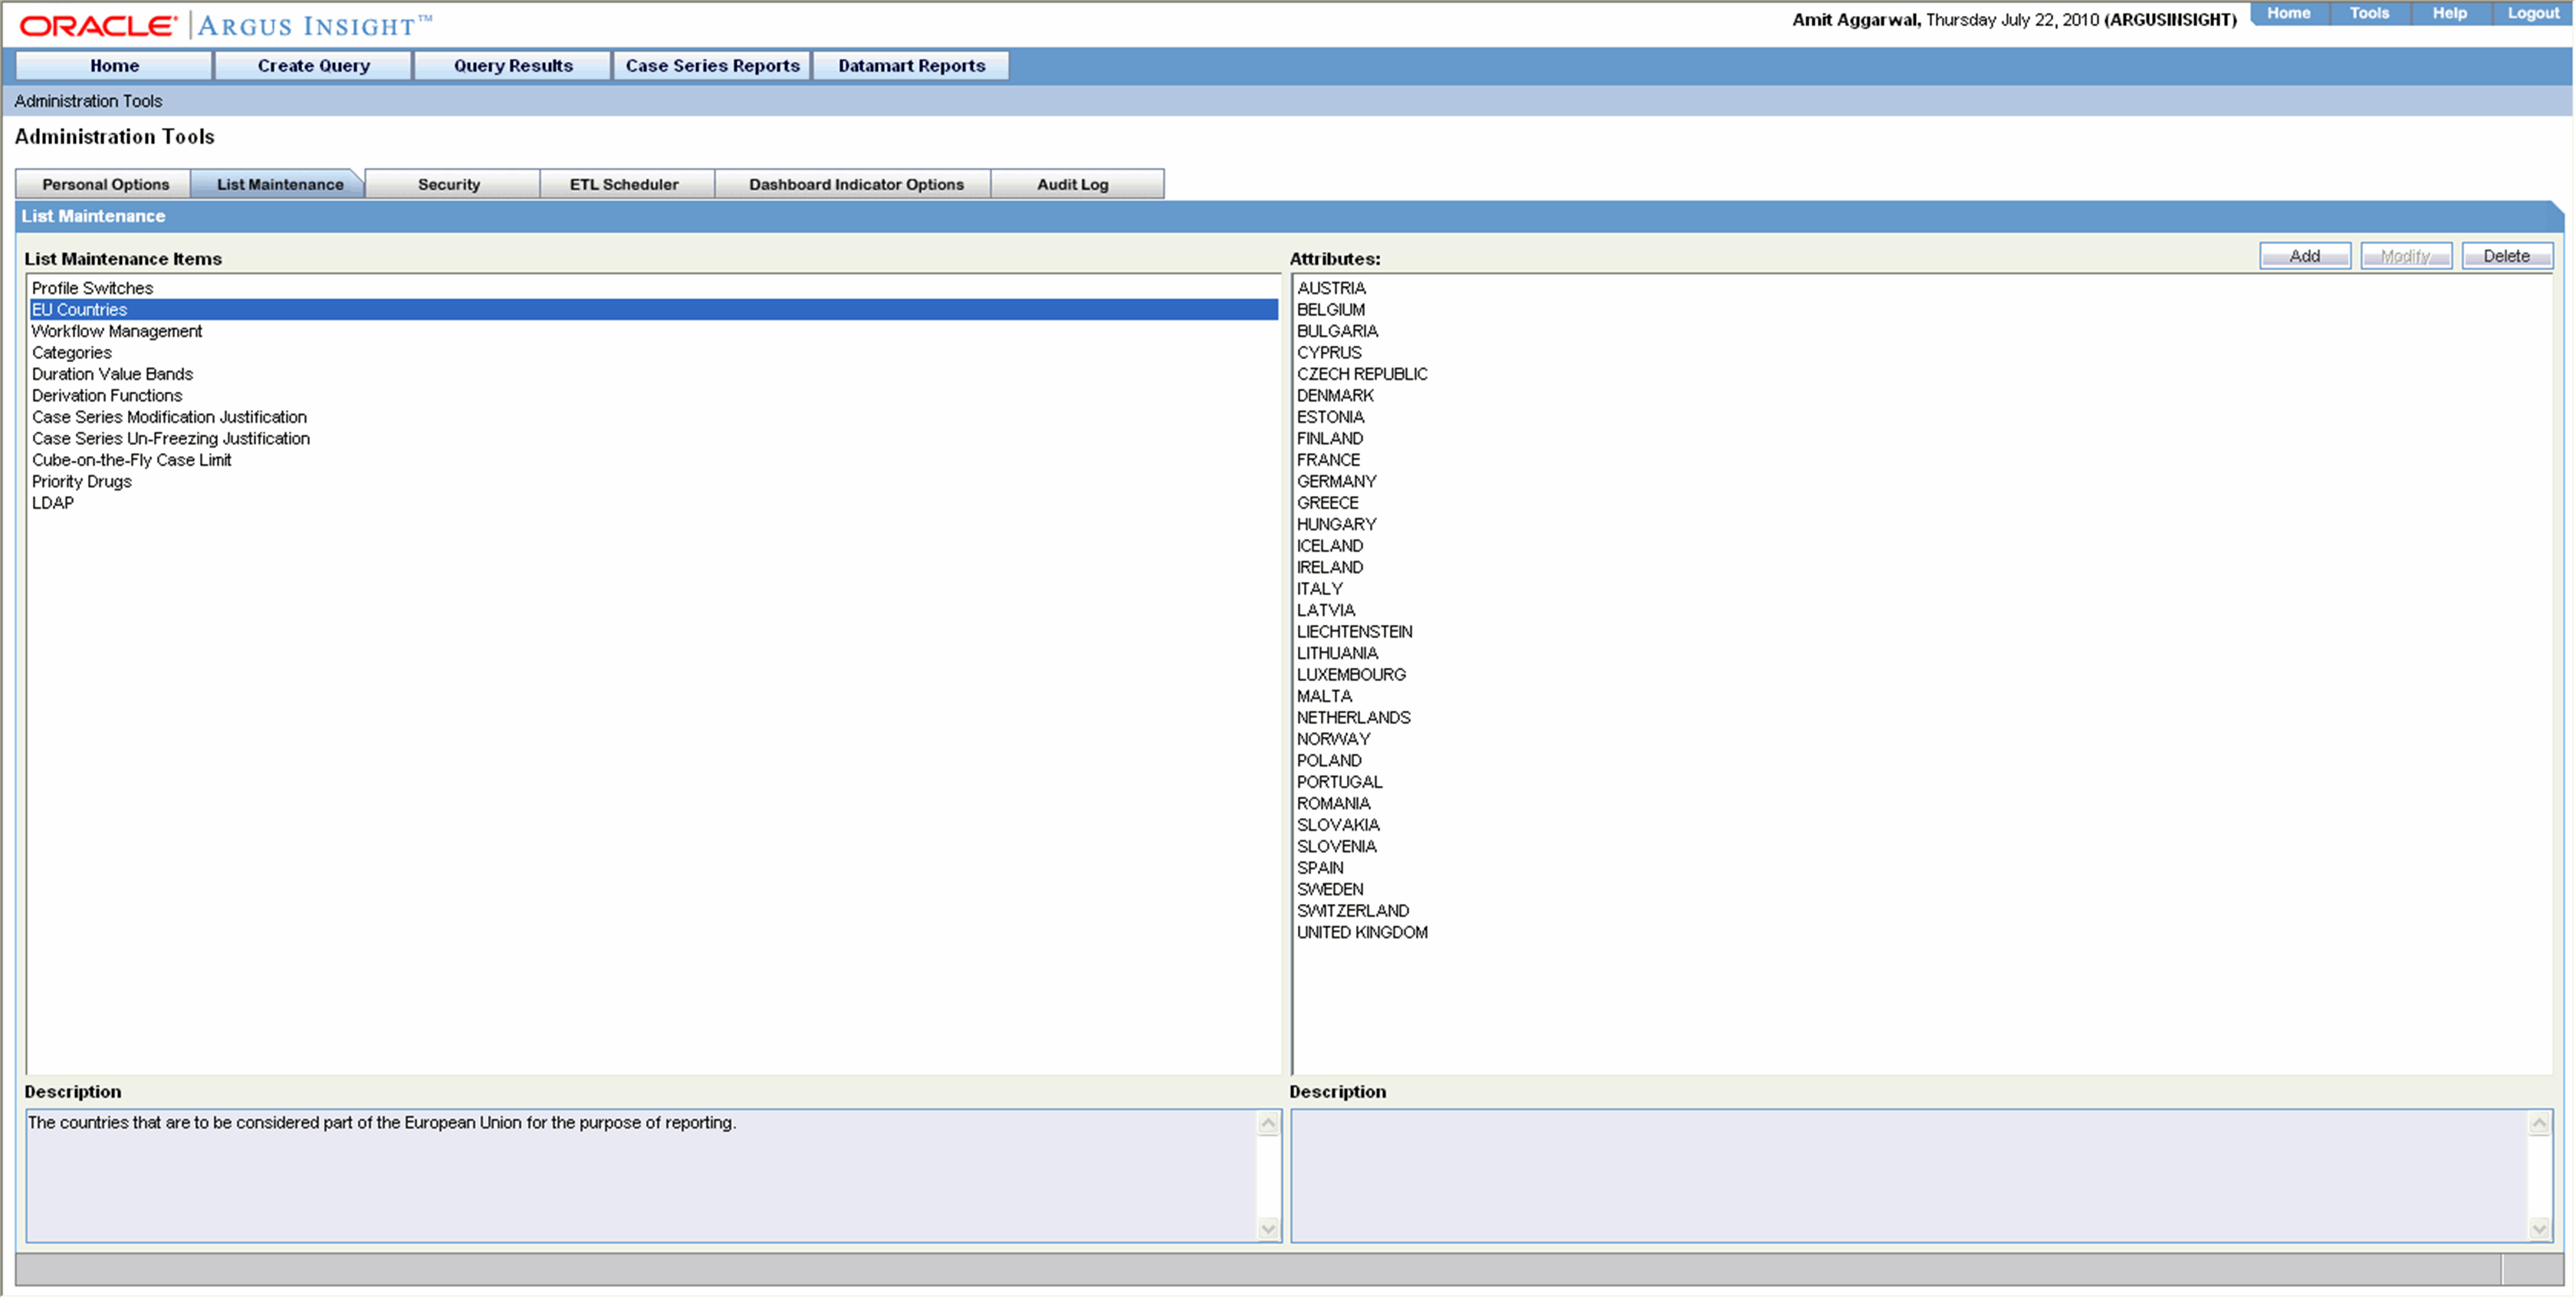
Click Add. The Add EU Countries dialog box appears.
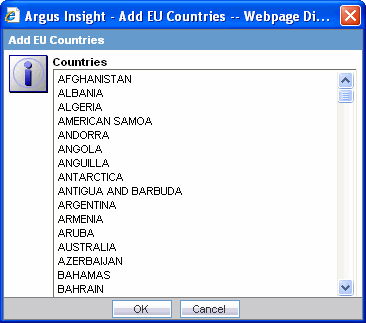
Select the country from the Countries list in the Add EU Countries dialog box.
Click OK. The new country is added to the EU countries list.
Use the following procedure to delete an existing country from the list:
To delete a country from the list:
In the List Maintenance page, select EU Countries from the List Maintenance Items list. The Attributes list displays the existing EU country names.
Select the country you wish to delete from Attributes list.
Click Delete. A delete confirmation dialog box appears.

Click OK to confirm the delete operation.
From the List Maintenance page, you can map all the site-specific workflow states to these default groups for the purpose of grouping outputs of certain reports:
Archiving States - all workflow states that are considered as Archived/Closed in Argus
Data Entry Complete - all workflow states that indicate completion of data entry in Argus
Assessment Complete - all workflow states that indicate completion of event assessment in Argus
Approval Complete - all workflow states that indicate that the case is ready for reporting after being locked in Argus
Although these mappings are pre-configured at the time of installation of Argus Insight, you can modify them by adding or removing workflow states from a group as required. However, you cannot add more groups or delete existing ones.
Use the following procedure to modify a workflow mapping.
In the List Maintenance page, select Workflow Management from the List Maintenance Items list. The Attributes list displays the existing workflow groups.
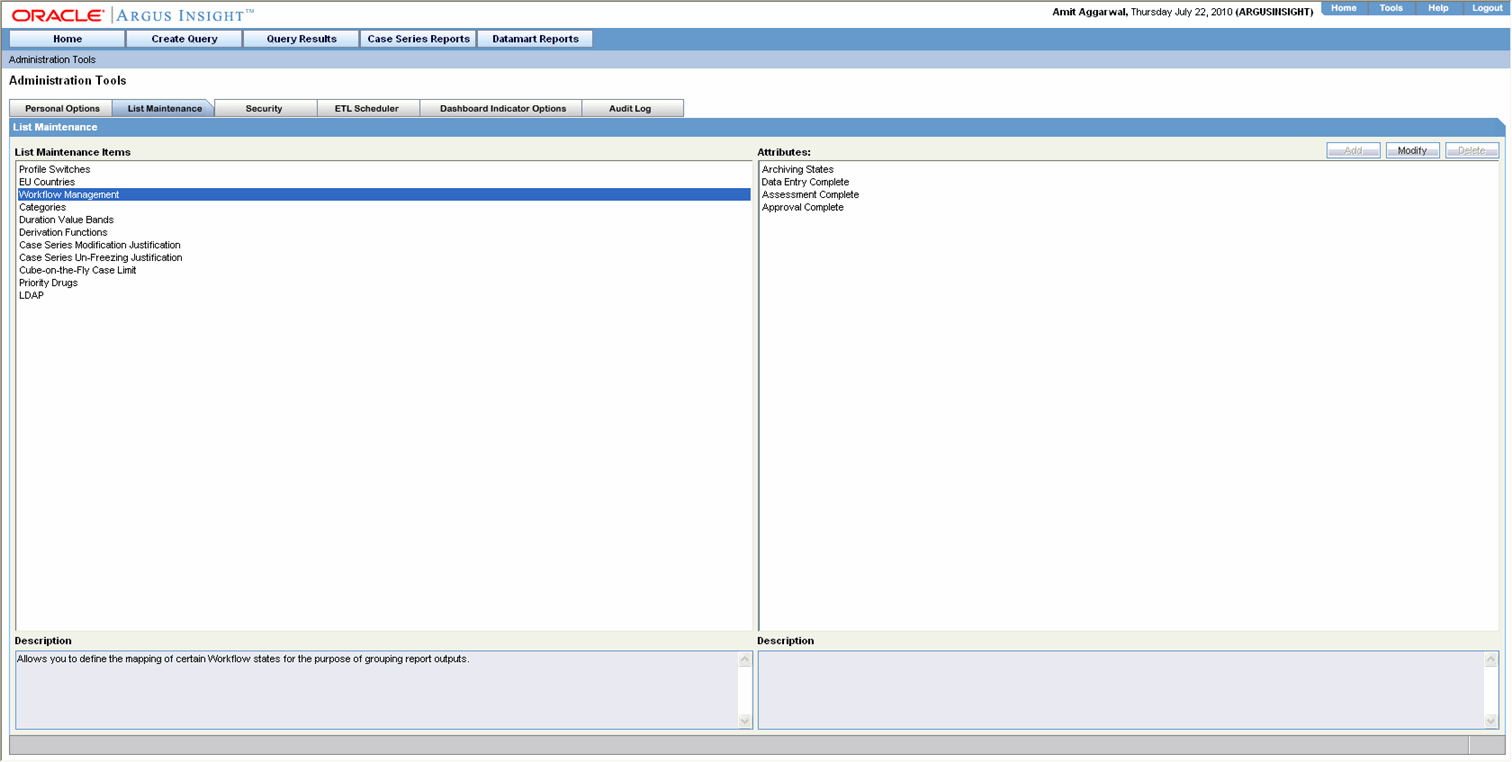
From the Attributes list, select the group to modify.
Click Modify. The following dialog box appears.
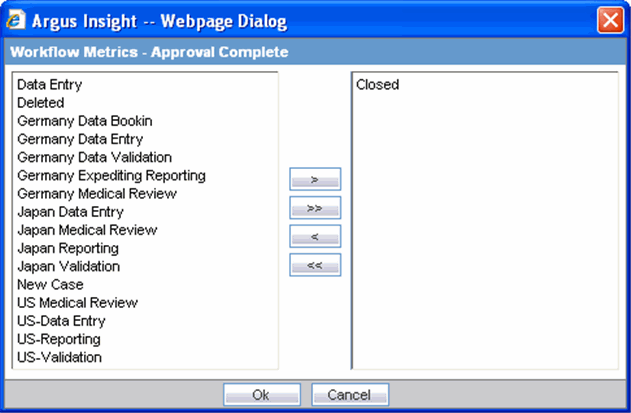
Modify the mappings, as appropriate:
Use the following procedure to add a new workflow state to the group, select a state from the list on the left and click >.
Use the following procedure to remove a workflow state from the group, select a state from the list on the right and click <.
Various Argus Insight objects, such as queries, Case Series, and Standard Reports, can be grouped in five default categories: Compliance, Configuration, General, Management, and Pharmacovigilance. This topic explains how to add, modify, and delete categories.
Use the following procedure to add a new category.
In the List Maintenance tab page, select the Categories item from the List Maintenance Items list. The Attributes list displays the existing categories.
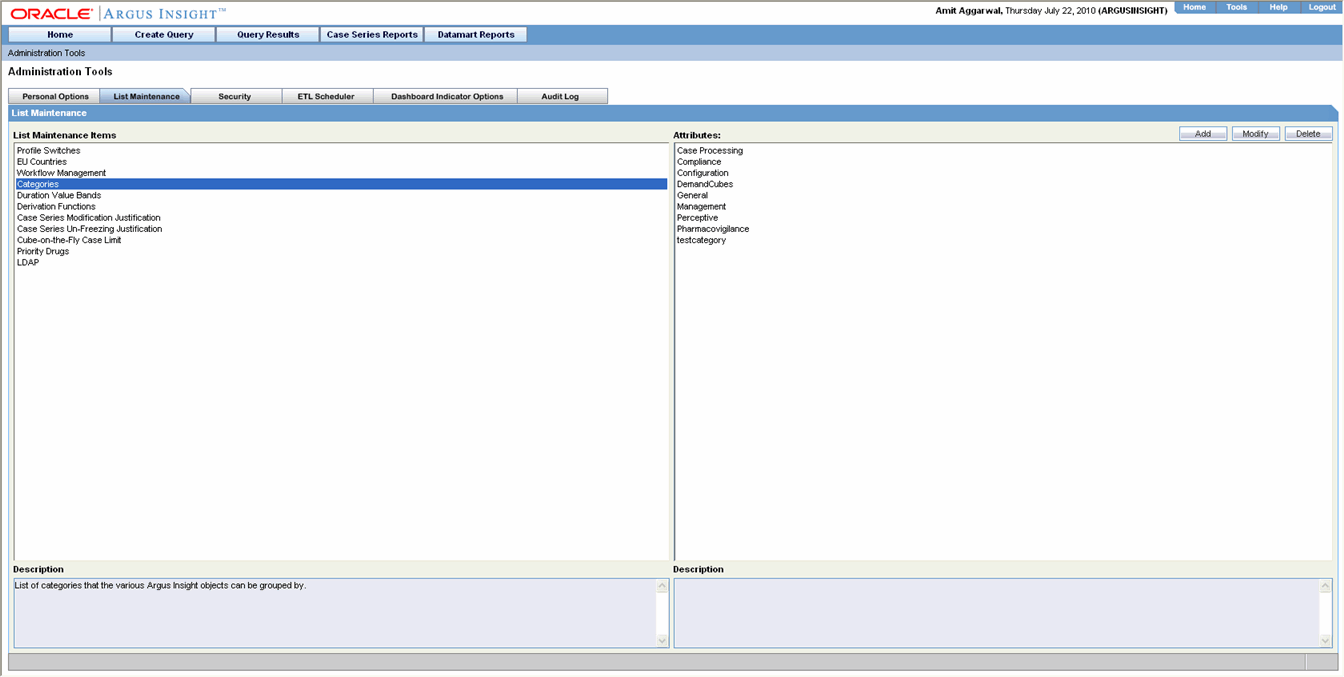
Click Add. The Add New Category dialog box appears.
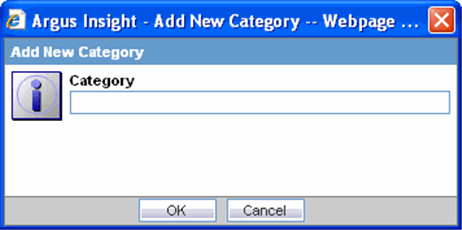
Enter the category name.
Click OK. The new category is added to Argus Insight.
Use the following procedure to change the name of an existing category, select the category from the Attributes list and click Modify. In the Modify Category dialog box that appears, change the category name and click OK.
Use the following procedure to delete an existing category, select the category from the Attributes list and click Delete. In the delete confirmation dialog box that appears, click OK.
In Argus Insight, the time values (entered in Argus Safety) in the Product Tab > Drug Duration of Administration, Events Tab > Time to Onset from First Dose, and Events Tab > Time to Onset from Last Dose fields can be mapped to specific ranges called Duration Value Bands. This enables you to specify querying criteria based on ranges instead of specific values for the above fields.
The Duration Values Bands item in the List Maintenance page lets you configure the duration value bands in the hour, day, week, month, and year categories. In each category, you can specify multiple ranges by entering maximum and minimum value for each range item. Any value that falls within a configured range will map to that range.
The steps that follow explain how to configure duration value bands.
In the List Maintenance tab page, select the Duration Values Bands item from the List Maintenance Items list. The Attributes list displays the existing categories. These are default categories and cannot be modified.
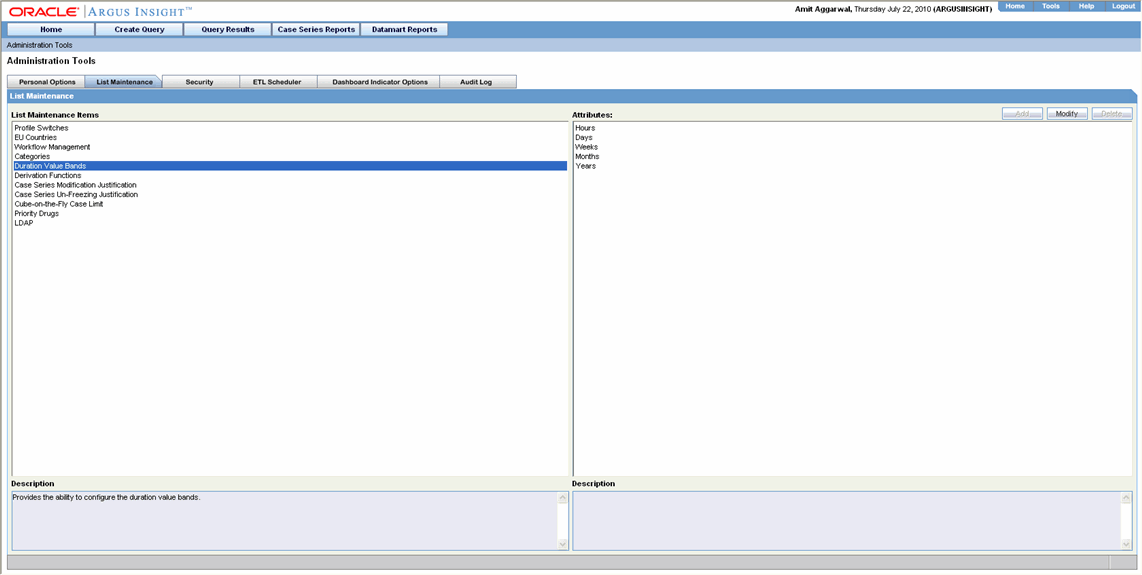
Select a category.
Click Modify. The Duration Value Bands Configuration dialog box appears. The factory-configured ranges are displayed. The Labelcolumn represents the name of the range. The Lower Range (>=) and Higher Range (<) columns contain the minimum and maximum values, respectively.
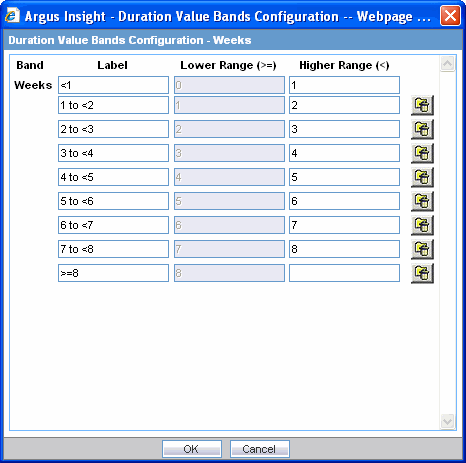
Modify the values, as appropriate. In the Duration Value Bands Configuration dialog box, you can delete an existing range by clicking the Deleteicon or you can modify a range by editing the values in the Lower Range (>=) and Higher Range (<) columns. Note that the lowest band cannot be deleted. Additionally, the highest value band includes values that are greater than the highest range value that you specify. Use the following procedure to add a range, enter a higher range compared to the previous highest range in Higher Range (<)and press TAB. This add a new row.
If you delete an intermediate range, the highest value of the deleted range is automatically converted to the lowest value in the next range. However, the range labels do not change.
Click OK to save the changes.
Argus Insight lets you create a new List Maintenance item and derive specific cases to this item based on case attributes. These attributes are supplied to the system as an SQL.
For example, you can create a new List Maintenance item called ReportType 1 and derive to this item, all the cases that have the Report Type attribute as Spontaneous, Literature, and Compassionate Use. As a result, the Report Type 1 List Maintenance item appears as an option in the query tool interface corresponding to the Report Type attribute. When you select the Report Type 1 from the Report Type list and execute your query, the system returns only those cases that have the report type attribute as Spontaneous, Literature, and Compassionate Use.
You may also create a further specialized List Maintenance item called Report Type 1 US and derive to this item, all the cases that have the Report Type attribute as Spontaneous, Literature, and Compassionate Use and the Country of Incidence attribute as United Sates.
|
Note: In some configuration situations two different List Maintenance items need to be created containing similar attributes (in the SQL criteria). In this case, you can assign a priority level to individual List Maintenance items. The priority level determines which LM item SQL is executed first. |
Use the following procedure to configure derivation functions.
In the List Maintenance tab page, select the Derivation Functions item from the List Maintenance Items list. The Attributes list displays the existing categories. This is a default category and cannot be modified.
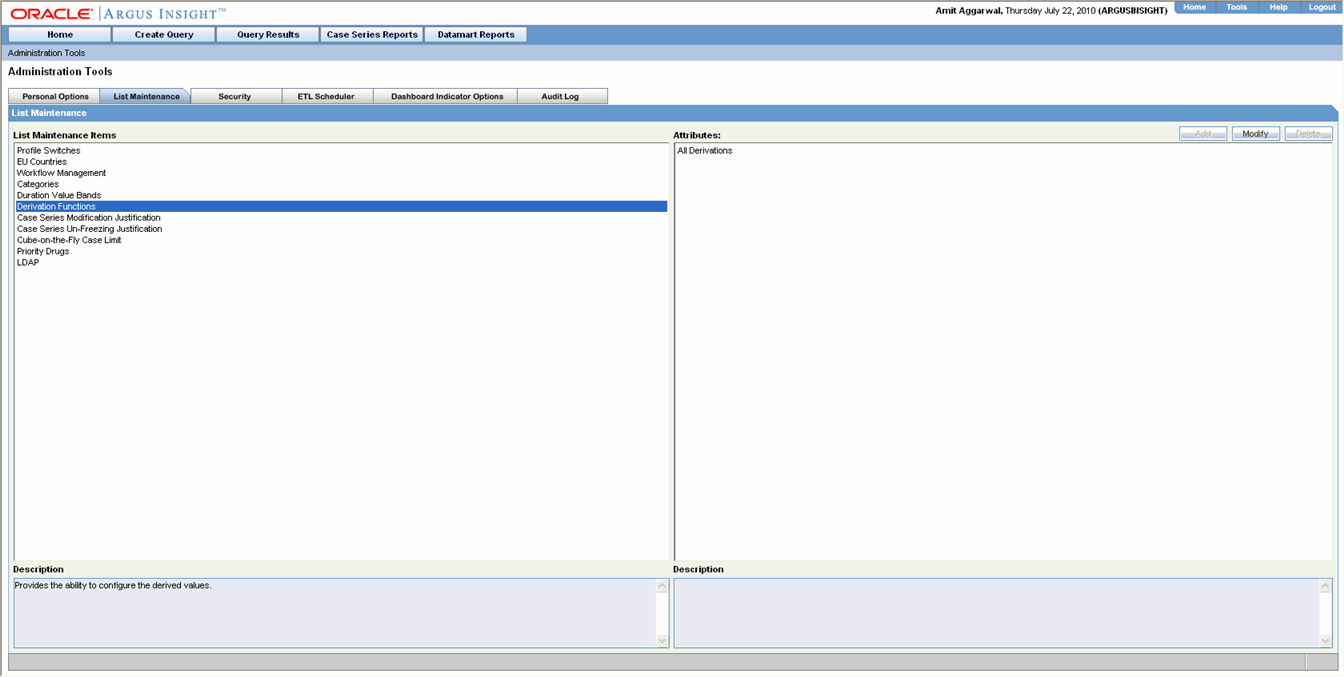
Select the category All derivations.
Click Modify. Use the menu icons available on the left side to add/delete/rearrange rows in the Derivation Fields window.
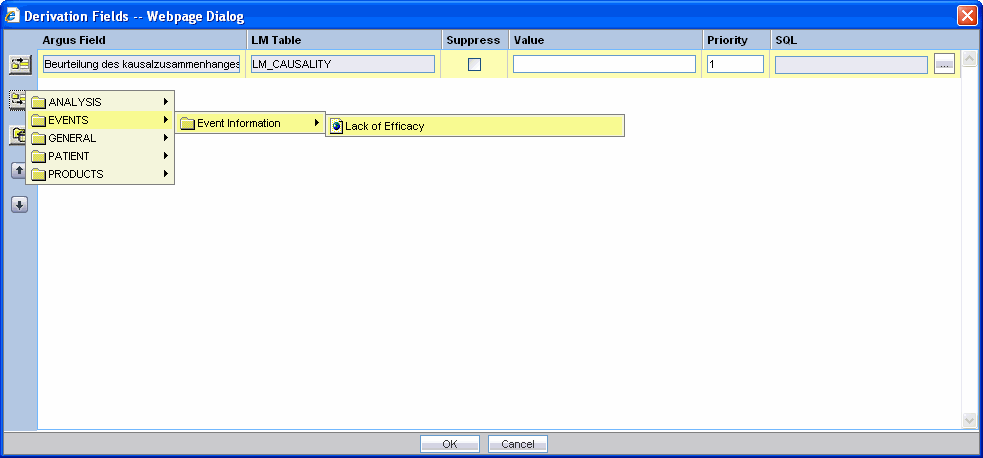
Refer to the brief descriptions for the explanation of the fields as displayed in the Derivation Fields window.
The Argus Field Mapping derivation rules are applicable as follows:
ANALYSIS -> BfArM Information -> Causality
ANALYSIS -> Case Assessment -> Listedness Determination
ANALYSIS -> Case Assessment -> Case Outcome
EVENTS -> Event Information -> Lack of Efficacy
GENERAL -> General Information -> Report Type
GENERAL -> General Information -> Pregnancy
PATIENT -> Patient Information -> Age Group
PATIENT -> Patient Information -> Patient weight BMI desc
PRODUCTS -> Product Drug -> Derived Overdose
PRODUCTS -> Product Drug -> Derived Drug Abuse
PRODUCTS -> Product Drug -> Derived Drug Interaction
PRODUCTS -> Product Drug -> Last daily dose
|
Note: Age Group, Causality, Last daily dose and Report Type are comma separated Derivation rules. |
This field is the table name of the selected Argus field i.e automatically populated.
This functionality is available only if the selected field has a list maintenance table. When this field is not enabled, the value of the derivation field is saved along with a new value in the corresponding LM (List Maintenance) table.
When this field is enabled, the old value of the derivation field is replaced with a new value in the corresponding LM (List Maintenance) table.
If Suppress is checked while creating the derivation rule, LM tables will have only those values which are present in the corresponding case tables. For example, if derivation rule is created for Gender field with Suppress checkbox checked and case data has Gender values as Male, Female and value satisfying 'Unknown/<Unspecified>'derivation rule, DM_LM_GENDER table will be populated with Male, Female and Unknown/<Unspecified> values only.
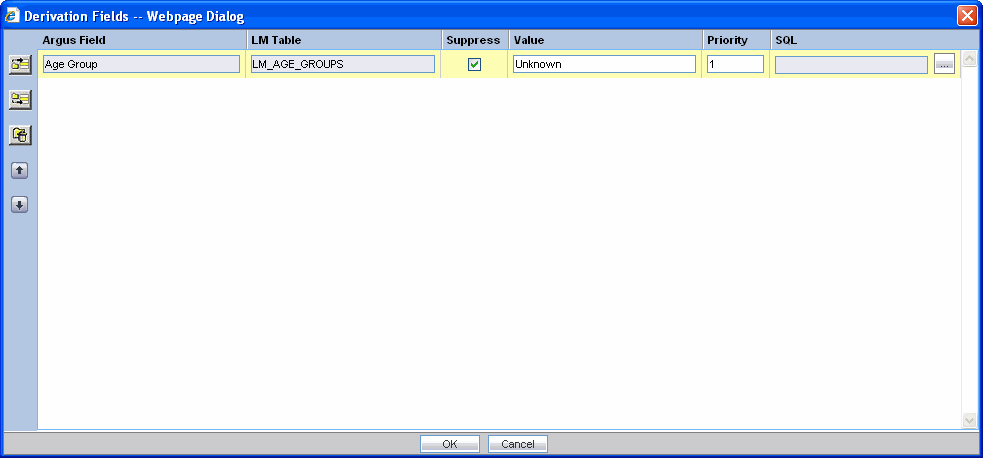
|
Note: This is applicable only if the condition specified in the SQL text box covers all the cases having the selected LM field. |
This is a textbox which captures the value for the new derivation field.
|
Note: For the following rules the system expects the user to enter the rule's new value as a comma separated value.Make sure that the values for these rules are entered as mentioned below. Unexpected results and/or ETL error might result if the values are not entered as specified. |
Age Group rule: VALUE,GROUP_LOW,GROUP_HIGH
| Parameter | Parameter Description |
| VALUE | New value for the rule |
| GROUP_LOW | Lower value of the Group |
| GROUP_HIGH | Higher value of the Group |
Example: NewAgeGroup,25,50
If you do not want to specify the High Value then the comma is mandatory in the end. For example, Unknown,70,
Causality: VALUE,REPORTABILITY
| Parameter | Parameter Description |
| VALUE | New value for the rule |
| REPORTABILITY | Lower value of the Group |
Example: NewCausality,1
Last Daily Dose:VALUE, DAILY_DOSE_SORTING_ORDER
| Parameter | Parameter Description |
| VALUE | New value for the rule |
| DAILY_DOSE_SORTING_ORDER | 1 or 2 or 3 and so on to define the sorting order if there are more than 1 rule for Last Daily Dose field |
Examples:
Example:1 -> 0to1,1
Example:2 -> 2to3,2
Example:3 -> 5to8,3
Report Type:VALUE, INC_LIT, INC_TRIAL,ABRV
| Parameter | Parameter Description |
| VALUE | New value for the rule |
| INC_LIT | 1 if Literature Report Type else 0 |
| INC_TRIAL | 1 if Clinical Trial Report Type else 0 |
| ABRV | A 3 letter abbreviation for the Report Type |
Example: NewReportType,0,1,NRT
This field captures the priority for a list of derivation rules applied to a single LM field. The value should be which is a value from 1 to 255.
|
Note: The priority for derivation rules applicable to a single LM filed should be unique. |
Specify the SQL statement to capture the cases for which the derivation rule is applicable.
|
Note: The SQL statement should follow the correct syntax.The UI does not validate the length of the new values against the database. Make sure that new values getting inserted into the MART do no exceed the limit defined in the database. |
The SQL query configured against a rule should only have the primary key column name(s) of the field in the SELECT clause. It should also not contain the table name.
Example:
select case_id from rpt_case where ….. (CORRECT)
select rpt_case.case_id from rpt_case where …. (INCORRECT)
Make sure that there is only one space after the select clause in the SQL query.
Example:
select case_id, seq_num from rpt_product where ….. (CORRECT)
select case_id, seq_num from rpt_product where …. (INCORRECT)
Make sure that no oracle keyword (such as distinct) is used after the select clause in the SQL query.
Example:
select case_id, seq_num from rpt_product where ….. (CORRECT)
select distinct case_id, seq_num from rpt_product where.. (INCORRECT)
Argus Insight lets you configure justification messages (which can be used by Argus Insight users) to justify any modifications to a case. This topic explains how to configure the text for justifying changes made to a case series, using the Case Series Modification Justification feature.
The Case Series Modification justification feature helps you to capture the reason for modifying a Case Series. This message must be captured for maintaining the case series history.
|
Note: When modifying a case, the user must select a relevant justification (text) from the Justification drop-down list box. |
The Case Series Modification Justification item in the List Maintenance page lets you configure the messages that appear in the Justification list box. Use the following procedure to configure the messages.
In the List Maintenance tab page, select the Case Series Modification Justification item from the List Maintenance Items list. The Attributes list displays the existing configured justification text, if any.
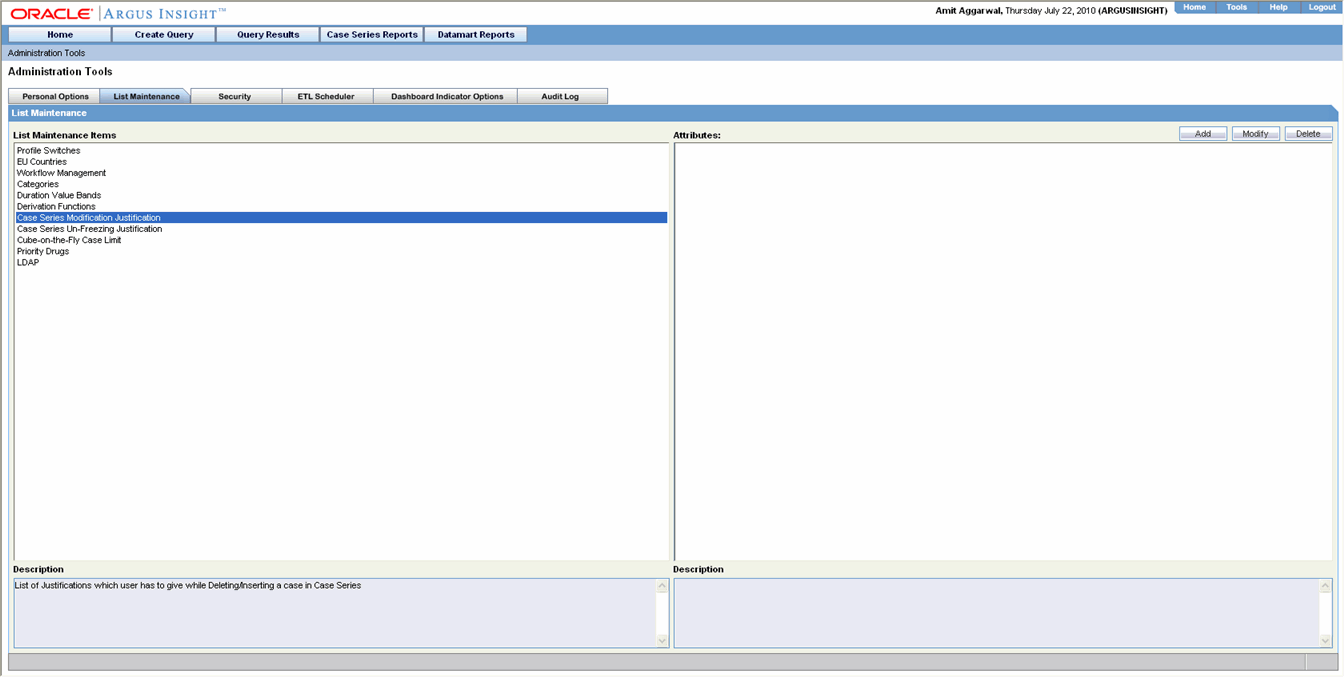
Click Add. The following dialog box appears.
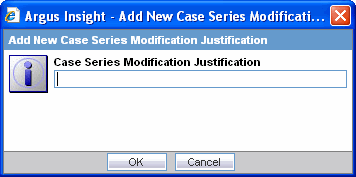
Enter the required justification text in the dialog box.
Click OK. The text is saved to the system as a justification for modifying a case series.
Argus Insight lets you configure un-freezing messages (which can be used by Argus Insight users) to justify any un-freezing to a case. This topic explains how to configure the text for justifying unfreezing a case series, using the Case Series Un-freezing Justification feature.
The Case Series Un-freezing Justification feature helps you to capture the reason for unrfeezing a Case Series. This message must be captured for maintaining the case series history.
|
Note: When unfreezing a case, the user must select a relevant justification (text) from the Justification drop-down list box. |
The Case Series Un-freezing Justification item in the List Maintenance page lets you configure the messages that appear in the Un-freezing list box. Use the following procedure to configure the messages.
In the List Maintenance tab page, select the Case Series Un-freezing Justification item from the List Maintenance Items list. The Attributes list displays the existing configured justification text, if any.
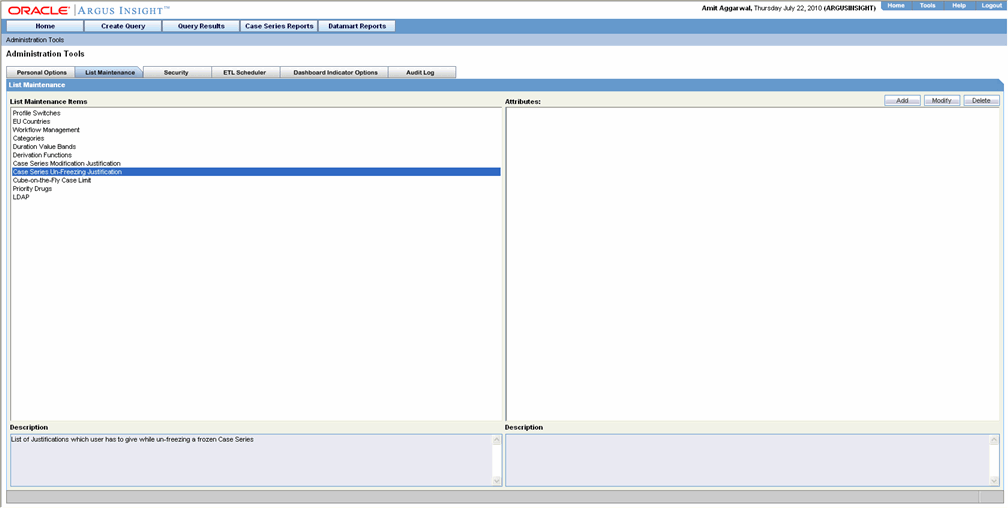
Click Add. The following dialog box appears.
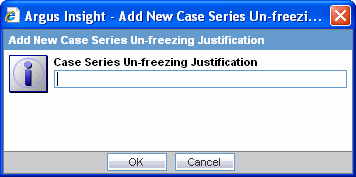
Enter the required justification text in the dialog box.
Click OK. The text is saved to the system as a justification for un-freezing a case series.
Argus Insight lets you configure custom cubes to work with a certain maximum number of cases for cubes on the fly. The Cubes-on-the-Fly Case Limit feature helps you to limit the case series to a certain number of cases.
The Cube-on-the-Fly Case Limit item in the List Maintenance page lets the system administrator configure the attribute values for cubes. Use the following procedure to configure attribute values (limiting the size of the case series for each cube) execute the procedure below:
In the List Maintenance tab page, select the Cube-on-the-Fly Case Limit item from the List Maintenance Items list. The Attributes list displays the associated values for the case series, if any.
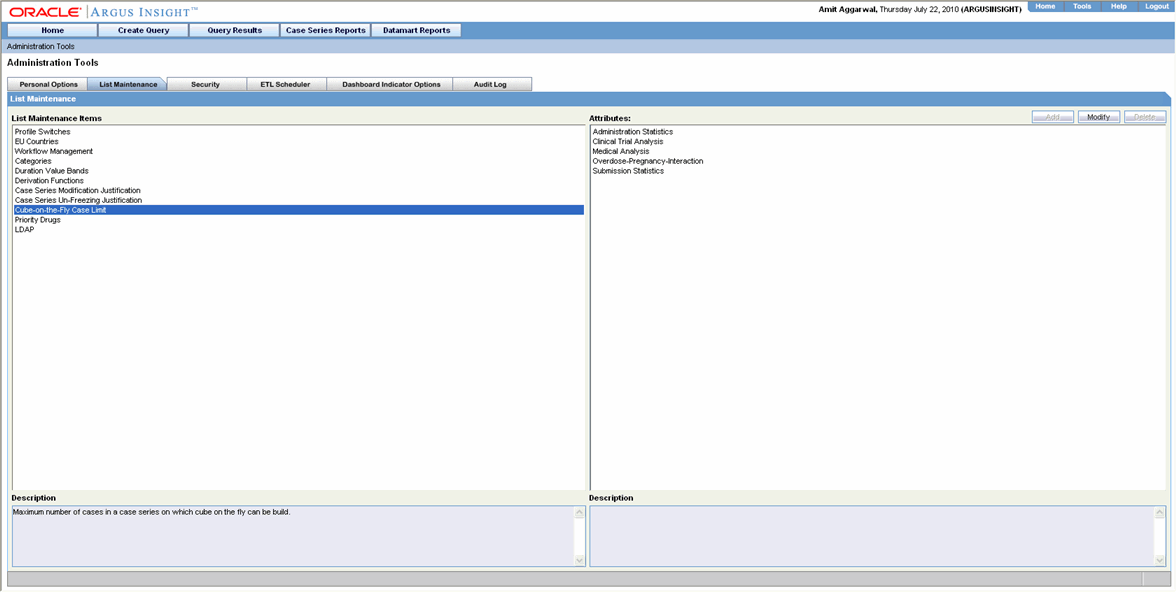
Select a cube and click Modify. The following dialog box appears.
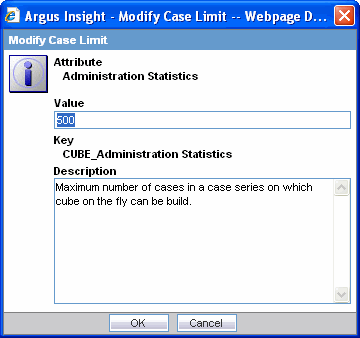
Enter the value for the attribute in the dialog box.
|
Note: Five (5) different cube names are displayed in the Attributes list. |
Click OK. The value is saved to the system.
|
Tip: You must ensure that during cube scheduling, the user case series should not exceed the number of cases allowed for the selected cube. You will get an error if you exceed the limit. |
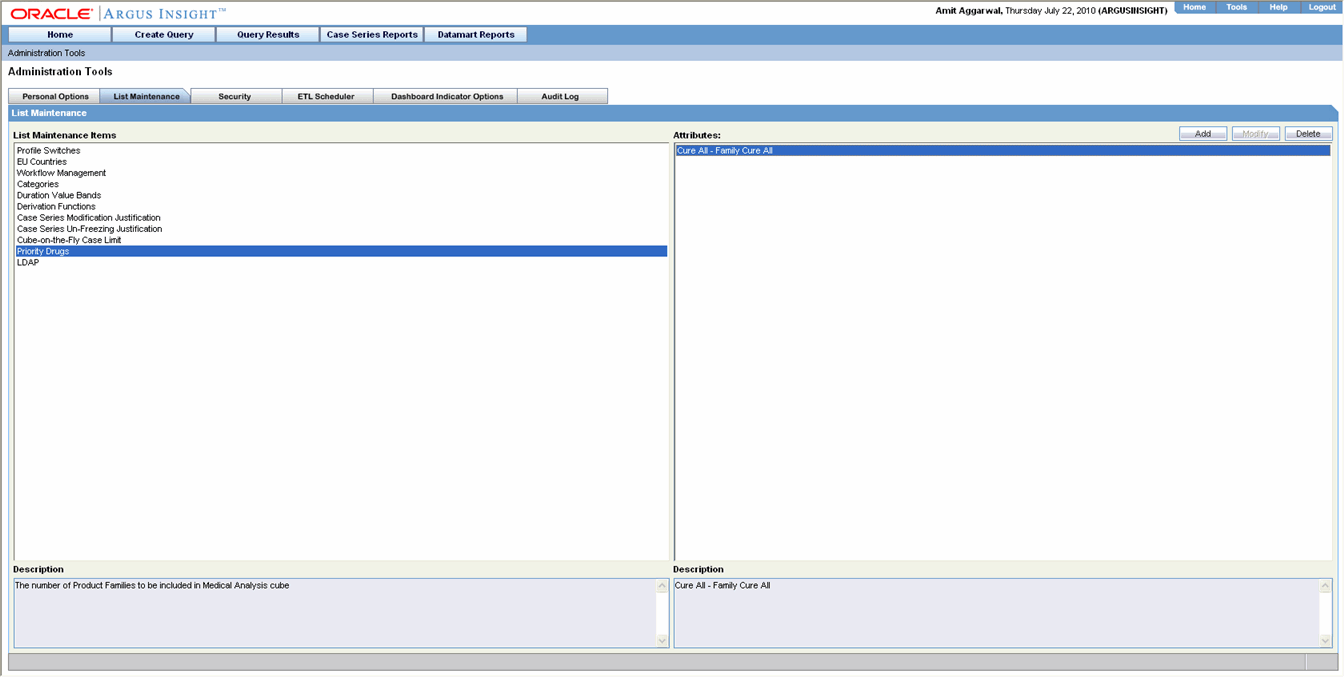
Argus Insight lets you add product families to the Priority drugs list. The Medical Analysis Standard Cube is generated only on the configured product families available in the priority drugs list. If there is no product family configured under this list, the Medical Analysis Cube will not be generated.
Use the following procedure to add a new product family.
In the List Maintenance tab page, select the Priority Drugs item from the List Maintenance Items list. The Attributes list displays the existing categories.
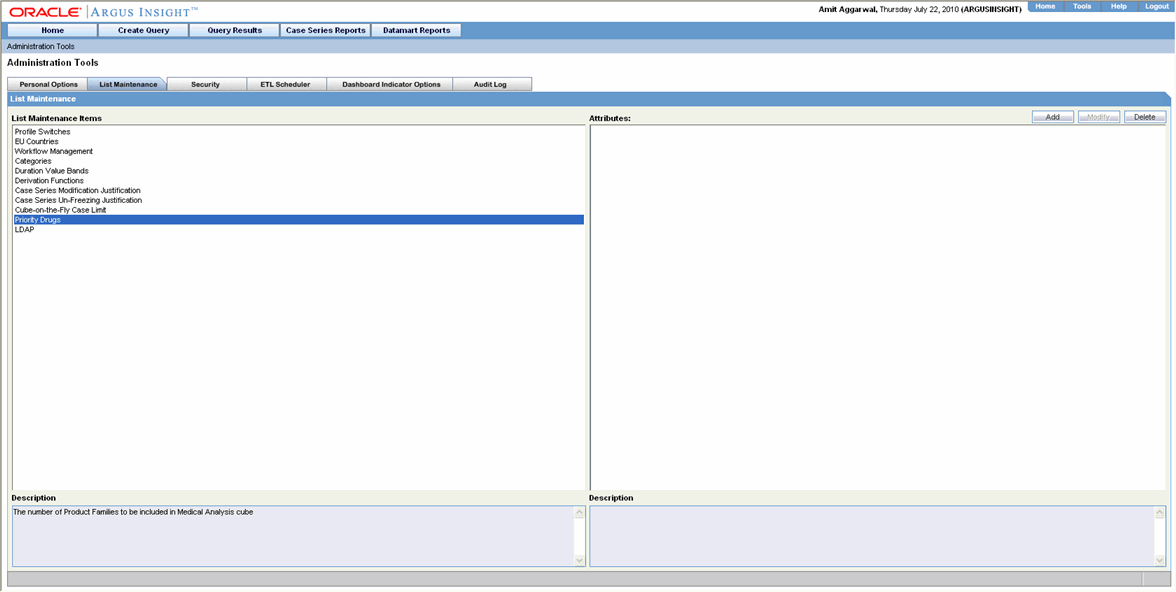
Click Add. The Product Browser dialog box appears.
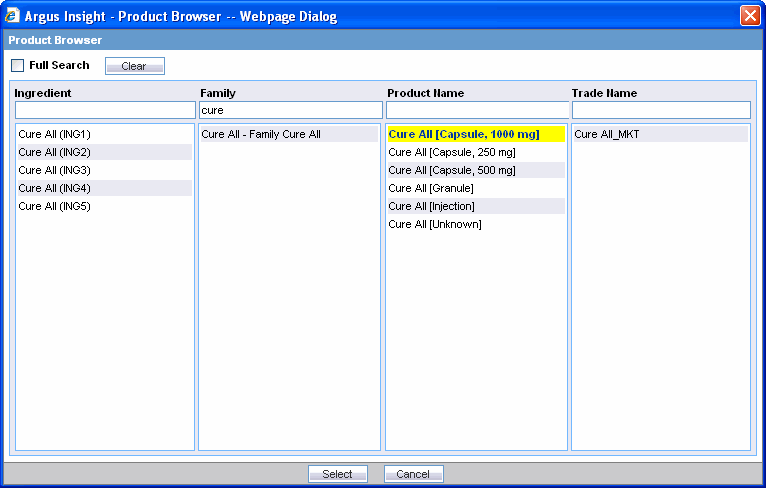
Search for a family name and select the required Family name.
Click Select. The new Family is added to the Priority Drugs list.
The Argus Insight installation program automatically creates the Administrators group that contains a user account for the system administrator. The default user name and password for the system administrator is administrator and password, respectively. More accounts can be added to this group.
Use the following procedure to create non-administration user accounts, you first need to create additional groups and configure the access rights. Next, you can create the various user accounts and assign them to one or more groups you created.
Additionally, all the existing Argus Safety user names and their passwords are replicated in Argus Insight.
The sections that follow explain how to create and manage user groups and accounts.
Use the following procedure to create new groups and accounts.
Create groups.
Select the Security tab in the Administration Tools page. The Security page appears.
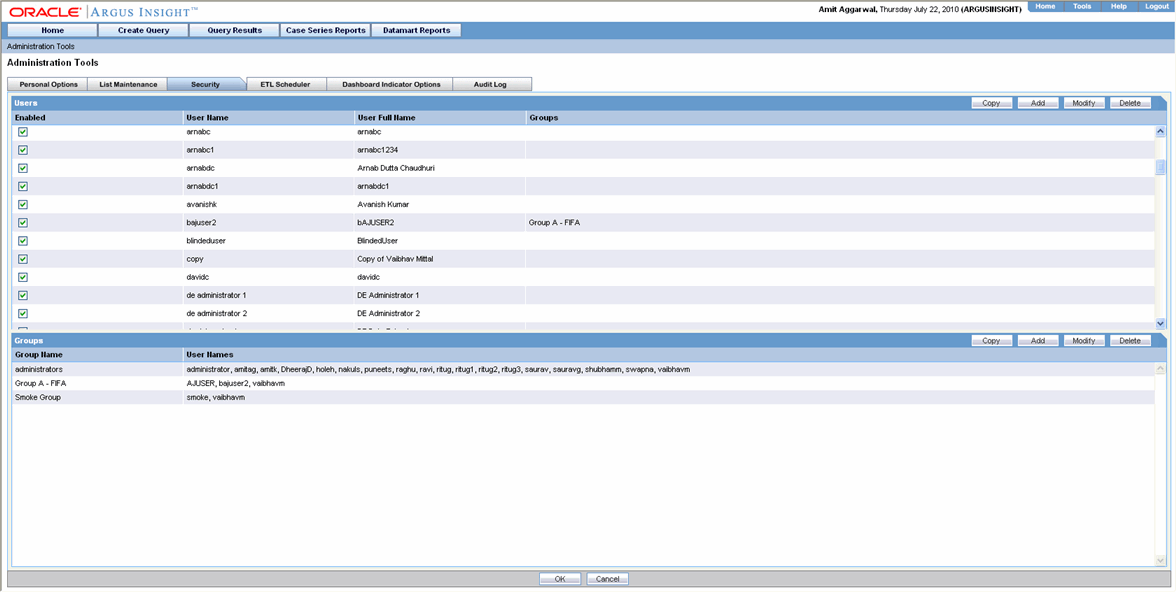
Click Add in the Groups section. The Group Administration dialog box opens.
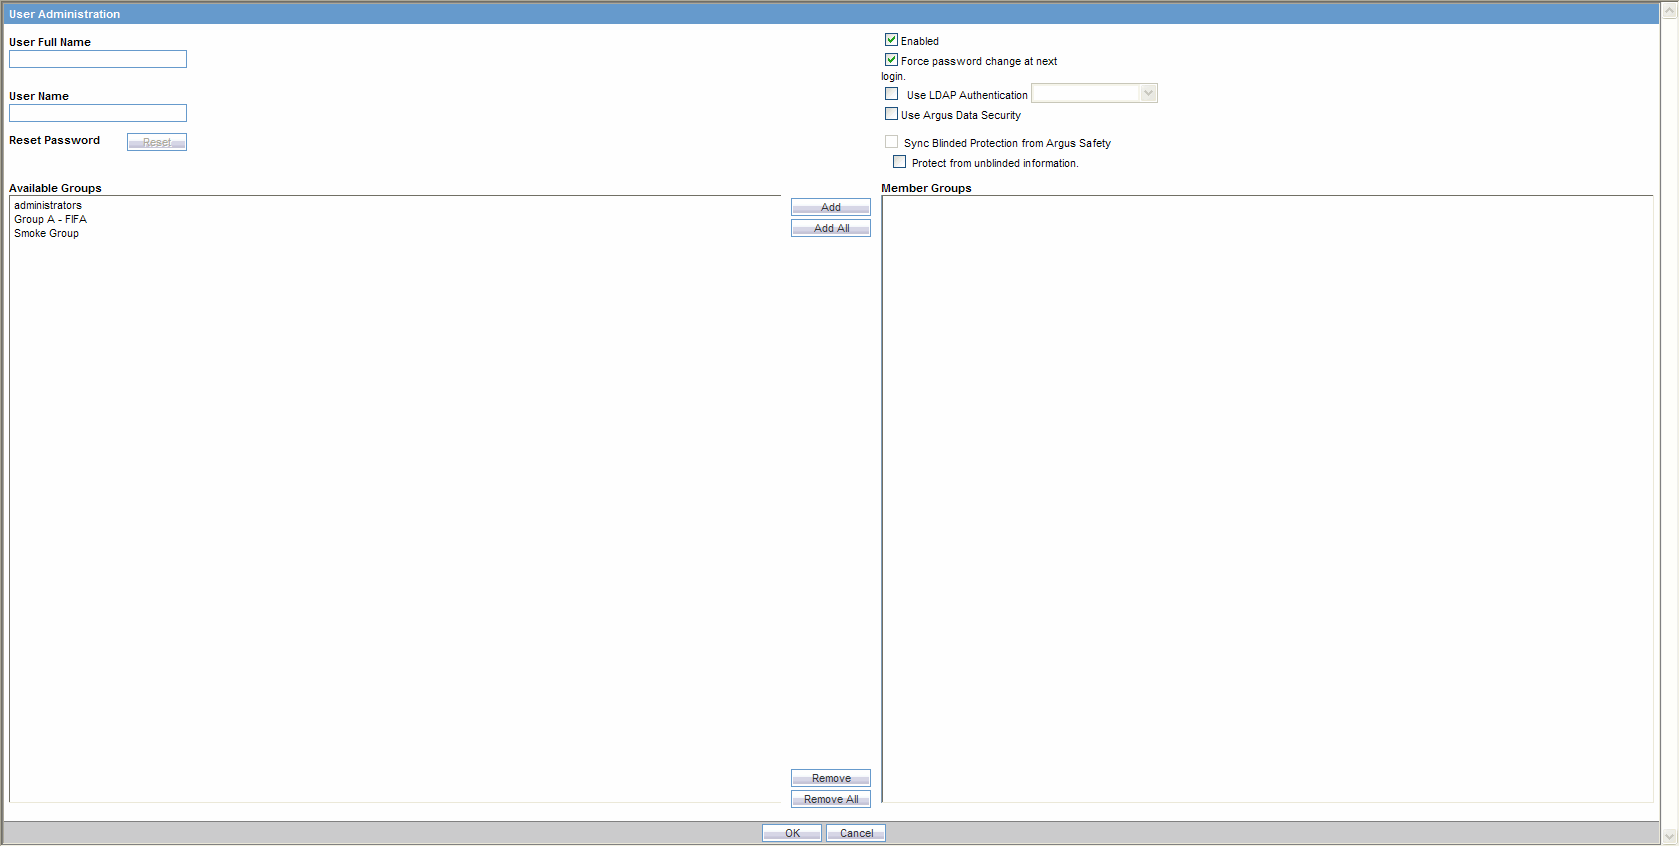
Enter the user name and user ID in the User Full Name and User Name text boxes, respectively.
|
Note: Argus Insight assigns the default password as password for the new users you create. The checked Force Password Change at next Login checkbox indicates that the user would need to change the password at the first login. If you require the new password to be alphanumeric, set the ALPHANUMERIC PASSWORD profile switch to 1. The checked Enabled checkbox indicates that the user account is enabled. If you clear this checkbox, the user will not be able to log in to Argus Insight |
Check the Use Argus Data Security checkbox if you want to implement the Argus' product, site, and study security policies for the user account.
From the Available Groups list, select a group with which you want to associate the user account.
Click Add. The selected group name appears in the Member Groups list indicating that the account has been associated.
Repeat these steps to associate the user account with other existing groups.
Click OK. The list in the Users section displays the details of the user account you created.
Once you have created a user group or account, you can use the Copy functionality to save the existing user group or account by another name while retaining all the access rights, group associations, and user associations. This is useful when you are creating multiple groups or user accounts with similar access rights and associations. Use the following procedure to create a new group or account by copying information from an existing group or account.
In the Security page, select a user name or a group name you wish to copy.

Click Copy in the Users or Groups section, as appropriate. The User Administration or Group Administration dialog box appears.
Enter a group name in the Group Name text box or the user name and user ID in the User Name and User ID text boxes, as appropriate.
Click OK. Settings from the copied group/account are carried over to the new group/account.
Use the following procedure to modify a group or user account details.
In the Security page, select a user name or a group name you wish to modify.

Click Modify in the Users or Groups section, as appropriate. The User Administration or Group Administration dialog box appears.
Modify the settings, as appropriate.
Use the following procedure to reset the existing password of the user to the default password (password), click the Reset button.
Click OK to save the modifications to the selected group or account. The modifications are saved.
In the Security page, select a user name or a group name you wish to delete.

Click Delete in the User or Group section, as appropriate. A delete confirmation dialog box appears.
|
Note: When you delete a user, all the queries and Case Series that the user saved in Argus Insight are also deleted. |
Click OK to delete the selected account or group. The selected account or group is deleted.
ETL stands for extract, transform and load processes that enable you to move data from your drug safety database, reformat it, and load it into another database (datamart) for querying, drill-down analysis, and report generation.
Argus must do the following data integrity checks before performing the ETL.
Every Case should have at least 1 Suspect Product
Every Case should have at least 1 Event with DESC_REPTD column as not null
Every Case should have one and only one Primary Event
Every Case should have a STATE (CASE_MASTER.STATE_ID)
Every Case should have a Report Type (CASE_MASTER.RPT_TYPE_ID)
Every Case should have a Country of Incidence (CASE_MASTER.COUNTRY_ID)
Every Case should have a Study record (CASE_STUDY)
For every Product in CASE_PRODUCT, there should be a record in CASE_PROD_DRUGS
If there are Reporters on the Case, there should be only one Primary Reporter
Every Case should have an Assessment record (in CASE_ASSESS table)
When Argus Insight is installed, the Initial ETL process is run to populate the datamart for the first time. Subsequently, you need to run incremental ETL processes at specific intervals to update the datamart with the latest data from your drug safety database.
|
Note: Incremental ETL should not be run for more than 30,000 cases. If the number of cases exceeds 30000, run the Initial ETL again. The Argus Insight Installation Guide explains how to run the initial ETL. |
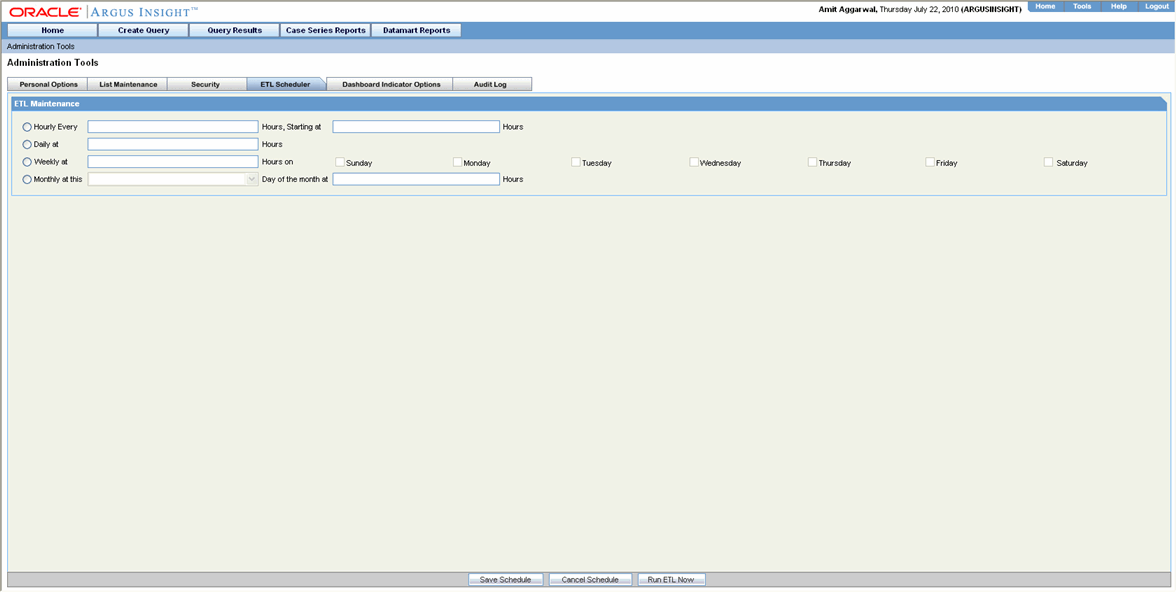
The ETL Scheduler tab page lets you schedule the incremental ETL process to run automatically and update the datamart.
|
Note: Updating reports table should always be followed by an update to the CASE_MASTER.LAST_UPDATE_TIME. (Updating the CASE_MASTER will result in moving the Case along with all the Reports to the Mart Schema) |
Use the following procedure to schedule the ETL:
In the ETL Scheduler tab page, check the checkboxes corresponding to the days of week when you wish to run the ETL.
In the Select Start Time text box, enter the time (HH:MM:SS) when you want to start the ETL on the days you selected. The time should be entered in the 24-hour format.
Click Save to save your settings.
You can also run the ETL immediately by clicking Run ETL Now. Running the ETL immediately does not affect the scheduled ETL.
During the execution of the ETL, Progress Meter showing the progress of ETL is displayed on your screen.
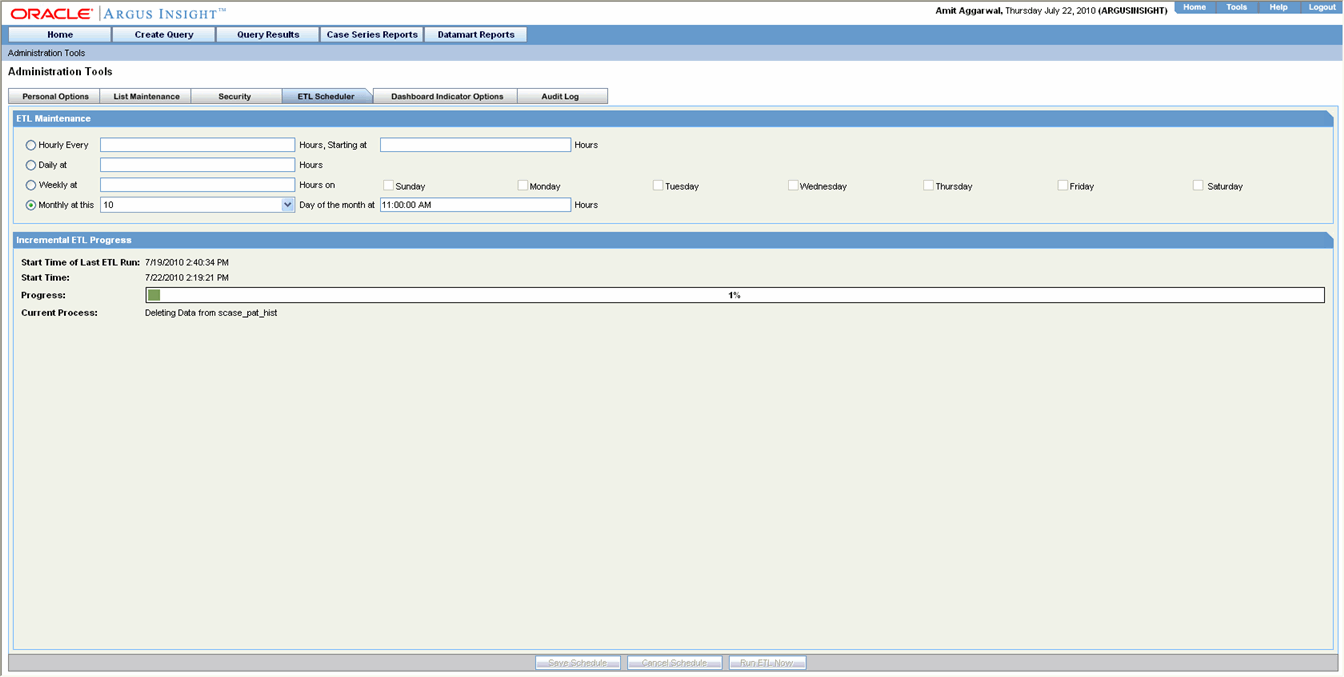
If some error occurs during the ETL execution, ETL will be stopped and error message will be displayed on your screen.
After the ETL execution is over, the system generates ETL reports. The ETL report details follow these guidelines:
ETL initial execution can be reviewed in the balancing log. These files can be viewed in the database installation folder.
ETL incremental execution log is generated for:
Argus to Staging
Staging to Mart (with the List maintenance tables and configuration tables, also case by case log is generated).
The last incremental execution can be reviewed in Case Series Reports -> Standard Reports ->Configuration
ETL log Argus to Staging
ETL log staging to mart
Earlier history of all ETL executions can be reviewed in the ETL log summary report
Argus Insight has three Dashboard Indicator reports: Executives, Reporting, and Data Entry. Based on a user's profile, you can assign a specific Dashboard Indicator report to a user by using the options in the Dashboard Indicator Options page. Only one report can be assigned to a user.
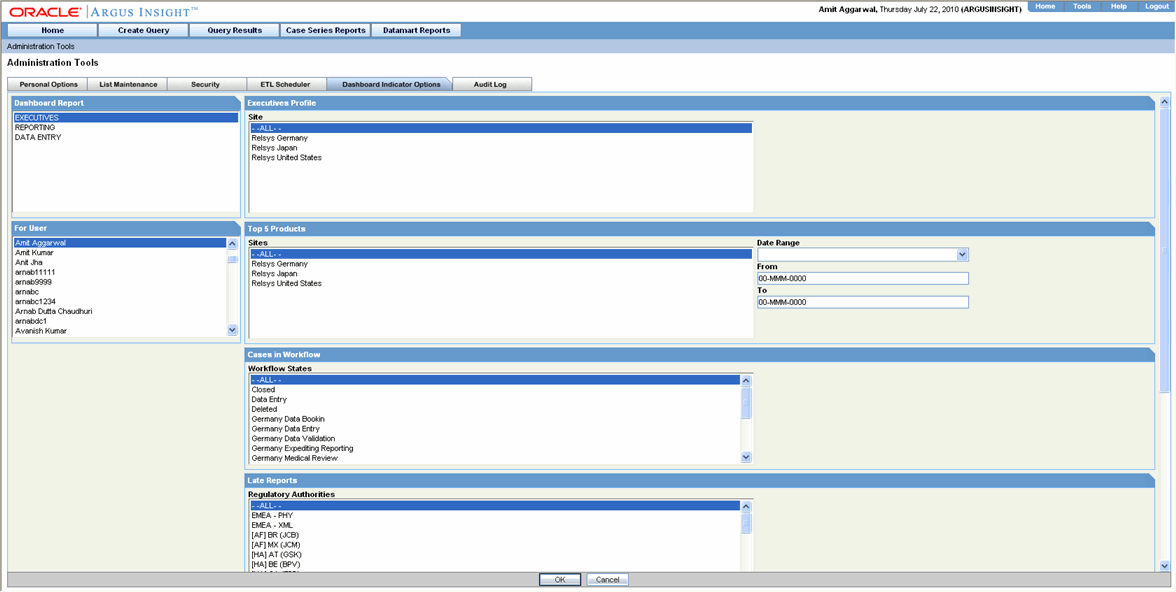
Each Dashboard Indicator report consists of a number of sub-reports. In turn, each sub-report has a set of filter elements associated to it. You need to set the filter elements for only those sub-reports that you wish to display in the Dashboard Indicator report output.
The selection of a particular Dashboard Indicator report and the sub-reports that appear in it is based on the profile and the reporting requirement of the user who would view these reports.
The following table lists the sub-reports for each Dashboard Indicator report and the filter elements associated with each sub-report.
| Dashboard Indicator Report | Sub-Report | Filter Element | ||
|---|---|---|---|---|
| Name | Description | Name | Description | |
| Executives | Executives Profile | This report provides a tabulation of case count for each site. The total count of serious cases for all sites is also listed. | Site | List of all sites as configured in Argus You can select specific sites or select All |
| Top 5 Products | This report is a listing of the top 5 products having the largest total case count sorted in descending order. The serious case count for each product is also listed. | Sites | List of all sites as configured in Argus You can select specific sites or select All | |
| Date Range | List of pre-configured date ranges
Select a date range from this list |
|||
| From | Date field for specifying the start date for a custom date range | |||
| To | Date field for specifying the end date for a custom date range | |||
| Cases in Workflow | This report is a graphical summary of the initial, follow up, and total case count in each workflow state. | Workflow States | List of all Argus workflow states You can select specific states or select All | |
| Late Reports | This report is a detailed listing of all cases for which reports are past the due date. Days past the due date are provided for each destination. | Regulatory Authorities | List of all regulatory authorities as configured in Argus You can select specific entities or select All | |
| Reporting Compliance | This report provides a graphical overview of reporting compliance count broken down by days remaining to due date and days past due date. | Date Range | List of pre-configured date ranges
Select a date range from this list |
|
| From | Date field for specifying the start date for a custom date range | |||
| To | Date field for specifying the end date for a custom date range | |||
| Regulatory Authorities | List of all regulatory authorities as configured in Argus You can select specific entities or select All | |||
| Receipt Latency | This report provides a graphical overview of receipt latency (from initial receipt date to central received date) by country of origin. | Sites | List of all sites as configured in Argus You can select specific sites or select All | |
| Date Range | List of pre-configured date ranges
Select a date range from this list |
|||
| From | Date field for specifying the start date for a custom date range | |||
| To | Date field for specifying the end date for a custom date range | |||
| Reporting | Reporting Profile | This report is a summary of scheduled report and past due report count for all the reporting groups. | Groups | List of all reporting groups as configured in Argus You can select specific groups or select All |
| Reporting Compliance (Count) | This report provides a graphical overview of reporting compliance count for each reporting destination. The counts are broken down by days remaining to due date and days past due date. | Regulatory Authorities | List of all regulatory authorities as configured in Argus You can select specific entities or select All | |
| Date Range | List of pre-configured date ranges
Select a date range from this list |
|||
| From | Date field for specifying the start date for a custom date range | |||
| To | Date field for specifying the end date for a custom date range | |||
| Reporting Compliance (Percentage) | This report provides a graphical overview of reporting compliance percentage broken down by days remaining to due date and days past due date. | Regulatory Authorities | List of all regulatory authorities as configured in Argus You can select specific entities or select All | |
| Date Range | List of pre-configured date ranges
Select a date range from this list of values |
|||
| From | Date field for specifying the start date for a custom date range | |||
| To | Date field for specifying the end date for a custom date range | |||
| Outstanding Submissions by Responsible Group (Summary) | For the selected reporting groups, this sub-report shows the outstanding report count by reporting destinations. Against each destination, the outstanding report count is further broken up in these groups:
- Due in greater then seven days - Due in 3-7 Days - Due in 0-2 days - Past the due date |
Regulatory Authorities | List of all regulatory authorities as configured in Argus You can select specific entities or select All | |
| Date Range | List of pre-configured date ranges
Select a date range from this list of values |
|||
| From | Date field for specifying the start date for a custom date range | |||
| To | Date field for specifying the end date for a custom date range | |||
| Outstanding Submissions by Responsible Group (Listing) | This report provides a detailed listing of cases for which report submissions are coming up.
The listing is grouped by the responsible group. Within each group, the listing is sorted in ascending order of days remaining for submission. |
Regulatory Authorities | List of all regulatory authorities as configured in Argus You can select specific entities or select All | |
| Data Entry | Data Entry Profile | This report provides a tabulation of case count for each site. The total count of serious cases for all sites is also listed. | Site | List of all sites as configured in Argus You can select specific sites or select All |
| Receipt Latency | This report provides a graphical overview of receipt latency (from initial receipt date to central received date) by country of origin. | Sites | List of all sites as configured in Argus You can select specific sites or select All | |
| Date Range | List of pre-configured date ranges
Select a date range from this list of values |
|||
| From | Date field for specifying the start date for a custom date range | |||
| To | Date field for specifying the end date for a custom date range | |||
| Cases in Workflow | This report is a graphical summary of the initial, follow up, and total case count in each workflow state. | Workflow States | List of all Argus workflow states You can select specific states or select All | |
| Case Load | This report provides a tabulation of cases received, cases in processing, and pending case counts for each workflow state. | Workflow States | List of all Argus workflow states You can select specific states or select All | |
| Case Workload by Site and Country | This report provides a tabulation of serious, non-serious, and total case counts grouped by site. For each site, the counts are displayed for each country. | Sites | List of all sites as configured in Argus You can select specific sites or select All | |
|
Note: The date range in reports is based on the ETL execution date. For example, if you select Yesterday for the Date Range filter element, the date populated for "Yesterday" will be the day before the ETL was last run. |
Use the following procedure to configure a Dashboard Indicator report for a user.
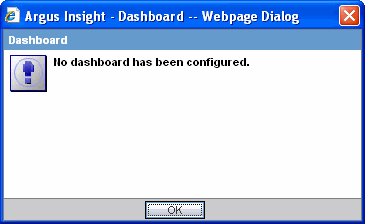
In the Dashboard Indicator Options page, use the list box in the For User section to select the user for who you wish to configure the Dashboard Indicator Report. If no report is configured for this user, the following dialog box appears. Click OK in this dialog box and proceed.
Depending on the profile and reporting requirement for the selected user, select a type of Dashboard Indicator Report from the list in the Dashboard Report section. Depending on the type of Dashboard Indicator report you selected, the Dashboard Indicator Options page displays the filter elements for the associated sub-reports.
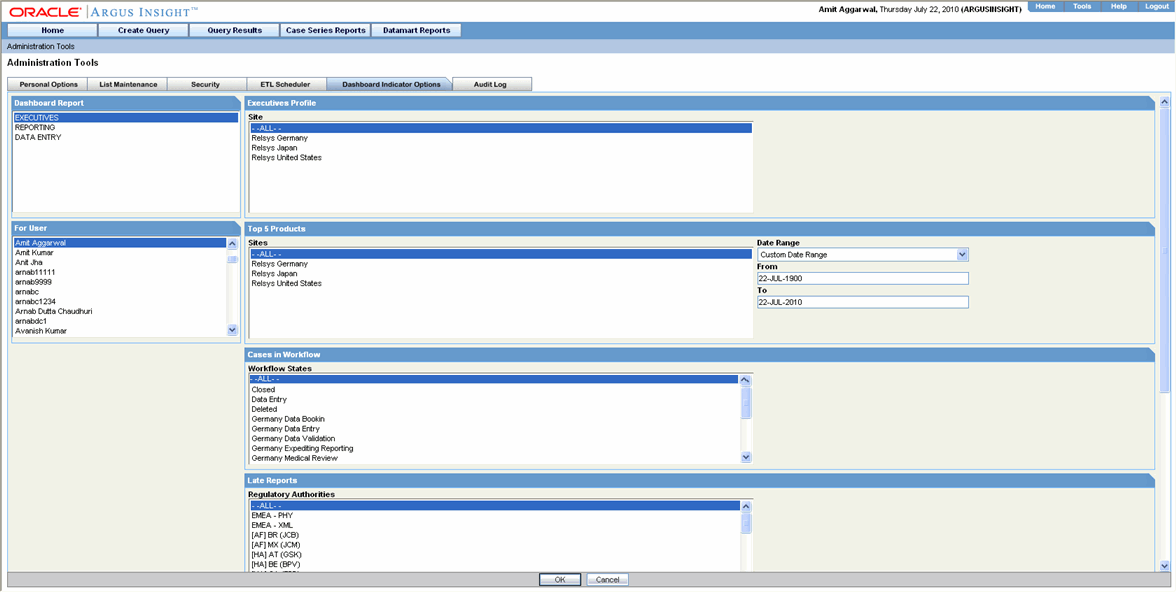
Set the filter elements for the sub-reports you wish to display in the Dashboard Indicator report. See the table above for descriptions of sub-reports and filter elements.
Click OK to save the settings.
Repeat steps 1 to 4 to configure Dashboard Indicator reports for other users.
From the Audit Log page, you can view the configuration activities performed by an Argus Insight user during a particular period.
Use the following procedure to view the Audit Log.
In the Administration Tools page, click the Audit Log tab. The Audit Log page appears.
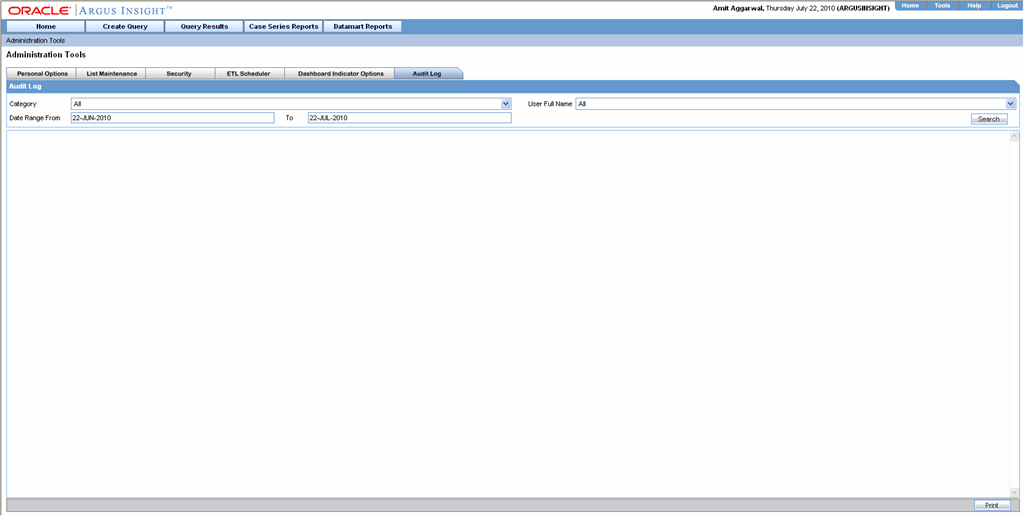
Select the activity category from the Category list box.
Select the user name from the User list box.
Enter a date range in the Date Range From and Use the following procedure to text boxes.
Click Search. The Audit Log page displays the list of activities according to the criteria you specified. You can print the list of activities by clicking Print at the bottom of the page.
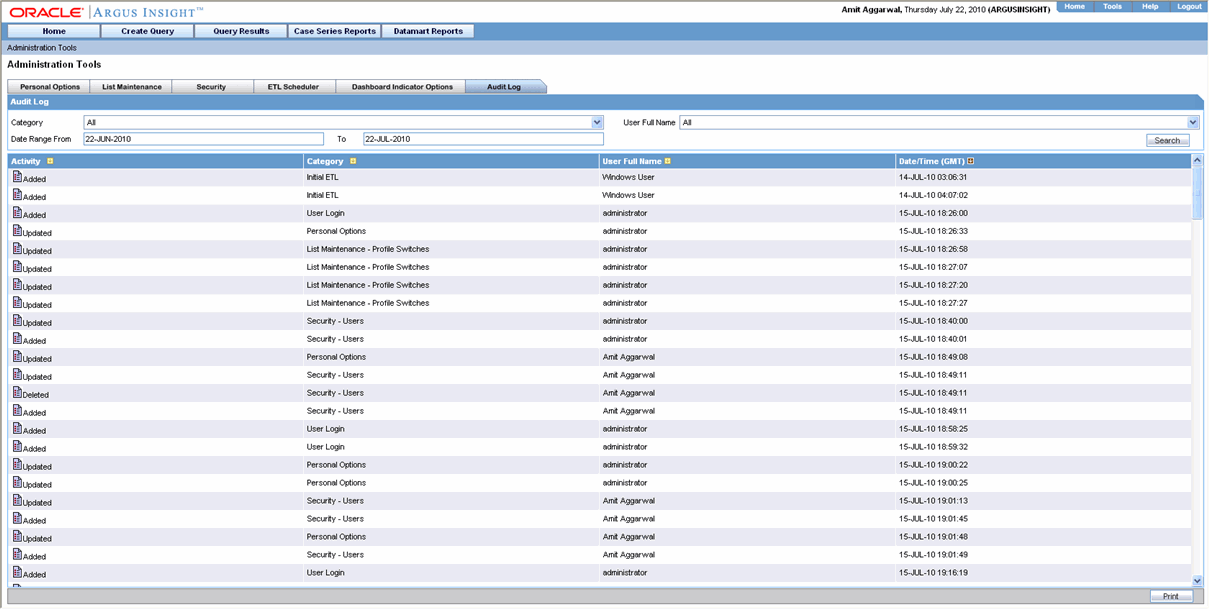
Click the Audit Log Details icon for an activity.
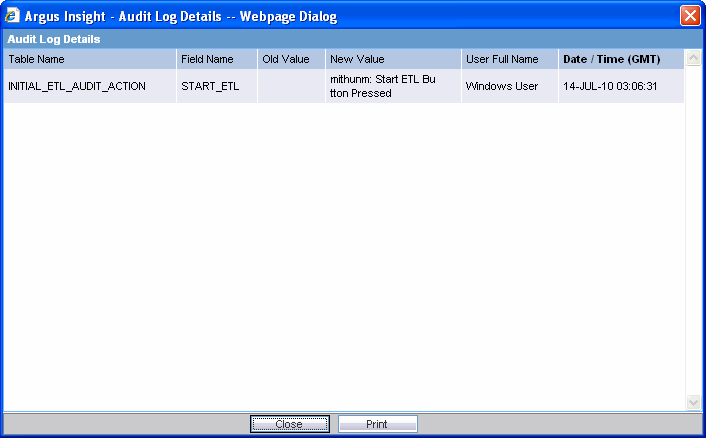
A dialog box displays the activity details. You can print the activity details by clicking Print in the dialog box.