Oracle® Insurance Rules Palette 9.4.0.0 E18894_01
The Rules Palette controls all security for both the Rules Palette and for the Oracle Insurance Policy Administration (OIPA) system. The Admin Explorer contains a security folder, which holds security controls for the Rules Palette and OIPA. Only users with Administration Palette Security Check-In/Check-Out privileges will see the security folder.
Palette Security privileges are configured in two steps:
User Security: contains a list of all users and the security roles assigned to them.
Security Role: contains a list of all security roles and the privileges each role has.
The security manager(s) first create specific
security roles, such as BA, Configuror, Build Manager, etc. These
roles will grant users access to the parts of the Rules Palette that pertain
to their specific job functions. Once the roles
are defined, each user can be assigned a security role. Security roles and privileges can be modified
at any time from the User Security or Security Role folder. Modifications
can be made and saved by selecting the Save All ![]() button. This will
save the modifications to the database.
button. This will
save the modifications to the database.
Note:
When using the Save All ![]() button, changes to security will be saved
to the database. In addition, any panes open for configuration with changes
will be saved to your local drive.
button, changes to security will be saved
to the database. In addition, any panes open for configuration with changes
will be saved to your local drive.
When a new company is created, you must manually re-load security scripts in order to update the database. If you do not complete this step, your new company will not have access to any of the Web Services.
Security will also need to be added to new transactions after they are created. The user who created the new transaction will notify a security manager when a new transaction is created. A security manager will then need to add the transaction to the security group for the appropriate users. If this step is not completed, users will not be able to see the new transaction in OIPA.
Security roles will need to be created for the release management process. Typically, BAs have access to the configuration package configuration. Then Build Managers and/or BAs with Administration privileges have access to create migration sets and release packages. You can also set a separate level for a Release Manager so that he can deploy the release package. If a user is not given release management privileges, then he/she will not be able to see any of the release management functionality in the palette.
Security Role is where the security roles are created for users. There are pre-configured access privileges that can be combined to create security roles. The Rules Palette offers visual editing options when you double-click Security Role in the Security folder.
Available privileges within Rules Palette
security are:
Available Privileges |
Definition |
|---|---|
|
Administration - All Non-Security Administration -CheckIn/CheckOut |
Check-in/Check-out all non-security items. The Administration folder will display in the Admin Explorer tab. Items in the folder can be modified. |
|
Administration - All Non-Security View |
View all non-security items. The Administration folder will display in the Admin Explorer tab. Items in the folder cannot be modified. |
|
Administration - Palette Security- Check-In/Check-Out |
Check-in/Check-out all Rules Palette security items. This privilege will allow you to add security to transactions and apply security roles to users of the Rules Palette. The Security folder will display in the Admin Explorer tab.
|
|
Administration - OIPA Security - Check-In/Check-Out |
Check-in/Check-out all OIPA security items. This privilege will allow you to set security around items in OIPA. The Security folder will display in the Admin Explorer tab. |
|
Business Rules - All Non-Administration Rules - Check-In/Check-Out |
Check-in/Check-out all non-administration business rules. |
|
Configuration Package - Add |
Release Management security item. Allows user to add new configuration packages. The Release Management folder will display in the Admin Explorer tab. |
|
Configuration Package - Put On Hold |
Release Management security item. Allows user to put configuration packages on hold. The Release Management folder will display in the Admin Explorer tab.
|
|
Configuration Package - Ready to Migrate |
Release Management security item. Allows user to migrate configuration packages. The Release Management folder will display in the Admin Explorer tab. |
|
Configuration Package - Remove Component |
Release Management security item. Allows user to remove a component from a configuration package. The Release Management folder will display in the Admin Explorer tab. |
|
Configuration Package - Take Off Hold |
Release Management security item. Allows user to take configuration packages off hold. The Release Management folder will display in the Admin Explorer tab. |
|
Configuration Package - View All |
Release Management security item. Allows user to view configuration packages created by all users. The Release Management folder will display in the Admin Explorer tab. |
|
Configuration Package - ViewOwned |
Release Management security item. Allows user to view only the configuration packages that he/she creates. The Release Management folder will display in the Admin Explorer tab. |
|
DataDictionary - Check-in/Check-out |
Check-in/Check-out DataDictionary terms. |
|
DataDictionary - Manager |
Manage the DataDictionary. |
|
DataDictionary - View |
View DataDictionary items. |
|
Migration Set - Create |
Release Management security item. Allows user to create migration sets. The Release Management folder will display in the Admin Explorer tab. |
|
Migration Set - View All |
Release Management security item. Allows user to view migration sets created by all users. The Release Management folder will display in the Admin Explorer tab. |
|
Release Package - Build |
Release Management security item. Allows user to build release packages. The Release Management folder will display in the Admin Explorer tab. |
|
Release Package - Create |
Release Management security item. Allows user to create release packages. The Release Management folder will display in the Admin Explorer tab. |
|
Release Package - Deploy |
Release Management security item. Allows user to deploy release packages to a new environment. The Release Management folder will display in the Admin Explorer tab. |
|
Release Package - Set Ready for SCM |
Release Management security item. Allows user to mark package ready for the Source Control Manager for approval and promotion. The Release Management folder will display in the Admin Explorer tab. |
|
Release Package - View All |
Release Management security item. Allows user to see release packages created by all users. The Release Management folder will display in the Admin Explorer tab. |
Note: All users will have view access to all rules as a default.
In Admin Explorer, double-click the Security Role option.
Select the New Role button.
Enter the name for the new role in the Role Name field.
Select the desired privileges to be granted to the new role from the list of Available Privileges. CTRL-click to select multiple options at a time. Selected items will become highlighted.
Use the left arrow  selection button to move selected privileges from the Available
Privileges list to the Applicable Privileges
list. The privileges you place in the Applicable
Privileges list will be the ones that are applied to your selected
role after clicking Save All
selection button to move selected privileges from the Available
Privileges list to the Applicable Privileges
list. The privileges you place in the Applicable
Privileges list will be the ones that are applied to your selected
role after clicking Save All .
You can also select the right arrow
.
You can also select the right arrow  button to remove items
from the Applicable Privileges list and return them to the Available Privileges
list.
button to remove items
from the Applicable Privileges list and return them to the Available Privileges
list.
An Insert action next to the role name indicates a new role is about to be added and disappears on saving these changes.
Select the Save
All  button on the Tool bar to save your changes.
You will be prompted to save your changes to the database.
button on the Tool bar to save your changes.
You will be prompted to save your changes to the database.
Select Yes
to save or No to cancel.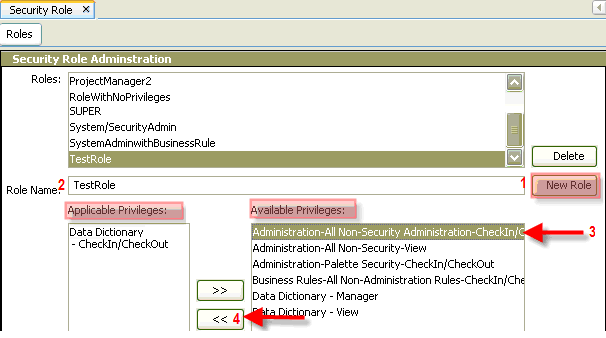
Security Role File
Note: When using the Save All button, changes to security will be saved to the database. In addition, any panes open for configuration with changes will be saved to your local drive.
In Admin Explorer, double-click the Security Role option.
Select the role from the Roles list that you wish to delete.
Click the Delete button. A delete action is indicated when the user deletes a role and on saving changes this disappears.
Click the Save
All button on the Tool bar to save your changes.
Note: When a Security Role is deleted all users assigned to that role will have Read Only privileges the next time they log into the system.
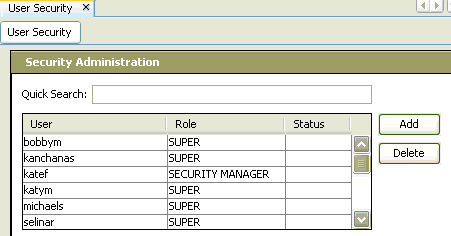
The User Security window is the gateway for managing users and their respective security roles. New users can be added and existing users can be deleted using the Add or Delete buttons. Each user can only be assigned one security role.
The Quick Search option at the top of the User Security window allows you to enter the first letter or letters to search for a particular user in the system. You can also click on the column heading (User, Role or Status) to sort the selected column alphabetically.
User Security File
Select the Add button in the User Security window. Additional fields will appear at the bottom of the window.
Enter the new user's name in the UserName field and assign a password in the Password field.
Assign a role to the new user
in the Role drop-down field.
Note: Depending on the role selected, the privileges field will be auto-populated by the system with the respective privileges. The privileges field is not editable.
Note: When using the Save All button, changes to security will be saved to the database. In addition, any panes open for configuration with changes will be saved to your local drive.
Select the user from the list of available users in the User Security window.
Select the Delete button. A pop-up window will appear asking you to confirm the delete.
Select Yes to delete the user or select No to cancel and return to the User Security window.
Copyright © 2009, 2011, Oracle and/or its affiliates. All rights reserved. Legal Notices