Writing and Editing Policy Rules for Proxies
Policy Rules are strictly ordered; that is, they take effect in the order in which they are listed. You can define them in the order in which you want them to take effect or you can reorder your policy rules after you have defined them.
To Write Policy Rules for the Proxies
-
From the Policies List page, highlight the policy you want use and click the Edit button to move to the Policy Rules page.
-
Select the Packet Filtering tab in the Policy Rules area.
Proxies are defined in the Packet Filtering page.
-
Click the Add New... button in the Packet Filtering area to display the Rule Definition dialog window for that policy.
-
In the Rule Definition dialog window, the Rule Index field is filled with the next available rule index.
-
If a rule is valid only for a particular Screen, select that Screen only in the Common Objects area; otherwise the rule is valid for all Screens.
-
Select a Service from the Type choice list:
-
ftp
-
www
-
smtp
-
telnet
-
-
Choose source and destination address that you want for the Source and Destination Address fields.
Be sure you have defined these addresses on the Policy Rules page.
-
If it is a proxy rule, select ALLOW or DENY in the Action field.
There are four entries in the Action field: ALLOW, DENY, ENCRYPT, SECURE; proxy rules can only be defined with allow or deny.
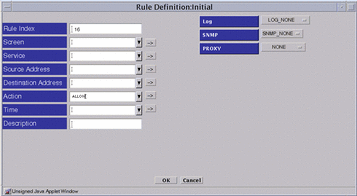
When ALLOW is chosen, three fields appear on the right side of the Rule Definition dialog window:
-
LOG
-
SNMP
-
PROXY
Figure 7-7 Rule Definition Dialog Window, Action ALLOW
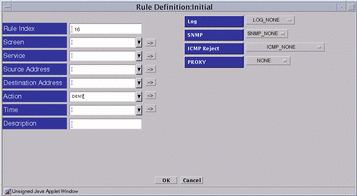
When DENY is chosen, four fields appear on the right side of the Rule Definition dialog window:
-
LOG
-
SNMP
-
ICMP Reject
-
PROXY
Figure 7-8 Rule Definition Dialog Window, Action DENY
-
-
Select the information into the LOG and SNMP fields.
There are five items in the Proxy choice list:
-
NONE
-
PROXY_HTTP
-
PROXY_FTP
-
PROXY_SMTP
-
PROXY_Telnet
Select the proxy you want to use.
-
-
Click and highlight the name of the proxy service for which you are writing this policy rule for the Service field.
If you plan to use proxies, you must select the appropriate proxy service:
Choose This Service
For This Proxy
ftp
PROXY_FTP
www
PROXY_HTTP
smtp
PROXY_SMTP
telnet
PROXY_TELNET
Optionally, if you know the name of the service that you want, you can type the first few letters of its name and that service appears in the field. You must type the first few letters exactly as the appear in the name because this feature is case sensitive.
-
Click the name of the proxy for which you are writing this policy rule to put it in the Proxy field:
PROXY_FTP
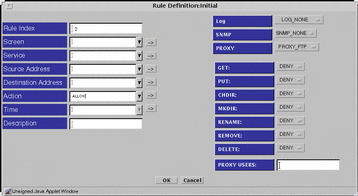
If you choose PROXY_FTP for the Proxy field, eight fields appears below the Proxy field on the right side of the Rule Definition dialog window:
-
GET
-
PUT
-
CHDIR
-
MKDIR
-
RENAME
-
REMOVE
-
DELETE
Figure 7-9 Rule Definition Dialog Window, PROXY_FTP
-
Choose an action for GET, PUT, CHDIR, MKDIR, RENAME, REMOVE, and DELETE or accept the default in the Proxy Details area.
-
Type a proxy user for the Proxy User in Proxy Details.
Be sure you have already defined the proxy user.
PROXY_Telnet
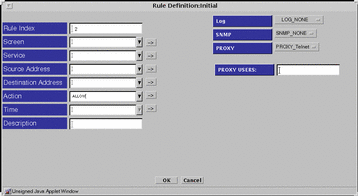
If you choose PROXY_Telnet for the Proxy field, the Proxy Users field appears below the Proxy field on the right side of the Rule Definition dialog window.
Figure 7-10 Rule Definition Dialog Window, PROXY_TELNET
PROXY_SMTP
If you choose the PROXY_SMTP for the Proxy field, the Relay field appears below the Proxy field on the right side of the Rule Definition dialog window.
Figure 7-11 Rule Definition Dialog Window, PROXY_SMTP
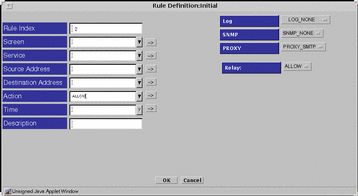
Choose whether you want to allow relaying of mail messages through the proxy in the Proxy Details area.
-
If you want to allow relaying, select the RELAY: ALLOW setting
-
If you do not want to allow the relaying, define the local domain name for the Screen or create a list of valid relay (domain) targets.
Define the Local Domain Name
Create or edit the etc/defaultdomain file, to contain the domain suffix for the Screen
Note -
You must shut down and reboot the Screen for this default domain to become active.
Create a List of Valid Relay Targets
Use the mail_relay feature of the ssadm command to create a list of valid relay (domain) targets (see the SunScreen Reference Manual manual).
PROXY_HTTP
If you chose PROXY_HTTP as the proxy, click that name to put it into the Proxy field.
Figure 7-12 Rule Definition Dialog Window, PROXY_HTTP
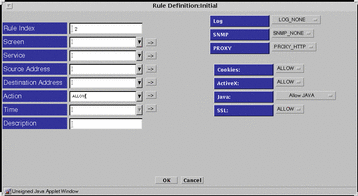
Four fields then appear below the Proxy field, on the right side of the Rule Definition dialog window. The first three fields are:
-
Cookies
-
ActiveX
-
SSL
Choose an action for Cookies, ActiveX, and SSL, or accept the default under Proxy Details.
The last field is Java. Click the button by the Java field, and choose the type of Java you will permit under Proxy Details:
- © 2010, Oracle Corporation and/or its affiliates
