Chapter 4 Routing Mode and VPN Gateway
Typically, a virtual private network (VPN) is used when a company has offices in more than one location. Usually, they want to use public networks for a secure private network, and they want to avoid the need for dedicated lines or any changes to their user applications.
Note -
You can configure a VPN gateway on a Screen in stealth mode as well as in routing mode.
Configuring a Screen to use a VPN gateway between two locations enables all packets traveling from one location to another to be encrypted and encapsulated before they are sent over the public Internetwork. The content of each packet remains private until it arrives at the remote location. Anyone capturing packets between locations will only see encrypted, unreadable packets.
A VPN enables a site to conceal the details of its network topology by encrypting the original packets (including their IP headers) and creating new IP headers using addresses specified by the VPN gateways. When these packets arrive at the remote location, the new IP headers are removed, and once decryption takes place, the original headers are restored so the packets can reach their intended destination.
Network Example
For the network example, shows a VPN set up between the San Francisco and Hong-Kong segments of the network. Looking at the diagram, an encrypted tunnel is set up between sf-screen1 and hk-screen1 to demonstrate the VPN by communicating securely between hosts sf-host1 and hk-host1 across the Internet.
Figure 4-1 San Francisco and Hong-Kong Segments of the Sample Company Network

General VPN Configuration
To configure a VPN with SunScreen requires several steps, in the following order:
-
Install the SunScreen software on all Screens that are involved in the VPN, including remote Administration Stations, as applicable.
-
Be sure each Screen is configured with its own local certificate.
For example, certificates sf-screen1.cert and hk-screen1.cert.
-
Add a certificate object to each Screen for every other Screen in the VPN.
-
Create address objects (HOST, GROUP, or RANGE) on each Screen for any address in the VPN, including an address object for each Screen as well.
-
Create policy rules under the VPN tab to define your VPN.
-
Create policy rules under the Packet Filter tab to use your VPN.
-
Save and activate your policy.
Detailed VPN Configuration
To configure VPN using SunScreen, you must complete the following steps:
-
Install the SunScreen software on Screens sf-screen1 and hk-screen1.
If these Screens were configured in routing mode with remote administration (as described in the Routing example), local certificates named sf-screen1.cert and hk-screen1.cert, respectively, were already generated.
-
Add the remote Screen's certificate object to each Screen.
-
On sf-screen1, add a certificate object for hk-screen1.cert.
-
On hk-screen1, add a certificate object for sf-screen1.cert.
For detailed information on adding certificates, see the SunScreen 3.1 Administration Guide.
-
Ensure that each Screen includes address objects for the following hosts:
-
hk-screen1
-
sf-screen1
-
hk-host1 (can be part of a group or range)
-
sf-host1 (can be part of a group or range)
For detailed information on adding address objects, see the SunScreen 3.1 Administration Guide.
-
-
-
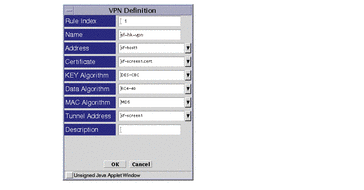
On Screen sf-screen1, under Policy Rules, click the VPN tab and add two entries (one for sf-host1 and one for hk-host1).
Figure 4-2 shows what the VPN definition window might look like when adding the entry for sf-host1.
Figure 4-2 VPN Definition Window

The name, address, certificate, and three algorithm fields are required for each entry. Notice that a tunnel address (sf-screen1) has also been specified, which enables the network topology to be concealed, and also allows the unregistered address of sf-host1 ( 10.0.1.1) to be used without it being seen on the Internet.
Once the VPN definitions have been completed for both hosts sf-host1 and hk-host1, the VPN tab, under the Policy Rules section of the administration GUI, should look like as shown in the following figure. Observe that the two entries contain the same name (sf-hk-vpn for this example).
Figure 4-3 VPN Tab, Under Policy Rules

Note -It is critical that any entries associated with a particular VPN all have the same VPN name. The VPN name is referenced again when you create the packet filtering rules, which will only accept a packet if both addresses in the IP header are associated with the same VPN.
-
To add a new rule on Screen sf-screen1, under the Policy Rules area, click the Packet Filtering tab and then the Add New button.
Complete the information as needed, and select SECURE as the action. The Action Details popup window asks you to supply a VPN. Type "sf-hk-vpn" in the VPN field, as shown in the dialog window in the following figure. This is where the hosts in the VPN are associated to the Packet Filtering rule.
Figure 4-4 Initial Rule Index Dialog Window

Note -It is recommended (at least for testing) to use an "*" for the source and destination addresses, which enables any packet that reaches this rule, and has both source and destination in the specified VPN, to be securely transported to the remote site.
-
Save and activate the policy.
-
Repeat steps 4 through 6 on Screen hk-screen1.
You can easily test the configuration by creating a SECURE packet-filtering rule that enables ICMP traffic to pass through the VPN, and then running a ping between hosts sf-host1 and hk-host1.
If you ran snoop on the network in San Francisco, Hong Kong, and out on the Internet, the results would be as follows:
Inside either the San Francisco or Hong Kong Screen:
sf-host1 -> hk-host1   ICMP Echo request
hk-host1 -> sf-host1   ICMP Echo reply
Outside the Screen on the Internet:
sf-screen1 -> hk-screen1 IP D=192.168.6.2 S=192.168.1.2 ...
hk-screen1 -> sf-screen1 IP D=192.168.1.2 S=192.168.6.2 ...
- © 2010, Oracle Corporation and/or its affiliates
