Graphical Configuration Tool
The graphical configuration tool, ews, requires Sun Java JDK 1.2 (JAVA 2) to be installed and the location of the Java virtual machine to be in your path.
To start ews and open an existing configuration file, type:
$ ews -c config-file |
The optional config-file specifies the path of the ChorusOS operating system configuration file conf/ChorusOS.xml to open at start-up.
To start ews without opening a file, type:
$ ews |
User Interface Overview
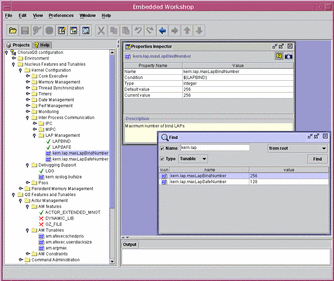
When started, ews opens a main window, containing a menu bar and toolbar at the top, a navigation tree pane on the left, and an output view pane at the bottom. The rest of the window is occupied by a Multiple Document Interface (MDI) area, which is used to display other windows, like the Properties Inspector, or the Find View (both are described later). These other windows can be resized, moved, or closed just like any other window, but are constrained within the MDI area, and cannot be moved outside.
A screenshot of ews is shown in Figure 3-1.
Figure 3-1 EWS User Interface
Navigation Pane
The navigation pane contains two tabbed windows: a Projects tab, which displays any opened configurations as a hierarchical tree, and a Help tab, which displays the online help table of contents.
Within the Project window, every element in the project view tree is represented by a small icon with a name. Right-clicking on an element brings up a floating context menu, which can be used to perform actions such as changing the element's value. Double-clicking on an element opens the main Properties Inspector window in the MDI area.
Within the Help window, selecting an entry in the table of contents will display the appropriate help page in the MDI area.
Other Windows
The Properties Inspector displays the properties of an element, such as its value and description. Some of these properties may be changed.
The Show Children View window displays the sub-element, or first-level child, of a selected element.
The Find window is used to locate an element in the project view tree. Any element can be searched for by specifying a substring of its name or its type. The search can take place from the root, on the entire tree hierarchy, or from the selected element.
Configuring a ChorusOS Operating System Image
Open a Configuration File
The first operation is to open a ChorusOS configuration file (unless the -c option was used on the command line). For this, select the Open option in the File menu. A file selection dialog appears to select the configuration file to open. The configuration to open is the conf/ChorusOS.xml file located in the configuration directory. Once opened, a new configuration item is added to the navigation tree.
Note -
More than one configuration may be opened in ews at the same time.
Browse the Configuration Tree
It is possible to browse the configuration by opening the elements in the navigation tree. There are two general kinds of elements in the tree: folders and variables. Folders are used to organize the configuration variables into hierarchical groups. A folder contains child elements that can be variables or folders. Variables are values used to configure the ChorusOS operating system image.
Disabled Elements
Some of the elements in the configuration tree may be grayed-out and cannot be edited. It is still possible to browse them, however. For example, some variables may depend on the presence of a specific feature: if this feature is not selected, and its current value is set to false, the corresponding tunables will be disabled.
Disabling of elements in the configuration is controlled by a condition. This is an optional property attached to some elements, and if the condition is evaluated to false, the element is disabled (elements without a condition property are always enabled). If a folder is disabled, all its child elements (folders and variables) are also disabled.
Invalid Elements
A configuration is invalid if there are one or more invalid elements in the configuration tree.
Configuring the Features and Tunables
The features of the ChorusOS operating system image are located in the various Features and Tunables folders. Features are expressed as boolean variables, and tunables are expressed as either integers or enumerated variables. The following properties for a tunable are visible in the Properties Inspector:
-
Name
-
Type
-
Default value
-
Current value
To change the value of a tunable parameter, edit the Current value property.
Setting a ChorusOS operating system Environment Variable
The values of the ChorusOS operating system environment variables are contained in the env variable located in the Environment folder. The env variable is a list, where each element represents an environment variable. This list may be empty for a new configuration. It is possible to add, remove or modify environment variables stored in this list.
Adding an Environment Variable
Select the env variable, right-click to display its context menu, and select New Element. The newly created variable is appended to the list (you might need to expand the list to see the new variable). Set the value of the new variable by editing its value field.
Modifying the Value of an Environment Variable
An environment variable is a structured variable containing two fields: a name and a value. The name field stores the name of the environment variable, and the value field stores the value of this environment variable. Edit the value field to change the value of the environment variable.
Deleting an Environment Variable
From the context menu of the environment variable, choose Delete.
Adding an Actor to the ChorusOS System Image
There are two stages to adding an actor to the system image:
-
Specify the new actor characteristics.
Open the Applications folder in the ChorusOS System Image Configuration folder. A newly-created System Image Configuration folder contains two templates for defining actors, one for user actors (user_actor) and one for supervisor actors (supervisor_actor). To create your actor definition, either modify or duplicate one of these templates, or choose New Actor from the context menu of the Applications folder:

A new actor called my_actor is created. Click on the handle icon to the left of the actor, or double-click on my_actor itself, to reveal a list of fields, or children:
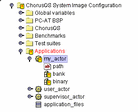
Invalid elements are indicated by an exclamation mark (!) over the icon. Your new actor is invalid because its field values are empty. Double-click on the path field to open the Properties Inspector window within the MDI:
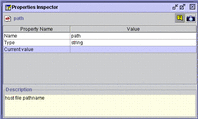
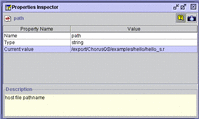
Enter the absolute pathname of your actor by double-clicking in the Value field of the Current Value property. For example:
Now double-click on the bank property to open up its Properties Inspector window, then double-click in the Value field of the Reference property. An ellipsis (...) will appear at the right hand side of the field:
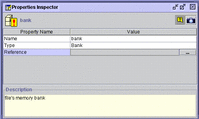
Click on the ellipsis to open the reference selecting window, Select a reference window:
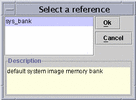
Click on the required reference, sys_bank, then click on Ok.
Now double-click on the binary property and perform similar actions to those you performed for the bank property.
-
Add the actor to the list of application files present in the system image.
The application_files list in the ChorusOS System Image Configuration folder contains references to the actors that will be present in the ChorusOS operating system image. If an actor is defined but not referenced in this list, it will not be added to the image. Add your actor to this list choosing New element from its context menu:
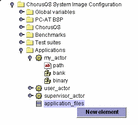
An empty element will appear:
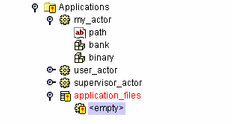
Update the element by opening it in the Properties Inspector and changing the Value field of the Reference property. Scroll down and select your newly defined actor, my_actor in this example, from the opened Select a reference window:
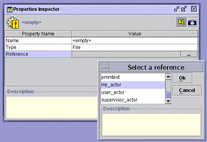
Click on Ok to complete the operation.
Note -
Drivers, defined in the BSP folder of the ChorusOS System Image Configuration folder, may be added to the system image in exactly the same way.
Saving the Modified Configuration
After a configuration has been edited, it can be saved. For this, select the ChorusOS configuration item in the navigation tree (this is the root element of a configuration), and use its context menu. It is also possible to save it using the Save option in the File menu on the main menu bar, or the Save button on the toolbar.
Note -
A modified configuration is displayed in red, as a visual warning that the file has changed.
Build the system image, as described in the next section.
Rebuilding the System Image
To rebuild the system image, select the ChorusOS configuration item in the navigation tree, and use the build item in its context menu (or the corresponding toolbar button). If the configuration file has not been saved since it was last modified, the tool will propose saving it, as the configuration needs to be saved in order to be built. If the configuration is invalid, it is not possible to build the corresponding ChorusOS operating system image.
During the build of the system image, various messages generated by the make tools are displayed in the output window.
It is possible to interrupt the build using the stop button on the toolbar. In this case, the system image is not built.
- © 2010, Oracle Corporation and/or its affiliates
