Part I Basic Application Development
This part of the book demonstrates how to start developing applications for ChorusOS systems. The example architectures discussed here have been made as generic as possible to emphasize the underlying principles. Most of the examples, discussions and presentations are independent of the target system architecture, allowing the knowledge you gain to be scalable, even if the underlying target architecture changes.
Chapter 1 ChorusOS Development Environment
This chapter describes the development environment for ChorusOS application programming. It provides the basic information required to approach the ChorusOS development environment and tools in an effective manner. It is written for application developers who have not yet developed applications for ChorusOS systems, but who have application development experience involving POSIX-compliant systems such as the Solaris operating environment.
Although designed for the ChorusOS novice, this chapter will also be helpful to experienced ChorusOS developers transitioning from an earlier version of the product to the current version.
Before reading this chapter, you may choose to review the description of the ChorusOS product provided in the ChorusOS 5.0 Features and Architecture Overview. This contains a complete overview of the ChorusOS operating system, including its advantages and peculiarities.
After reading this chapter, you will know how to begin developing applications on ChorusOS systems. This chapter does not, however, include examples that demonstrate actual development. Subsequent chapters show how to use the tools to create ChorusOS applications. Debugging of applications and systems is covered in the ChorusOS 5.0 Debugging Guide.
Note -
If you are transitioning from an earlier version of the ChorusOS operating system, it is suggested that you read the ChorusOS 5.0 Transition Guide.
Overview of the Sun Embedded Workshop Development Environment
The Sun Embedded Workshop development environment provides an environment for applications running on a network of target machines, controlled by a remote host.
-
The target system runs the ChorusOS operating system and provides the execution environment.
-
The host machine provides the development and debugging environment. You can develop applications on the host and execute and debug the applications running on the targets, from the host.
This environment is illustrated in the graphic below:
Figure 1-1 Sun Embedded Workshop Host-Target Development Environment
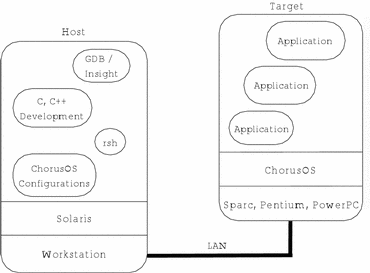
The host system is used as a platform on which the operating system is configured and applications are developed. The resultant code is then loaded and executed on the target, which runs an instance of the ChorusOS operating system.
The development environment consists of a set of host tools that enable you to produce a runtime image. This runtime image includes the system image, configuration files, system commands, and customer applications. The image can be executed on the target with varying degrees of host cooperation.
The development environment has been designed for a host and target that use different hardware. This means you can develop applications for one or more targets with different architectures on a specific platform host. Developing applications in this manner is called cross development.
For more information on the development environment refer to the section on "Multi-Platform Development Environment" in ChorusOS 5.0 Features and Architecture Overview.
Target Software Architecture
Applications written in high-level programming languages (such as C and C++) are compiled and linked for the target platform using the ChorusOS host tools. Although the resultant executable files are initially placed on the host file system, they can only be executed on the target platform.
In the context of the ChorusOS target software architecture, tools denotes a program (or a set of programs) which execute on the host. The term applications denotes a program (or set of programs) which execute on the target. Some applications are provided as built-in system commands or utilities. Others may be developed by the user.
Although applications are initially developed and stored on the host file system, they may also be located:
-
In the system image (embedded applications).
-
On local target storage (disk, flash or memory bank).
You can execute an application on the target platform in different ways, depending on the location of the application executable file.
Protocols for Communicating Between the Host and Target
Communication between the host and target is achieved using the rsh
(remote shell) protocol. The remote shell protocol is used to execute commands
remotely on the target from the host. In particular, this feature allows applications
to be loaded dynamically. If the RSH feature is set
to true, the rshd daemon enables the command interpreter
to be run in an infinite loop to read input from the remote system, using
the remote shell protocol. For more information on the rshd
daemon, refer to the rshd(1M) man page.
It is also possible to communicate with the host using the telnet protocol.
In addition, ChorusOS systems provide support for TCP and UDP (User Datagram Protocol) over IP. TCP is a high-level, reliable, connection-oriented protocol that verifies that messages sent arrive at their destinations. Messages that do not reach their destination are automatically resent. This feature of TCP relies on connections between the sender and the receiver. UDP is also a high-level protocol protocol, however, it is not as reliable as TCP because UDP sends messages without verifying that they arrive. UDP is faster and not as resource-hungry as TCP.
Both TCP and UDP sit above the lower-level IP transport protocol.
For details about the ChorusOS implementations of these protocols, see the IP(7P), TCP(7P), and UDP(7P) man pages.
Note -
Two additional communication protocols are supported on ChorusOS systems, although they are not used for communicating between the host and target.
Support for remote inter-process communication (remote IPC) is provided, by enabling you to create an IPC stack in the C_OS system actor and attach the stack to an Ethernet device. For details, see the ethIpcStackAttach(2K), IPC(5FEA), and IPC_REMOTE(5FEA) man pages.
Support for Open Systems Interconnect (OSI) is provided since you are able to attach an OSI stack to an Ethernet device. For details, see the ethOsiStackAttach(2K) man page.
Host and Target Development Tools
The Sun Embedded Workshop provides a complete development environment for creating applications or systems that use the ChorusOS operating system (or an embedded system based on the ChorusOS operating system). The Sun Embedded Workshop contains the ChorusOS operating system and development environment. For a comprehensive overview of The Sun Embedded Workshop software, refer to "Multi-Platform Development Environment" in ChorusOS 5.0 Features and Architecture Overview.
Development Environment Components
The development environment provided by the Sun Embedded Workshop includes the following major components:
-
C and C++ Development Toolchain, including the GNU gcc and g++ cross-compilers.
-
A debugging framework and a C and C++ reference debugger, GNU GDB debugger for ChorusOS systems. The current version of GDB includes the Insight graphical user interface. For more information on the ChorusOS debugging tools, refer to the ChorusOS 5.0 Debugging Guide.
-
A set of configuration tools.
-
A set of libraries, described in "ChorusOS APIs".
Configuration Tools
The ChorusOS operating system consists of modules that can be configured by providing a list of the required components. The configuration tools manage any hidden dependencies or incompatibilities.
The configuration tools are designed to be flexible enough to configure system components and application actors that are part of the ChorusOS operating system image.
You can use the Ews graphical user interface or a command-line interface (configurator) to view or modify characteristics of a ChorusOS operating system image. In addition to selecting the components required for the operating system, Sun Embedded Workshop supports three other levels of system configuration:
-
Resources. For the list of selected components, you can fix the amount of resources to be managed and set the values of tunable parameters, for example, the amount of memory reserved for network buffers.
-
Boot actors. Additional actors can be included in the memory image loaded at boot time.
-
Environment. System-wide configuration parameters can be fixed by setting environment strings, which are similar to the environment variables used in UNIX systems. The operating system and actors retrieve these environment strings when they are initialized.
Chapter 2 Getting Started
This chapter introduces the ChorusOS development environment through the creation of a basic application designed to run on ChorusOS systems. After implementing the procedures and examples in this chapter, you will have a ChorusOS system ready for initial development and a basic grasp of the tools, of the configuration and of the steps involved in application development for ChorusOS systems.
It is assumed here that your development environment meets the following requirements.
-
The host development tool chain is installed and configured on your development host.
-
You have built and booted a standard ChorusOS system image on your target hardware system.
-
You have access to the target console from your development host.
If these requirements have not yet been met, you must make sure they are satisfied before trying the examples and procedures described in this guide. Before continuing, ensure that your system administrator has set up the host and target systems for your use, or follow the instructions provided in the ChorusOS Installation Guide for basic installation, building and booting a standard ChorusOS system image, and setting up access to the target system console.
General Principles
When writing applications for ChorusOS systems, there are certain principles and conventions you should be aware of. These are described in the following sections.
Programming Conventions
The ChorusOS operating system provides a large variety of services that you can use in your applications. These services are accessed as C routines. C header files provide the required constants, types, and prototype definitions. The high modularity of the ChorusOS operating system is reflected by the numerous header files. However, in the following examples a global header file, named chorus.h, is used for simplicity. The chorus.h header file collects most of the required header files. Refer to the man pages to obtain the actual minimum header files required for each service.
Most ChorusOS operating system constants are prefixed with K_. ChorusOS operating system error codes are prefixed with with K_E.
Note -
Constants and error codes are all written in uppercase.
Most specific data types are prefixed by Kn. When type names are composed of several lexemes, the first letter of each lexeme is written in uppercase while the remaining letters are in lowercase, as in KnRgnDesc (region descriptor).
To compile and link an application, the following information must be specified in the makefile:
-
The header file directories and compilation flags.
-
The program entry point.
-
The libraries to be linked to the program according to the services used by the:
-
Application
-
Environment present on the target system
-
Actor type (user or supervisor)
-
Program Entry Point
To initialize libraries correctly before starting the execution of application code, the program entry point must be set to _start. Once the initialization of libraries is completed, _start calls the _main routine, which initializes variables in C++ programs. The main() routine is then called. The _main routine manages any double calling at program initialization.
Libraries
To determine which ChorusOS operating system libraries to use, consider the following points:
-
Which APIs (POSIX or microkernel) are to be used by the application.
-
What additional libraries are required.
-
In which address space will the application execute.
Supervisor Application Binaries
Because supervisor applications share the same supervisor address space, they are built as relocatable binaries which are linked dynamically prior to loading. Supervisor applications jump into the system to access system services, that is, they do not trap.
Note -
When programming supervisor applications, remember that no memory protection is provided between applications. A badly written supervisor application that accesses addresses outside its own address space can corrupt any supervisor region and cause unexpected behavior such as a system crash or reboot.
User Application Binaries
Although user applications use private address spaces, they are also built as relocatable binaries. This simplifies the building of supervisor and user applications. Unlike supervisor applications, user applications trap to the system to access system services.
User applications built as relocatable binaries can run in either VIRTUAL_ADDRESS_SPACE or in non-virtual address space (flat memory). If they were relocated on the host, these binaries cannot run in flat memory mode, which does not support private address spaces.
Note -
Although it is possible to relocate user applications on the host, the ChorusOS operating system provides no specific tools to achieve this.
The link address (relocatable) of the user applications and the size of the user address space are board-dependent. User applications are also linked dynamically prior to loading.
Before Starting
Before attempting any examples in this chapter, ensure that you have:
-
The JavaTM Runtime Environment (version 1.2 or above) on the host workstation.
-
Names of the host workstation, boot server, and target system.
-
Root passwords for the host workstation and boot server.
-
IP addresses of the host workstation, boot server and target system.
-
Ethernet address of the target system.
Target File System Setup
This section walks the user through building a root file system on the host, sharing the root file system through NFS, and mounting it on the target both manually and automatically at boot time.
Building the Target NFS Root
The root makefile target (located in the build directory) enables you to copy files from components into the root directory.
Because the EXAMPLES component contains binary
files that the target must see, use the make root command
to copy the binary files of the EXAMPLES component
into the root directory as follows:
host% make root
The root directory now contains the binary files
of the EXAMPLES component. You can run this component
on any target system where the root directory can be NFS
mounted.
Creating a Basic Application
When you build a standard ChorusOS sytem image on your target hardware system, a build directory is created in your work directory for each source component included in the system image. Each build directory contains the binary code for its associated component.
Note -
No directories are created for binary components.
Creating a Basic "Hello" Application
Create a src subdirectory on your host.
To create the basic "hello" application,
-
Create the following files in the src directory:
-
hello.c, this source file will say "hello" and is written as follows:
#include <stdio.h> int main() { /* Print the message */ printf("Hello World\n"); return 0; } -
Imakefile. This file provides the rules to build the application and contains the following:
UserActorTarget(hello_u,hello.o,)
SupActorTarget(hello_s, hello.o,)
The Imakefile declares:
-
The source files to be compiled (implicitly).
-
The libraries to be used (only standard libraries are used).
-
That you want to build both a user and a supervisor application called hello.
-
-
-
Use the ChorusOSMkMf command to create a make file that will build your application:
% ChorusOSMkMf build_dir
The ChorusOSMkMf command should be located in your PATH. See "Setting Environment Variables" in the ChorusOS 5.0 Installation Guide for information on how to modify your PATH.
-
Build your application:
% make
Running the Application
Use the C_INIT loading facility to run the application dynamically, as follows:
-
Copy the executable application files into the root_dir/bin directory:
% cp hello_s root_dir/bin
This step is important because the applications must be in a directory on the host that is exported to the target system.
-
Start the hello supervisor actor:
% rsh target_name /bin/hello_s
This command returns the PID of the new application.
Debugging in ChorusOS Systems
The ChorusOS operating system provides two levels of debugging:
-
System debugging
-
Application debugging
Application and system debugging are both achieved using the GDB debugger for ChorusOS systems and its graphical user interface, Insight.
The ChorusOS 5.0 Debugging Guide provides detailed information on how to debug applications and your ChorusOS system.
Chapter 3 ChorusOS Actors and Processes
This chapter defines the concepts of actors and processes as they relate to ChorusOS systems. It explains how actors relate to POSIX processes, and demonstrates the use of the application programming interfaces that enable applications to handle actors and processes.
Although actors and processes have similar functionality, they are used in different contexts and different rules apply to them. Once you have completed this chapter, you will understand how actors and processes differ, what kinds of applications you are creating, and what rules apply to your applications.
ChorusOS Application Types
Within the ChorusOS operating system environment, an application is a program or a set of programs usually written in C or C++. An application must be loaded on the ChorusOS runtime system to run. The normal unit of loading is called an actor or a process. It is loaded from a binary file located on the host machine or on a ramdisk or physical disk on the target.
Applications are loaded from binary files, which can be either absolute or relocatable. In an absolute binary, all addresses have been resolved and computed from a well-known, fixed basis that cannot be changed. A relocatable binary can be loaded or relocated at any address. Absolute binaries are executed in place in the system image and are built from standard relocatable binaries when building the system image. Absolute binaries cannot use dynamic or shared libraries.
Both user and supervisor applications can be loaded from either absolute or relocatable binary files. Common practice is to load them from relocatable files to avoid a static partitioning of the common supervisor address space, and to enable the loading of user applications into the address space in the flat memory model.
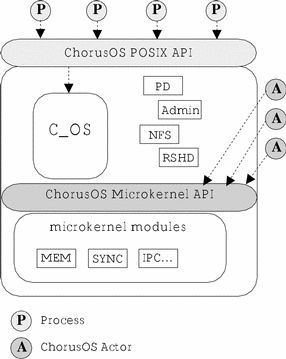
Whether an application is defined as an actor or a process is determined by the set of APIs to which the application has access. The ChorusOS APIs are discussed in detail in "ChorusOS APIs". For now, it is sufficient to know that there are two main sets of APIs:
-
POSIX APIs
-
Microkernel APIs
Applications that have access to the POSIX API are called processes while applications that have access to the Microkernel API are called actors. This distinction is illustrated in Figure 3-1.
Figure 3-1 Actors, Processes and the ChorusOS APIs
Processes
The POSIX subsystem provides a complete set of POSIX APIs that enable you to create POSIX-compatible applications. These applications are called processes. A process is the unit of encapsulation of the POSIX subsystem.
A process is identified by a local process identifier (PID). This identifier is displayed when the process is executed. The PID can be passed as a parameter of the akill command to kill a process.
A process can be defined as a ChorusOS application that uses the POSIX APIs. The C_OS, shown in Figure 3-1, manages I/O operations and provides the POSIX interface to applications. The C_OS also manages file systems, networking and shared memory. Processes have access to the complete set of POSIX APIs and extensions. Microkernel APIs must not be used by processes (except for a small number of explicit services). For more information on the APIs that can be used with processes, refer to "ChorusOS APIs".
Note -
Processes are dynamic and cannot be loaded alongside the C_OS and drivers at boot time. However, it is possible to include processes as part of the sysadm.ini file, which is used to specify system initialization commands. For more information, see "System Administration in the Extended Profile" in ChorusOS 5.0 System Administrator's Guide
ChorusOS Actors
An actor is the unit of encapsulation of resources with regard to the ChorusOS microkernel.
Actors are linked only with the microkernel libraries and are completely unknown to the C_OS. A process can load or run a microkernel actor dynamically using the POSIX-like afexec() microkernel service.
For more information on loading actors, see "Spawning an Actor".
An actor can be embedded, which means that it becomes part of the system image. However, actors are not necessarily embedded and can be located on a separate disk or file system. Embedded actors can be bootable, which means that they are executed as the ChorusOS system is booted. Embedded actors that are not boot actors can be loaded by other embedded actors using the afexec() system call.
Actors cannot access POSIX services. If microkernel services and POSIX services are used together in the same application, the behaviour of the application is unpredictable and can even cause the system to crash.
An actor is represented by its capability (KnCap),
which is allocated by the microkernel.
Typically, drivers are embedded actors, however drivers do not require the services of the POSIX subsystem and can be started dynamically through the afexec() system call.
Commonalities Between Processes and Actors
Processes and actors are similar in many ways. In most instances, the same functionality is available to both actors and processes. However, different system calls are required to obtain this functionality.
A process can be defined as an actor that uses the services of the POSIX API. Therefore, all processes are actors and have a capability KnCap. The reverse is not true, that is, not all actors are necessarily processes.
Processes are linked to the os/lib/libc.a library. Actors such as drivers should never be linked to the os/lib/libc.a library and therefore cannot be processes.
The rsh targetname aps command enables a list of all processes running on a target to be displayed.
Note -
To the microkernel, all entities running on the system (both actors and processes) are actors.
Actor and Process Identification
Every actor, whether it is a boot actor or a dynamically
loaded actor, is uniquely identified by an actor capability (KnCap). When several ChorusOS operating systems are functioning over
a network in a distributed system, these capabilities are always unique through
space and time. An actor may identify itself with the predefined capability:
K_MYACTOR
The microkernel attributes a capability (KnCap) to
each actor. A process is also identified by a local process identifier (PID).
This identifier is displayed when the process is executed manually.
User and Supervisor Processes and Actors
Applications are classified as either supervisor or user applications. This classification is called the privilege of the application. User applications have separate and protected address spaces so that they cannot overwrite each other's address spaces. Supervisor applications use a common (but partitioned) address space. Depending on the underlying hardware, a supervisor application can execute privileged hardware instructions (such as initiating I/O), while a user application cannot.
The ChorusOS operating system offers a method to determine dynamically whether an application is currently running as a user or supervisor process or actor. The example below demonstrates how to find the privilege of an actor. The same call can be used to find the privilege of a process.
#include <chorus.h>
int actorPrivilege (	KnCap*					actorCap,
  						 	KnActorPrivilege*		old,
								KnActorPrivilege*		new);
In the previous example, if actorCap is set to the name of an actor, you can use this API to obtain the privilege of the named actor. If actorCap is set to the predefined value K_MYACTOR, you can obtain the privilege of the current actor. If the actor is a privileged (supervisor or system) actor, this call can also be used to change the privilege of an actor dynamically from user to system or vice versa.
The following example illustrates the use of the actorPrivilege(2K) service. It is a small program that retrieves its privilege without trying to modify it. The program prints one message if the actor is running as a user actor, and another if it is running as a supervisor actor.
KnActorPrivilege is the type defined by the ChorusOS operating system to handle the type of an actor. The defined values for the actor type are:
-
K_SUPACTOR: a supervisor actor running in the supervisor address space that can access all privileged microkernel calls.
-
K_SYSTEMACTOR: a trusted user actor, launched at boot time by the microkernel and running in its own user address space. This actor can access certain privileged microkernel calls. A system actor can also be launched using rsh with the -T option (where -T indicates trusted).
-
K_USERACTOR: a user actor running in its own user space. It has fewer privileges than K_SYSTEMACTOR.
Example 3-1 Getting Actor Privilege
#include <stdio.h>
#include <chorus.h>
int main(int argc, char** argv, char** envp)
{
   KnActorPrivilege    actorP;
   int                 res;
       /* Get actor's privilege */
   res = actorPrivilege(K_MYACTOR, &actorP, NULL);
   if (res != K_OK) {
      printf("Cannot get the privilege of the actor, error %d\n", res);
      exit(1);
   }
   if (actorP == K_SUPACTOR) {
      printf("This actor is running as a supervisor actor\n");
   } else {
      printf("This actor is running as a user/system actor\n");
   }
   exit(0);
}
Execution Environment of Actors and Processes
Actors have a different execution environment depending on whether they are loaded dynamically or at boot time. Processes have the same execution environment because they are always loaded dynamically.
An actor loaded at boot time has no arguments or environment. Consequently, argc is set to 0, and argv and argp are null pointers. If an actor loaded at boot time is linked with the embedded library, it can perform basic I/O operations such as printing traces on the system console using the printf() C library routine. It can also read characters entered at the keyboard through scanf() and similar C library routines. If the actor is linked with the libc.a library, it must open /dev/console three times to activate stdin, stdout, or stderr (to enable the printf() and scanf() operations).
The main thread of an actor loaded at boot time belongs to the SCHED_FIFO scheduling policy (see "Setting Scheduling Attributes") . The main thread has an arbitrary priority depending on the rank of the actor within the system image. The size of the stack provided to the main thread of this type of actor is defined by a system-wide tunable parameter.
Start a dynamically loaded actor or processes as a regular C application with arguments and an environment:
int main(int argc, char** argv, char** envp)
 {
         /* Main routine of a dynamically loaded application */
         /* regardless of whether the application is a user  */
         /* or supervisor process/actor.                     */
 }
The standard I/O and error files of a dynamically loaded actor or process may be redirected so that the I/O operations performed by this application occur either on the system console, a regular file (accessed through NFS), or a terminal window of the host system. The main thread of a dynamically loaded application has its scheduling policy, priority, and stack size set according to system-wide tunable parameters.
Application Context
The context of an application depends on how the system is configured. A process has a file context similar to the file context of a UNIX process; it has a root directory as well as a current directory. It can also create, open, close, read and write files or sockets.
A process runs on behalf of a user who is identified by a credentials structure. The process credentials include:
-
the identifier of the user (
uid) -
the identifier of the user group (
gid) -
a list (possibly empty) of identifiers of supplementary groups
The process credentials are specified in the data structure cx_cred_t, which includes the following members:
uid_t           cr_uid;       /* process's user ID */
gid_t           cr_gid;       /* process's group ID */
unsigned short  cr_ngroups;   /* number of groups in cr_groups */
gid_t           cr_groups[];  /* supplementary group list */
Note -
The ChorusOS operating system concept of credentials is simpler than the UNIX one. The ChorusOS operating system does not differentiate between real or effective user and group identification because it is not supported.
These process credentials are used for file access and also when the ChorusOS operating system runs in secure mode to check the validity of an operation. For example, in secure mode only the superuser, whose user identifier is 0, can load supervisor actors.
Standard I/O
A process can take advantage of the entire C library for dealing with I/O. In addition to the I/O interface provided by the C library, a process may also use POSIX I/O services such as open(), read(), or write(), as well as POSIX socket services such as socket(), bind(), and connect().
The following program can be run as a process and illustrates the way in which the C library can be used from a process.
Example 3-2 Using the C Library from a Process
#include <stdio.h>
#include <stdlib.h>
#include <chorus.h>
#define  BUF_SIZE 80
struct stat st;
int main(int argc, char** argv, char** envp)
{
   FILE* file;
   FILE* filew;
   char* buf;
   int res;
   if (argc != 2 && argc != 3) {
      fprintf(stderr, "Usage: %s filename\n", argv[0]);
      exit(1);
   }
   file = fopen(argv[1], "r");
   if (file == NULL) {
      fprintf(stderr, "Cannot open file %s\n", argv[1]);
      exit(1);
   }
   res = stat(argv[1], &st);
   if (res < 0) {
      fprintf(stderr, "Cannot stat file\n");
      exit(1);
   }
   printf("File size is %d mode 0x%x\n", st.st_size, st.st_mode);
   buf = (char*) malloc(BUF_SIZE);
   if (buf == NULL) {
      fprintf(stderr, "Cannot allocate buffer\n");
      exit(1);
   }
   bzero(buf, BUF_SIZE);
   res = read(fileno(file), buf, 80);
   if (res == -1) {
      fprintf(stderr, "Cannot read file\n");
      exit(1);
   }
   printf("%s\n", buf);
   if (argv[2] != NULL) {
      filew = fopen(argv[2], "w");
      if (filew == NULL) {
         fprintf(stderr, "Cannot open file %s\n", argv[2]);
         exit(1);
      }
      printf("Type any input you like: \n");
      do {
         scanf("%80s", buf);
         printf("buf=%s\n", buf);
         fprintf(filew, "%s", buf);
         printf("buf=%s\n", buf);
      } while (buf[0] != 'Q');
   }
   exit(0);
}
Note -
Referencing argv[0] without checking if argc is greater than zero can cause the process to incur an exception and be deleted.
Allocating Memory
In any C program, memory can be dynamically allocated by means of the malloc() C library routine within actors and processes. It makes no difference whether the actors or process are loaded at boot time or dynamically, or whether they are running as user or supervisor applications.
Terminating an Application
You can terminate an application by invoking the exit() routine, as with any typical C program. Invoking exit() ensures that all resources used by the application are freed. I/O buffers are flushed, all open files are closed, and other system resources provided by features configured within the system are automatically released.
Spawning a Process or Actor
Processes can be spawned using the posix_spawn system call. Actors can also be spawned using the afexec system call.
Note -
Processes can also be launched using the fork() and exec() system calls. For more information, see the fork(2POSIX) and exec(3POSIX) man pages.
Spawning a Process
A process can spawn another process dynamically using the posix_spawn() or posix_spawnp() function. This spawned process can be either a supervisor or a user process.
Example 3-3 creates a new process. The spawned process executes a binary file stored in the file named path. Note that the example uses posix_spawnp() and not posix_spawn(). The posix_spawnp() function searches for the binary file in all directories specified by the PATH environment variable. If you use posix_spawn() instead, you must specify the full path to the binary file.
The main thread of this process runs the main routine of the program. This thread has the same scheduling attributes and stack size as an embedded actor loaded manually.
argv and spawnedEnv are pointers to the array of arguments and environments that are received by the newly created process.
If successful, all posix_spawn() and posix_spawnp() routines return 0. Otherwise, they return an error code.
Note -
The value of errno is unspecified.
In the example:
-
A user process spawns another user process, running the same executable file.
-
Both print a trace and terminate.
-
The parent process is distinguished from the one it spawns by the number of arguments; the parent process has no argument but spawns the child process and passes it a string as its first argument. This string is printed by the child process.
-
The parent process prints the process identifier (PID) of the child process.
Example 3-3 Spawning a Process
#include <stdlib.h>
#include <stdio.h>
#include <errno.h>
#include <span.h>
#include <string.h>

char*   spawnedArgs[3];
char*   spawnedEnv[1];
char*   tagPtr = "Welcome newly created process!";

int main(int argc, char* argv[])
{
  int          res;
  pid_t        pid;

  if (argc == 1) {
        /*
         * This is the first process (or spawning process):
         *   Binary file used to load this process is passed
         *   as argv[0],
         *
         *   Set an argument in order to enable the second
         *   process to know it is the second one.
         */
    spawnedArgs[0] = argv[0];
    spawnedArgs[1] = tagPtr;
    spawnedArgs[2] = NULL;
    spawnedEnv[0] = NULL;
    res = posix_spawnp(&pid, spawnedArgs[0], NULL,
          NULL, spawnedArgs, spawnedEnv);
    if (res != 0) {
      printf("Cannot spawn second process, error %d\n", res);
      exit(1);
    }
    printf("I successfully created a process whose pid is %d\n", pid);
  } else {
        /*
         * This is the spawned process:
         *   Check the number of args,
         *   Print args,
         *   Exit
         */
    if ((argc == 2) && (strcmp(tagPtr, argv[1]) == 0)) {
            /*
             * This is really the spawned process.
             */
        printf("My spawning process passed me this argument: %s\n",
               argv[1]);
    } else {
        printf("You ran %s with an argument. Do not!\n", argv[0]);
        exit(1);
    }
  }
  exit(0);
}
Spawning an Actor
The ChorusOS operating system enables an actor to spawn another actor dynamically from a binary file. This spawned actor may be either a supervisor or a user actor. This service is similar to the exec() UNIX system call:
#include <cx/afexec.h>
int afexecve (const char* path,
              KnCap* actorCap,
              const AcParam* param,
              char* const* argv,
              char* const* envp);
This service creates a new actor whose capability is returned by the system at the location pointed to by the actorCap argument. The actor created executes the binary file stored in the file named path. If the file named path does not exist, afexec() will attempt to find path.gz. The main thread of this actor runs the main routine of the program. This thread has the same scheduling attributes and stack size as an actor loaded using the arun command.
argv and envp are pointers to the array of arguments and environments that will be received by the newly created actor.
There are several variants of the afexec(2K) service that are similar to the UNIX exec() call variants. If successful, all afexec(2K) routines return the actor identifier of the newly created actor. Otherwise, they return -1, and the error code is returned in the errno variable.
In most instances, you do not need to use the afexec(2K) service. Instead, simply execute the actor manually, or include the actor as part of the system image. However, for convenience, some examples within this chapter do use this service.
The following example illustrates the use of the afexecve(2K) service call. In this example:
-
A user actor spawns another user actor, running the same executable file.
-
They both print a trace and terminate.
-
The parent actor is distinguished from the one it spawns by the number of arguments; the parent actor has no argument but spawns the child actor, passing it a string as its first argument. This string is printed by the child actor.
-
The parent actor prints the actor identifier of the child actor.
Note -
This example assumes that argv[0] is valid, and that the actor is linked with the os/lib/libc.a library because the library is common to both user and supervisor actors. Referencing argv[0] without checking if argc is greater than zero can cause the actor to create an exception and be deleted.
Example 3-4 Spawning an Actor
#include <stdio.h>
#include <stdlib.h>
#include <string.h>
#include <errno.h>
#include <cx/afexec.h>
AcParam param;
char* spawnedArgs[3];
char* tagPtr = "Welcome newly created actor!";
int main(int argc, char** argv, char**envp)
{
KnCap spawnedCap;
int res;
if (argc == 1) {
/*
* This is the first actor (or spawning actor):
* Binary file used to load this actor is passed
* by "arun" as argv[0],
*
* Set an argument in order to enable the second
* actor to know it is the second one.
*/
param.acFlags = AFX_ANY_SPACE;
spawnedArgs[0] = argv[0];
spawnedArgs[1] = tagPtr;
spawnedArgs[2] = NULL;
/*
* Other fields are implicitly set to NULL, as
* param is allocated within the bss of the program.
*/
res = afexecve(argv[0], &spawnedCap, ¶m, spawnedArgs, envp);
if (res == -1) {
printf("Cannot spawn second actor, error %d\n", errno);
exit(1);
}
printf("I succeeded creating actor whose pid is %d\n", res);
} else {
/*
* This is the spawned actor:
* Check the number of args,
* Print args,
* Exit
*/
if ((argc == 2) && (strcmp(tagPtr, argv[1]) == 0)) {
/*
* This is really the spawned actor.
*/
printf("My spawning actor passed me this argument: %s\n", argv[1]);
} else {
printf("You ran %s with an argument, you should not!\n", argv[0]);
exit(1);
}
}
return 0;
}
-
A null AcParam argument instructs the system to use default values for afexec(2K) calls.
-
The acFlags field indicates, among other possibilities, whether the actor should be created as a user actor (when the flag is set to AFX_USER_SPACE), or as a supervisor actor (when the flag is set to AFX_SUPERVISOR_SPACE). These values are mutually exclusive - only one of the two values can be set. In addition, ensure that the value of the flag is consistent with the binary file used to load the actor. Attempting to create a supervisor actor with a binary file prepared for a user actor, by linking with the user libraries, will result in an error.
The AFX_ANY_SPACE option can be passed to instruct the operating system to retrieve the binary file privilege and create an actor that has the same privilege.
-
Unused fields of the AcParam argument must be set to 0.
Deleting Actors and Processes
An actor that does not require the services of the C_OS, and created with actorCreate(), can be deleted using the actorDelete() call, (provided you have the actor capability).
void main()
{
    KnActorPrivilege   actPriv;
    KnCap              actCap;
    int                err;

    actPriv = K_SUPACTOR;

    err = actorCreate(K_MYACTOR, &actCap;, actPriv, K_STOPPED);
    if (err != K_EOK) {
        printf("actorCreate %d\n", err);
    }
    err = actorDelete(&actCap;);
    if (err != K_EOK) {
        printf("actorDelete %d\n", err);
    }
}
Processes can be deleted using the standard POSIX call kill(). See the kill(2POSIX) man page for more information.
Process and Actor Commands
The following examples demonstrate the basic commands you can use with either processes or actors:
Launching a Process or Actor Using arun
An embedded actor is launched at boot time. A standard actor or process can be loaded manually from the host, using rsh.
To launch a process or actor with specific options, use the arun command:
% rsh targetname arun -k processname |
To launch a process or actor without runtime options, enter the application name at the command line.
% rsh targetname processname |
or
% rsh targetname actorname |
Listing Processes Using aps
Use the aps command to list all processes running on a target. This command displays the following information for each process:
-
User ID (UID)
-
Process ID (PID)
-
Process name (NAME)
-
Debugging status (DBG)
-
Process status (STAT)
-
Group ID (GROUP)
% rsh targetname aps UID PID NAME DBG STAT GROUP 0 12 MY_PROG 0 SRUN 0 0 3 HR_CTRL 0 SRUN 0 0 2 C_INIT 0 SRUN 0 0 1 init 0 SRUN 0 0 0 unused 0 SRUN 0 |
For more information, refer to the aps(1M) man page.
Killing Processes Using akill
Use the akill command to kill a process, passing the PID as a parameter:
% rsh targetname akill pid |
The previous example showed a process called MY_PROG with a pid of 12 running on the target. To kill this process, you would type the following:
% rsh targetname akill 12 |
For more information, refer to the akill(1M) man page.
Note -
The ChorusOS operating system does not provide a command to terminate an actor. Actors cannot be terminated using the akill command. They can be terminated using the akill(2K) or the actorDelete(2K) system calls.
Chapter 4 Building Makefiles and Configuring the System Image
This chapter describes the tools used to define what a ChorusOS system image contains. It also demonstrates how to include an application in a ChorusOS system image causing the application to execute when the system boots. After implementing the examples in this chapter, you will have a basic understanding of how to include an application in a ChorusOS system image using the tools provided.
Building Makefiles with ChorusOSMkMf
ChorusOSMkMf is a host utility that enables the creation of a Makefile from an Imakefile for an application. ChorusOSMkMf uses imake to generate the Makefile from a project template, a set of cpp macros, and the application's Imakefile. In most cases, an Imakefile contains three things:
-
A list of source files
-
Macros that specify the global compilation rules
-
Macros that specify how to build the target
The following procedure shows how ChorusOSMkMf is used in the development life cycle. The application in this procedure is composed of a single C source file, for example, myprog.c in the directory myprog.
Using ChorusOSMkMf
Writing an Imakefile is straightforward.
-
Set the SRCS variable to the list of source files.
In this example there is only one:
SRCS = myprog.c
-
Specify how to build the executable.
The macro required depends on the type of binary you want. To build a user-mode binary (for example myprog_u), use the UserActorTarget() macro, as illustrated in the following example. The first argument is the name of the executable. The second argument lists the object files. The third argument enables you to specify which libraries your program depends on. In the following example there is no library, therefore, there is an empty argument (you could also pass a NullParameter).
UserActorTarget(myprog_u,myprog.o,)
To build a supervisor-mode binary (for example, myprog_s.r), use the SupActorTarget() macro as follows. The arguments are the same as for UserActorTarget().
SupActorTarget(myprog_s.r,myprog.o,)
-
Use the Depend() macro to generate the Makefile dependencies.
Depend($(SRCS))
The complete Imakefile is as follows:
SRCS = myprog.c
UserActorTarget(myprog_u,myprog.o,)
SupActorTarget(myprog_s.r,myprog.o,)
Depend($(SRCS))
-
Generate the Makefile with the ChorusOSMkMf() tool.
In the myprog directory, type:
% ChorusOSMkMf <build_dir>
Where build_dir is the directory where the ChorusOS system was built and from which the application will run.
-
Generate the make dependencies.
To do this, type:
% make depend
-
Compile and link the program.
To do this type:
% make
The program is now ready to be executed.
ChorusOS Configuration Files
The ChorusOS operating system configuration is defined in a number of XML based configuration files. There are several levels of configuration files, all of which are located in the conf directory. These configuration files are used to build the system image.
For more information on the configuration files refer to "Configuring and Tuning" in the ChorusOS 5.0 System Administrator's Guide.
The ChorusOS System Image
The ChorusOS operating system is started from a bootable file called the system image which is loaded in memory either by a hardware or primary boot, depending on the hardware. This bootable file contains the image of the system to be run on the target machine.
The system image contains a configured version of the ChorusOS operating system, and possibly some user-defined applications (actors).
Depending on its configuration options, the ChorusOS operating system is made up of a microkernel and a collection of actors. The actors contribute to the implementation of some ChorusOS operating system features and are known as ChorusOS operating system actors.
Configuration options relating to system image components deal mainly with the inclusion of system and application actors within system images.
For more information on target configuration, refer to "Configuring and Tuning" in the ChorusOS 5.0 System Administrator's Guide.
ChorusOS Configuration Tools
The ChorusOS configuration tools enable you to configure the ChorusOS operating system. The tools also enable configuration of system components (OS) and actors that may be part of the ChorusOS operating system image.
There are two methods of viewing and modifying the characteristics of a system image:
-
Ews - graphical interface
-
Configurator - command-line interface
The examples in this chapter use Ews to add applications to the system image. For more information on the configuration tools, see "Configuration Tools" in the ChorusOS 5.0 System Administrator's Guide.
Using Ews
The graphical configuration tool, Ews, requires Sun Java JDK 1.2 (JAVA 2) or higher to be installed, and the location of the Java virtual machine to be set in your path. For a complete description of Ews, refer to "Configuration Tools" in the ChorusOS 5.0 System Administrator's Guide.
To start Ews and open an existing configuration file, type:
$ews -c <path>/ChorusOS.xml |
The optional config-file specifies the path of the ChorusOS operating system configuration file conf/ChorusOS.xml to open when starting.
To start ews without opening a file, simply type:
$ ews |
Adding an Application to the System Image
An application may be loaded either at system boot time or dynamically.
Adding a Boot Actor With Ews
The ChorusOS configuration tools enable configuration of the system image with user provided actors (which may be user or supervisor actors). After the system has initialized, it starts the actors automatically and creates a main thread for each of them. These actors are often referred to as boot actors.
There are two stages in adding a boot actor to the system image:
-
Specify the characteristics of the new actor.
Open the Applications folder in the ChorusOS System Image Configuration folder. A newly-created System Image Configuration folder contains two templates for defining actors, one for user actors (user_actor), and one for supervisor actors (supervisor_actor). To create your actor definition, either modify or duplicate one of these templates, or choose New Actor from the context menu of the Applications folder:
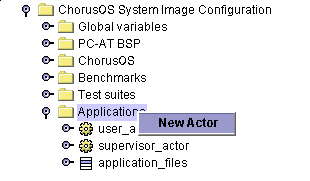
A new actor called my_actor is created. Click on the handle icon to the left of the actor, or double-click on my_actor itself, to reveal a list of fields or children:
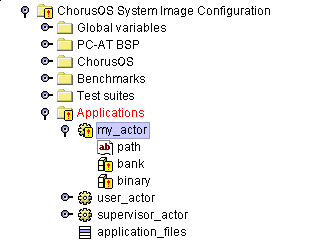
Invalid elements are indicated by an exclamation mark (!) on top of the icon. The new actor is invalid because its field values are empty. Double-click on the path field to open the Properties Inspector window within the Multiple Document Interface (MDI):
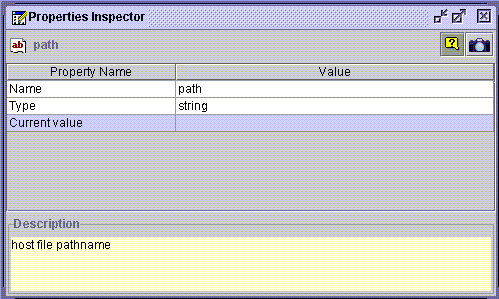
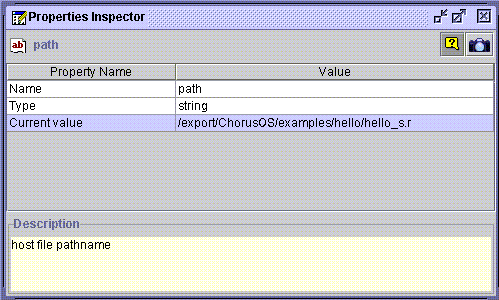
Enter the absolute pathname of the actor by double-clicking in the Value field of the Current Value property. For example:
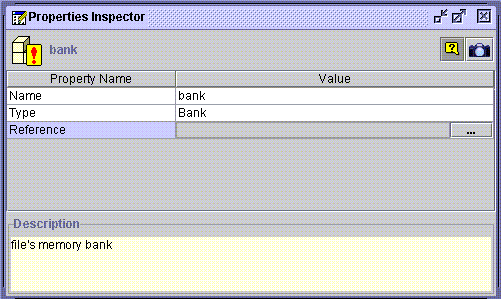
Now, double-click on the bank property to open up its Properties Inspector window, then double-click in the Value field of the Reference property. An ellipsis (...) is displayed in the right of the field:
Click on the ellipsis to open the reference selecting window, Select a reference window:
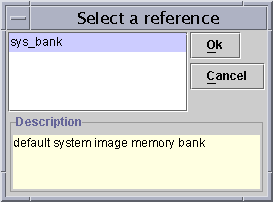
Click on the required reference, sys_bank, then click Ok.
Now, double-click on the binary property and perform the same actions as those performed when setting the bank property.
-
Add the actor to the list of application files present in the system image.
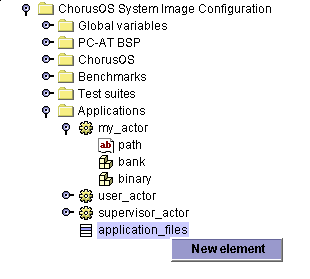
The application_files list in the ChorusOS System Image Configuration folder contains references to the actors that will be present in the ChorusOS operating system image. If an actor is defined but not referenced in this list, it will not be added to the image. Add your actor to this list by choosing New element from its context menu:
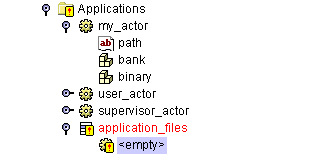
An empty element is displayed:
Update the new element by opening it in the Properties Inspector and changing the Value field of the Reference property. Scroll down and select your newly defined actor (my_actor in this example), from the opened Select a reference window:
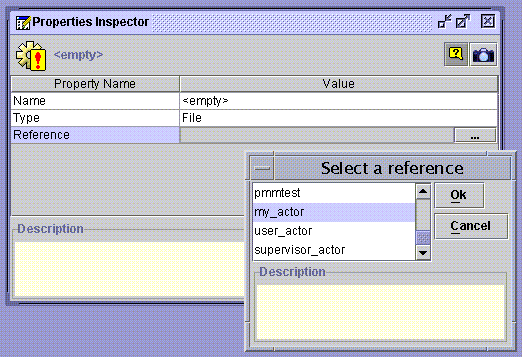
Click Ok to complete the operation.
Note -
Applications that are device drives can be added using the same method.
After a configuration has been edited it must be saved. To do this, select the ChorusOS configuration item from the navigation tree (the root element of a configuration), and use its context menu. It is also possible to save the configuration using the Save option in the File menu on the main menu bar, or the Save button on the toolbar.
Note -
A modified configuration that is displayed in red indicates the file has been changed.
The new actor has now been added and you are ready to rebuild the system image.
Rebuilding the System Image
To rebuild the system image, select the ChorusOS configuration item in the navigation tree, and use the build item from the context menu (or corresponding toolbar button). If the configuration file has not been saved since it was last modified, the tool will prompt you to save it because the configuration cannot be built unless the file has been saved. If the configuration is invalid, it is not possible to build the corresponding ChorusOS operating system image.
During the build of the system image, messages generated by the make tools are displayed in the output window.
To interrupt the build use the stop button on the toolbar. In this case, the system image is not built.
Adding a Non-Boot Application
Not all applications included in the system image need to start at boot time.
The ChorusOS operating system is able to load binary files dynamically from a host system acting as an NFS server, from a local disk, or from the system image (/image/sys_bank). This host-target environment enables you to load supervisor and user actors using a basic remote shell mechanism.
To execute an application called hello on the target host moon, launch the application as follows:
% rsh moon hello |
- © 2010, Oracle Corporation and/or its affiliates
