Installing the Terminal Concentrator
This section describes the procedure for installing the terminal concentrator hardware and for connecting cables from the terminal concentrator to the administrative console and to the cluster nodes.
 How to Install the Terminal Concentrator in a Cabinet
This procedure provides step-by-step instructions for rack-mounting the terminal concentrator in a cabinet. For convenience, you can rack-mount the terminal concentrator even if your cluster does not contain rack-mounted nodes.
-
To rack-mount your terminal concentrator, go to the first step of the following procedure.
-
If you do not want to rack-mount your terminal concentrator, place the terminal concentrator in its standalone location, connect the unit power cord into a utility outlet, and go to How to Connect the Terminal Concentrator.
-
Install the terminal concentrator bracket hinge onto the primary cabinet:
-
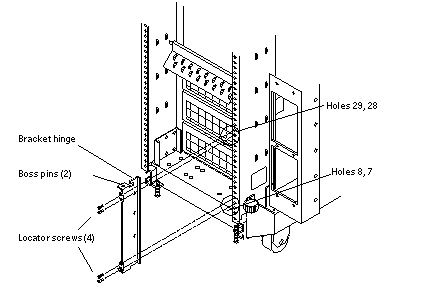
Locate the bracket hinge portion of the terminal concentrator bracket assembly (see Figure 2–1).
-
Loosely install two locator screws in the right-side rail of the rear of the cabinet.
Thread the screws into holes 8 and 29, as shown in Figure 2–1. The locator screws accept the slotted holes in the hinge piece.
-
Place the slotted holes of the hinge over the locator screws, and let the hinge drop into place.
-
Install the screws into holes 7 and 28.
Tighten these screws, and the screws in holes 8 and 29, as shown in Figure 2–1.
Figure 2–1 Installing the Terminal Concentrator Bracket Hinge to the Cabinet
-
-
Install the terminal concentrator into the bracket.
-
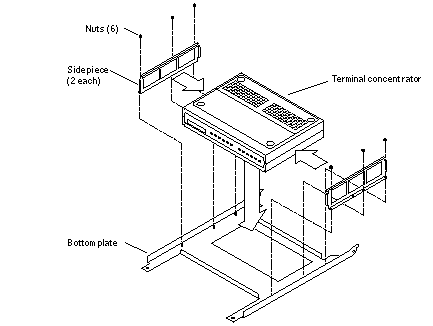
Place the side pieces of the bracket against the terminal concentrator, as shown in Figure 2–2.
-
Lower the terminal concentrator (with side pieces) onto the bottom plate, aligning the holes in the side pieces with the threaded studs on the bottom plate.
-
Install and tighten three nuts on the three threaded studs that penetrate through each side plate.
Figure 2–2 Installing the Terminal Concentrator Into the Bracket
-
-
Install the terminal concentrator bracket onto the bracket hinge that is already installed on the cabinet.
-
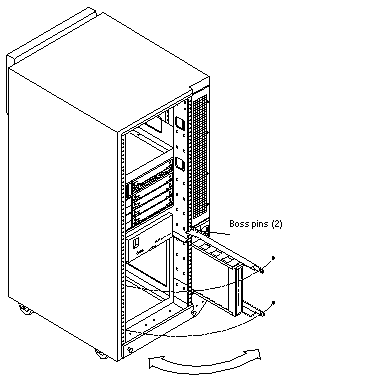
Turn the terminal concentrator bracket on its side so the hinge holes and cable connectors face toward the bracket hinge (see Figure 2–3).
-
Align the bracket holes with the boss pins on the bracket hinge and install the bracket onto the hinge.
-
Install the keeper screw in the shorter boss pin to ensure the assembly cannot be accidentally knocked off the hinge.
Figure 2–3 Terminal Concentrator Bracket Installed on the Hinge
-
-
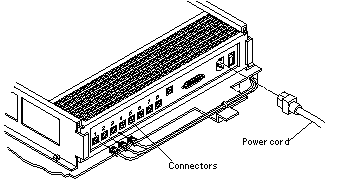
Connect one end of the power cord to the terminal concentrator, as shown in Figure 2–4. Connect the other end of the power cord to the power distribution unit.
Figure 2–4 Terminal Concentrator Cable Connector Locations
See Also
To cable the terminal concentrator, go to How to Connect the Terminal Concentrator.
 How to Connect the Terminal Concentrator
-
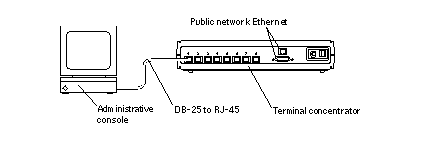
Connect a DB-25 to RJ-45 serial cable (part number 530-2152-01 or 530-2151-01) from serial port A on the administrative console to serial port 1 on the terminal concentrator, as shown in Figure 2–5.
This cable connection from the administrative console enables you to configure the terminal concentrator. You can remove this connection after you set up the terminal concentrator.
Figure 2–5 Connecting the Administrative Console
-
Connect the cluster nodes to the terminal concentrator by using serial cables.
The cable connections from the concentrator to the nodes enable you to access the ok prompt or OpenBootTM PROM (OBP) mode by using the Cluster Console windows from the Cluster Control Panel (CCP). For more information on how to use the CCP, see your Sun Cluster system administration documentation.
-
Connect the public network Ethernet cable to the appropriate connector on the terminal concentrator.
Note –The terminal concentrator requires a 10-Mbit/sec Ethernet connection.
-
Close the terminal concentrator bracket, and install screws in holes 8 and 29 on the left-side rear rail of the cabinet (see Figure 2–3).
Next Steps
- © 2010, Oracle Corporation and/or its affiliates
