Create a Service Using GDS in the SunPlex Agent Builder
Creating a Service Using GDS in the Agent Builder
-
Start the SunPlex Agent Builder.
# /usr/cluster/bin/scdsbuilder
-
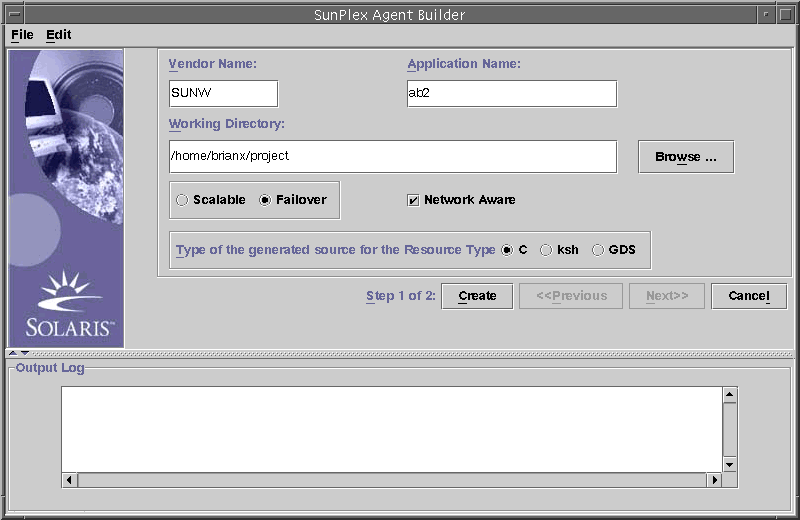
The SunPlex Agent Builder panel appears.

-
Enter the Vendor Name.
-
Enter the Application Name.
Note –The combination of Vendor and Application Name may not contain more than nine characters. It is used as the name of the package for the driving scripts.
-
Go to the working directory.
You can use the Browse pulldown to select the directory rather than typing the path.
-
Select whether the data service is scalable or failover.
You do not need to select Network Aware since that is the default when creating the GDS.
-
Select GDS.
-
Click the Create button to create the driving scripts.
-
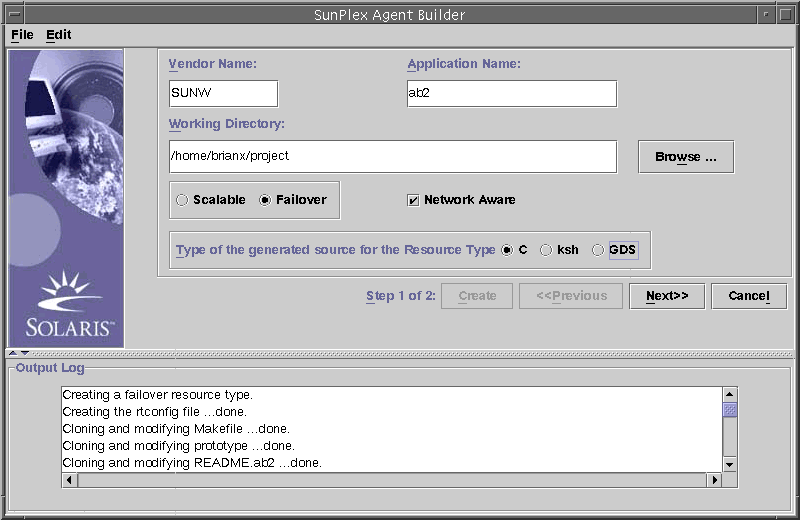
The SunPlex Agent Builder panel displays the results of the creation of the service. The Create button is grayed out and you can now use the Next button.

Configuring the Driving Scripts
After creating the driving scripts, you need to use the SunPlex Agent Builder to configure the new service.
-
Click the Next button and the configuration panel appears.
-
Either enter the location of the Start command or use the browse button to locate the Start command.
-
(Optional) Enter the Stop command or use the browse button to locate the Stop command.
-
(Optional) Enter the Probe command or use the browse button to locate the Probe command.
-
(Optional) Specify the timeout values for the Start, Stop, and Probe commands.
-
Click Configure to start the configuration of the driving scripts.
Note –The package name will consist of a concatenation of the Vendor Name and Application Name.
A package for driving scripts will be created and placed in:
For example, /export/wdir/NETapp/pkg
<working-dir>/<vendor_name><application>/pkg
-
Install the completed package on all nodes of the cluster.
# cd /export/wdir/NETapp/pkg
# pkgadd -d . NETapp
-
The following files will be installed during the pkgadd:
/opt/NETapp
/opt/NETapp/README.app
/opt/NETapp/man
/opt/NETapp/man/man1m
/opt/NETapp/man/man1m/removeapp.1m
/opt/NETapp/man/man1m/startapp.1m
/opt/NETapp/man/man1m/stopapp.1m
/opt/NETapp/man/man1m/app_config.1m
/opt/NETapp/util
/opt/NETapp/util/removeapp
/opt/NETapp/util/startapp
/opt/NETapp/util/stopapp
/opt/NETapp/util/app_config
Note –The man pages and script names will correspond to the Application Name you entered above preceded by the script name; for example, startapp.
To view the man pages, you need to specify the path to the man page. For example, to view the startapp man pages, use:
# man -M /opt/NETapp/man startapp
-
On one node of the cluster, configure the resources and start the application.
# /opt/NETapp/util/startapp -h <logichostname> -p <port and protocol list>
The arguments to the start script will vary according to the type of resource: failover or scalable. Check the customized man page or run the start script without any argument to get a usage statement.
# /opt/NETapp/util/startapp
 The resource name of LogicalHostname or SharedAddress must be specified.
 For failover services:
 Usage: startapp -h <logical host name>
          -p <port and protocol list>
          [-n <ipmpgroup/adapter list>]
 For scalable services:
 Usage: startapp
          -h <shared address name>
          -p <port and protocol list>
          [-l <load balancing policy>]
          [-n <ipmpgroup/adapter list>]
          [-w <load balancing weights>]
- © 2010, Oracle Corporation and/or its affiliates
