About Container Creation
Every project starts with a container. A project can be one of three types, depending on the project type that is selected during its creation. The project type determines how processes are tracked.
Project Types
When creating a new container, you must select the project type. A project is a network-wide administrative identifier (ID) for related work. All processes that run in a container have the same project ID, and a container tracks the resources being used with the project ID. The container type is based on which project type is selected when creating the container.
Every container has a project name that is a permanent part of its information. When a container is activated on a host, this project name is added to that host's /etc/project file. This entry remains as long as the container is active on that host.
You cannot have two projects with the same project name active on a host at the same time. This is because processes that run in a container are tracked with the project ID, so every project name on a host must be unique.
When creating user-based and group-based projects, the user or group name becomes part of the project name. For user-based containers, the project name becomes user.username. For group-based containers, the project name becomes group.groupname. Therefore, when creating user-based or group-based projects, you cannot use a user name or group name that duplicates the /etc/project entries for the default containers. For more information, see Default Containers.
You provide a project name of your choosing as part of the creation process for application-based containers. The Project Creation wizard accepts duplicate project names for different application-based projects. But two application-based projects that have the same project name cannot be active on the same host at the same time. Reuse project names when creating application-based projects, only if you plan to activate these containers on different hosts. If you try to activate a second project on a host that already has a project with the identical project name, the activation fails.
The following table provides details about the three project types that are available and which changes occur based on the selection.
Table 3–2 Project Type Details|
Project Type |
OS Version |
Details |
|---|---|---|
|
User-Based |
Solaris 8 |
Only type of project supported in the Solaris 8 release. The project name in the /etc/project file becomes user.username. The project becomes the user's primary default project. |
|
|
Solaris 9 and Solaris 10 |
The project name in the /etc/project file becomes user.username, with a list of UNIX users who can join this project. Valid forms are username. |
|
Group-Based |
Solaris 9 and Solaris 10 |
The project name in the /etc/project file becomes group.groupname. Valid form is groupname. |
|
Application-Based |
Solaris 9 and Solaris 10 |
The project name can be the application name or any other chosen name. The name that is provided is added to the /etc/project file. A match expression can be provided for automatically moving the matching processes to the project name. This expression is case sensitive. The corresponding username or groupname under which the processes currently run must be provided. |
About Making Resource Reservations (CPU Shares)
Before you begin using projects to manage an application's resources, you must first know the resource trends for the application. The performance of certain applications, such as ORACLE®, will be significantly degraded if the amount of the memory cap is inadequate. Every project must have resource reservations set: a minimum CPU share and optionally, a maximum memory reservation (memory cap). You should only begin using projects to manage these reservations after you have established the resource requirements for the applications.
Do not set a physical memory cap for a project that is less than what the application typically uses. This practice affects the application's performance adversely and might result in significant delays because of higher paging and swapping as the application is required to use more virtual memory.
You must have your server consolidation plan finalized before you start using projects to manage system resources. An important related task is to identify the trends in the resource consumption of the applications you include in your consolidation plan. Ideally. you identify the trends in resource utilization of the application for at least a month in your test environment before implementing your plan in your production environment. After you have established the CPU and memory consumption trends, you should allow at least a few percentage points above the typical memory requirement.
When making a reservation for the amount of CPU shares that is needed by the project, you assign the amount of CPU as an integer. For example, 25, 1, and 37 are all valid amounts. The term share is used to define a portion of the system's CPU resources that is allocated to a project. If you assign a greater number of CPU shares to a project, relative to other projects, the project receives more CPU resources from the fair share scheduler.
CPU shares are not equivalent to percentages of CPU resources. Shares are used to define the relative importance of workloads in relation to other workloads. For example, if the sales project is twice as important as the marketing project, the sales project should be assigned twice as many shares as the marketing project. The number of shares you assign is irrelevant; 2 shares for the sales project versus 1 share for the marketing project is the same as 18 shares for the sales project versus 9 shares for the marketing project. In both cases, the sales project is entitled to twice the amount of CPU as the marketing project.
CPU shares can be further broken down into two categories:
-
CPU shares
-
(Solaris 10 only) Project CPU shares (on a specific zone)
CPU Shares Assigned During Pool or Project Creation
On hosts running Solaris 8 OS, one resource pool, pool_default only, is available. The pool_default has a value of 100 CPU shares.
On hosts running Solaris 9 and Solaris 10 OS, when you create a new resource pool, you establish the value of the CPU shares for the pool. Solaris Container Manager gives a default value, but you can enter any integer. Some system administrators use a formula of 100 CPU shares per CPUs available to the resource pool. For example, you might assign 100 CPU shares to a pool, which has 1 CPU.
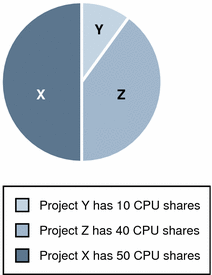
Let's say, for this pool, you have three projects: Project X, Project Y and Project Z. You assign the most important project, Project X, 50 CPU shares and the next project, Project Y, 10 shares and the next project, Project Z, 40 shares.
Figure 3–8 Project CPU Shares
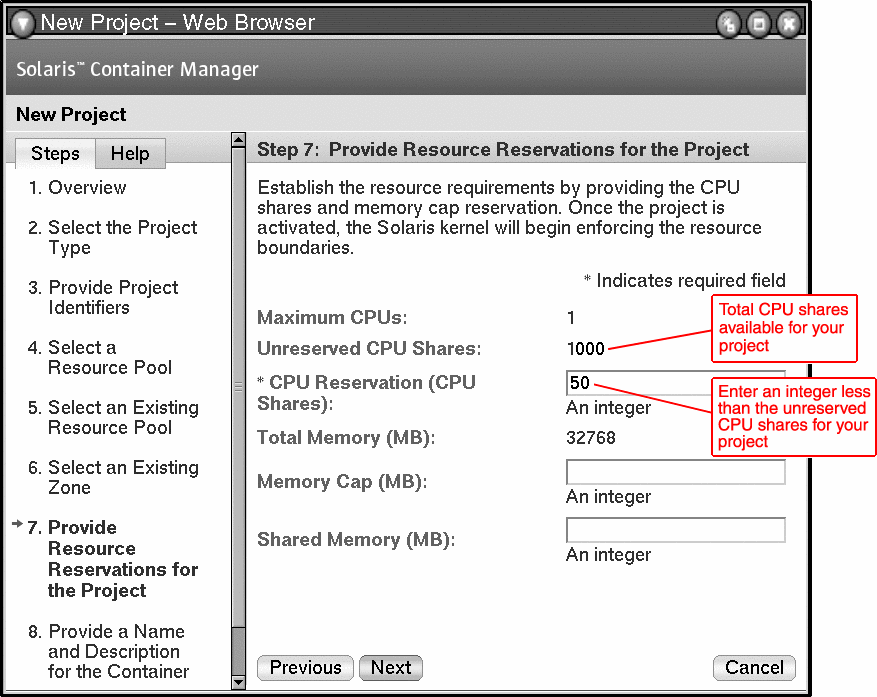
You assign the CPU shares to the project when you create the project by using the New Project wizard. The New Project wizard shows the Unreserved CPU shares for the pool so you can determine the CPU shares available and assign an appropriate amount to the project.
Figure 3–9 CPU Shares
(Solaris 10 only) CPU Shares Assigned During Zone Creation
If your host runs on the Solaris 10 Operating System, you can create zones and assign CPU shares for the zone as a whole and Project CPU shares for the projects in the zone. These are related entities.
You assign the CPU shares and Project CPU shares during zone creation by using the New Zone wizard. In Step 4 of the New Zone wizard, you select a resource pool. The wizard shows the Total CPU Shares for the pool and the Total Available CPU Shares for the pool.
You enter a value for the CPU shares that you want to allocate to this zone from the resource pool. This integer must be less than or equal to the Total Available CPU Shares for the pool.
Figure 3–10 Zone Shares
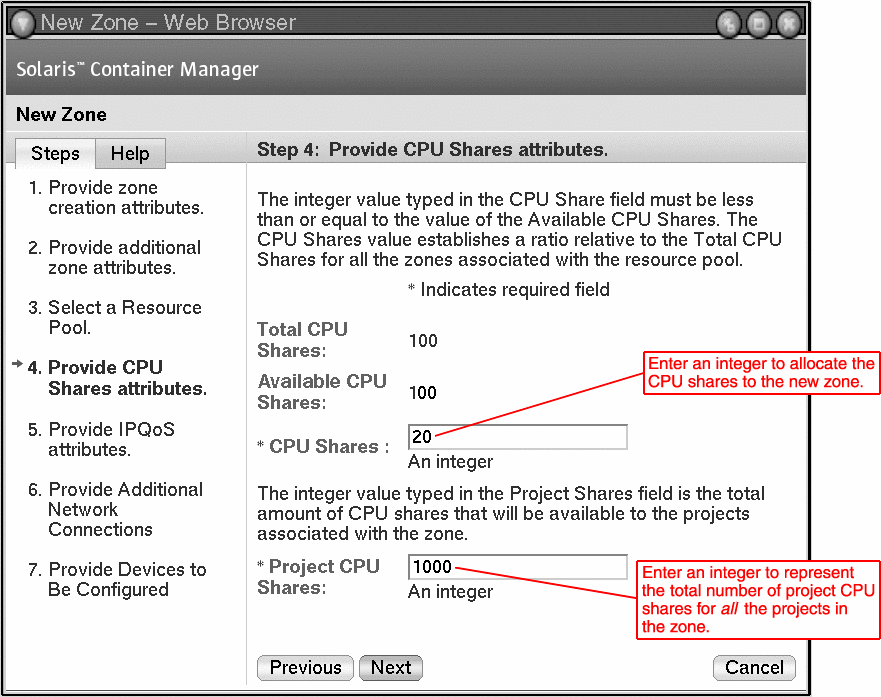
If the pool has a Total Available CPU Shares of 100, then you can assign this zone all or some of the 100 shares. In this example, let's say we assign the zone 20 CPU shares from the resource pool.
Project CPU Shares Assigned During Zone Creation
In Step 4 of the New Zone wizard, you can also enter the Project CPU Shares. This field specifies the number of CPU shares that is allocated to projects in the zone. When you create this value, you establish the value of the Project CPU shares for the zone. You can enter any integer. The integer you enter determines the granularity you want to achieve.
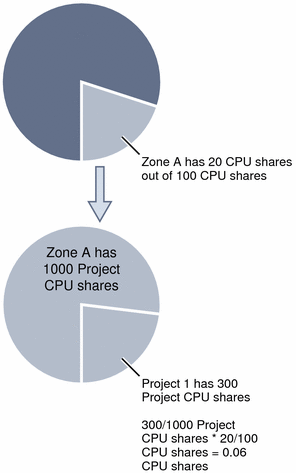
For example, let's say we assign the Project CPU shares for Zone A to be 1000. On a physical level, 1000 Project CPU shares is the 20 CPU shares, inherited from the resource pool, divided into 1000 shares. Here is a formula that shows the relationship between 1 Project CPU share and CPU shares in this example:
1 Project CPU share = 20 (number of CPU shares allocated to the zone)/1000 (number of Project CPU shares) = 0.02 CPU shares
When you create a project, Project 1, in Zone A, Project 1 gets the shares from the zone and not directly from the resource pool. If Project 1 is assigned 300 shares in Zone A, then it gets 300 Project CPU shares or 300/1000 x 20/100 = 0.06 CPU shares.
Figure 3–11 Zone CPU Shares
You assign the Project CPU shares to the project when you invoke the New Project wizard. In Step 7 of the New Project Wizard, Provide Resource Reservations for the Project, you enter the Project CPU shares in the field labeled CPU Reservations (CPU Shares). This is true when you create a project only in a zone on a Solaris 10 host only.
Figure 3–12 Project CPU Shares
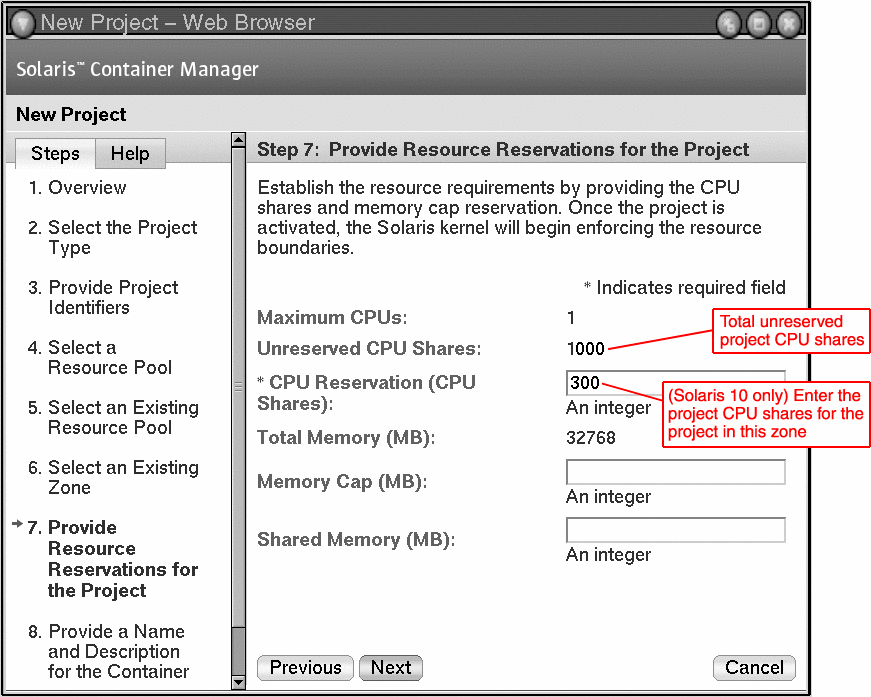
Note –
When you create a project on a Solaris 8 or Solaris 9 host, the field Unreserved CPU Shares is used for entering CPU shares (not Project CPU shares).
Do not use the command line (zonecfg command) to change the CPU shares manually. This will interfere with the Solaris Container Manager calculations.
The Global Zone and Its Projects
The global zone is the only zone that is not bound to only one resource pool. It can get CPU resources from any pool. Projects in the global zone can obtain CPU resources from every resource pool on the host because a hidden global zone is present in every resource pool on the host.
For example, the resource pool, Pool_default, has 4 CPUs and has zone_1 and zone_2 deployed on it. The Pool_default has 10 CPU shares. Zone_1 has 5 CPU shares, zone_2 has 4 CPU shares and the global zone has 1 CPU share.
Another resource pool, Pool_1, has 2 CPUs and has 10 CPU shares. Pool_1 has only one zone, zone_3 deployed. Zone_3 has 9 CPU shares. The global zone has 1 CPU share.
The projects in the global zone get their CPU resource from the 1 CPU share of the pool that they are deployed on.
In Solaris Container Manager, projects in the global zone must be deployed to pool_default.
Fair Share Scheduler (FSS)
Container Manager uses the fair share scheduler (FSS) to ensure the minimum CPU shares you set. The fair share scheduler is the default scheduler. The fair share scheduler calculates the proportion of CPU allocated to a project by dividing the shares for the project by the total number of active projects' shares. An active project is a project with at least one process that uses the CPU. Shares for idle projects, that is, projects with no active processes, are not used in the calculations.
For example, three projects, sales, marketing, and database, have two, one, and four shares allocated respectively. All projects are active. The CPU resources for the resource pool is distributed this way: the sales project receives to 2/7ths, the marketing project receives 1/7th, and the database project receives 4/7ths of the CPU resources. If the sales project is idle, then the marketing project receives 1/5th and the database project receives 4/5ths of the CPU resources.
Note that the fair share scheduler only limits CPU usage if there is competition for the CPU. A project that is the only active project on the system can use 100 percent of the CPU, regardless of the number of shares it holds. CPU cycles are not wasted. If a project does not use all of the CPU that it is entitled to use because it has no work to perform, the remaining CPU resources are distributed among other active processes. If a project does not have any CPU shares defined, it is assigned one share. Processes in projects with zero (0) shares are run at the lowest system priority. These processes only run when projects with nonzero shares are not using CPU resources.
Timesharing Scheduler (TS)
The timesharing scheduler tries to provide every process relatively equal access to the available CPUs, allocating CPU time based on priority. Because the TS does not need to be administered, it is easy to use. However, the TS cannot guarantee performance to a specific application. You should use TS if CPU allocation is not required.
For example, if two projects are assigned to an FSS resource pool and they each have two shares, the number of processes that are running in those projects is irrelevant. A project can only access 50 percent of the available CPU. Thus, if one process is running the sales project and 99 processes are running in the marketing project, the one process in the sales project can access 50 percent of the CPU. The 99 processes in the marketing project must share 50 percent of the available CPU resources.
In a TS resource pool, the CPU is allocated per process. The one process in the sales project has access to only 1 percent of the CPU, while the 99 processes in the marketing project have access to 99 percent of the available CPU resources.
For more information about the fair share scheduler or the timesharing scheduler, see System Administration Guide: Network Services.
Using Container Manager to Trend Application Resource Consumption
You can use Container Manager in your test environment as a tool to help trend application resource consumption by doing the following:
-
Installing and setting up the Container Manager software along with any required software.
For information, see Chapter 2, Container Manager Installation and Setup.
-
Installing Performance Reporting Manager on all agent machines you want to monitor.
For more information, see Chapter 2, Container Manager Installation and Setup and Sun Management Center 3.6.1 Performance Reporting Manager User’s Guide.
-
Creating an active application-based container for the application you want to trend. In the New Creation wizard, make a minimum CPU reservation only. Do not set a memory cap.
For more information, see Creating an Application-Based Project and To Create an Application-Based Project.
-
Monitoring the resources used for a couple of weeks with daily, weekly, or real-time graphs. Two graphs, one for CPU and memory resources used, are available for the container that is running on an individual host. You can also view the Processes table to monitor processes running in the application.
For more information, see To Request a Resource Utilization Report for an Active Project and Viewing Project Processes.
-
After you have established the maximum physical memory requirement for the application, modify the container's properties to include a memory cap. Do not set a cap that is less than the maximum memory the application has been using.
For more information, see To Modify a Project Using a Property Sheet.
-
Setting an alarm so you are notified if the memory used starts to exceed the memory cap set. Make any adjustments to the memory cap using the Properties sheet.
For more information, see To Set an Alarm Threshold and To Modify a Project Using a Property Sheet.
After you have established resource utilization trends by using Container Manager, you can use containers to consolidate servers in your production environment.
For more information about how to plan and execute a server consolidation, you can read the Sun Blueprints book Consolidation in the Data Center by David Hornby and Ken Pepple. For more information about server consolidation on systems running the ORACLE database, you can read the Sun white paper Consolidating Oracle RDBMS Instances Using Solaris Resource Manager Software.
- © 2010, Oracle Corporation and/or its affiliates
