 How to View or Change Printer Queue Properties
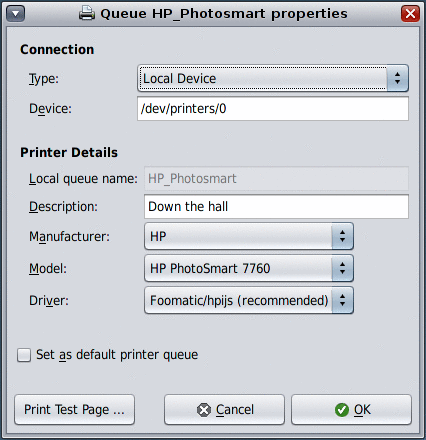
The properties dialog for a printer queue allows you to edit the properties of an existing printer queue. Open this dialog from the Properties menu item in the Printer menu. This dialog looks and behaves almost the same as the Add Printer Queue dialog.
-
In the Queue pane, select the printer queue in which to view or change properties.
-
From the Printer menu, choose Properties.
The properties dialog for the printer queue is displayed.

-
To change settings for the printer queue, type or select the new information, then click OK.
- Type
-
Connection type: Internet Printing Protocol (IPP), Remote IPP, Line Printer Daemon (LPD), Remote LPD, Socket or Local Device
- Printer Name or IP
-
Hostname or IP address of the remote printer. (IPP, LPD, Socket only)
- Print Server
-
Hostname or IP address of the print server. (Remote IPP, Remote LPD only)
- Queue Name
-
Name of the remote printer queue. (IPP, Remote IPP, LPD, Remote LPD only)
- Port
-
Port number through which to communicate with the printer queue, default = 9100. (Socket only)
- Device
-
Path to the local printer device, default = /dev/printers/0. (Local Device only)
- Local queue name
-
Local name for the printer queue.
- Description
-
Optional text description of the printer queue.
- Manufacturer
-
List of printer manufacturers for which PostScript Printer Description (PPD) files are installed.
- Model
-
List of printer models that are available for the selected manufacturer.
Note –The printer manufacturer and model is discovered. If the exact model is not available, a similar model is provided.
- Driver
-
List of drivers that are available for the selected printer model.
Note that this field is blank until you have entered the minimum amount of information about the printer queue.
To print a test page, click the Print Test Page button.
To add the printer queue, click the OK button.
To set the printer queue as the default in the application print dialogs, select the Set as default printer queue checkbox.
Note –Some printer queue settings cannot be changed after a printer queue has been created.
- © 2010, Oracle Corporation and/or its affiliates
