Chapter 1 Preparing for Installation
This chapter describes how to prepare your site for the Sun Enterprise 3500 server system.
The tasks for installing the system are:
Unpacking the server
Preparing the site
Preparing the server
Cabling
Powering on
Using the software
Note -
For information about physical specifications, electrical specifications, and environmental requirements, refer to Appendix A "Specifications," in the Sun Enterprise 3500 System Reference Manual (part number 805-2630).
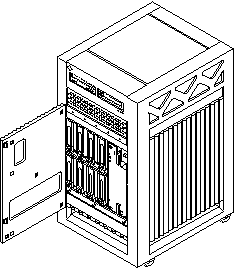
Figure 1-1 Enterprise 3500 System

Unpacking and Preparing the System
Note -
Inspect all shipping cartons for evidence of physical damage. If a shipping carton is damaged, request that the carrier's agent be present when the carton is opened. Keep all contents and packing material for the agent's inspection.
If the system is already unpacked, go to "Preparing the Electrical Circuits".
The system can weigh up to 185 lbs (84 kg). To prevent personal injury, two people are needed to lift the system safely. The rear support bracket is designed to support the system weight only when the system is stationary, on a flat surface. Do not attempt to lift the system by grasping the support bracket.
Tools
-
#2 Phillips screwdriver
-
System key for front door and key switch (packed in a bag in the accessory box)
Follow the graphical instructions on the shipping container to remove the system from the container. Remove the system key (for front door and key switch), and power cord from the shipping container. These are needed to power on the system.
Note -
Any unpacking instructions printed on the outside of the shipping carton take precedence over information in this section.
Shipping and Storing the System
Save the original shipping containers and packing materials in case you need to store or ship your system.
If you cannot store the shipping materials, recycle or dispose of the materials properly. Consult your local recycling authority for information.
Preparing the Electrical Circuits
In planning where to place your equipment, remember that each of the following items requires access (by way of a separate power cord) to a power outlet:
-
Enterprise 3500 system
-
External peripherals
-
Monitor used for diagnostics
The Enterprise 3500 system uses nominal input voltages of 100-120 VAC or 200-220 VAC. Sun products are designed to work with single-phase power systems having a grounded neutral conductor.
To reduce the risk of electrical shock, do not plug Sun products into another type of power source. Contact your facilities manager or a qualified electrician if you are unsure what type of power is supplied to your building.
Preparing the Air Conditioning
For the most reliable system operation:
-
The room should have sufficient air conditioning capacity to support the cooling needs of the entire system.
-
The air conditioning system should have controls that prevent excessive temperature changes.
Refer to Appendix A "Specifications," in the Sun Enterprise 3500 System Reference Manual for environmental information.
Preparing the Ethernet Network
The Enterprise 3500 system follows the IEEE standard for 10/100BASE-T Ethernet (twisted-pair) or MII (Media Independent Interface).
Twisted-pair cables used with Sun Microsystems products have RJ-45 connectors that resemble the smaller RJ-11 connectors used for modular telephone cables. For twisted-pair cable length, see Table 2-1.
A MII to AUI converter cable, available from Sun, enables the 10/100 Mbps Ethernet interface to run over 10 Mbps coaxial Ethernet networks. Other MII Ethernet connectivity products are available from third parties.
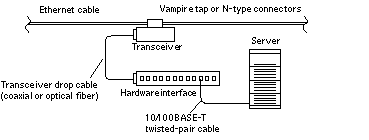
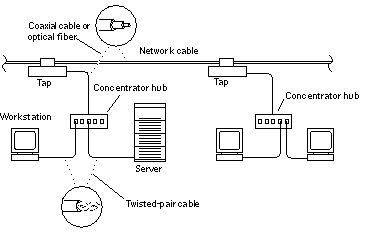
Figure 1-2 and Figure 1-3 illustrate types of network cables and possible implementations of 10/100BASE-T Ethernet.
Set up the network using Sun or third-party components. To obtain the best results, read any applicable manufacturer instructions. Be aware that Sun Microsystems cannot guarantee the performance of any components that are not purchased from Sun.
Figure 1-2 Types of Network Cables Used

Figure 1-3 Example of 10/100BASE-T (Twisted-Pair) Ethernet

Note -
Multiplexer boxes require a transceiver when used with the Ethernet applications described in this manual. Although these transceivers are compatible with Sun equipment, Sun Microsystems does not guarantee the performance of any component that was not purchased from Sun.
Many transceivers are compatible with both level-1 and level-2 Ethernet. To operate these transceivers with Sun equipment, set the device for level-2 operation following the manufacturer's instructions.
Sun equipment conforms to the Ethernet 10/100BASE-T standard, which states that the 10/100BASE-T Link Integrity Test function should always be enabled on both the host and the hub. If you have problems verifying connection between Sun equipment and your hub, verify that your hub also has the link test function enabled. Refer to "Failure of Network Communications" in the Sun Enterprise 3500 System Reference Manual (part number 805-2630), and refer to the manual provided with your hub.
Preparing the Area
Use the following guidelines to prepare a location for your server.
-
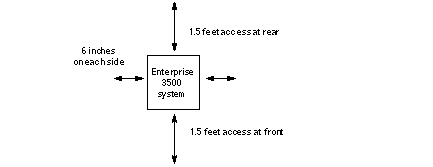
The server unit requires approximately 1.5 feet (47 cm) of space in the front and rear for access by service personnel (Figure 1-4).
-
A minimum space of 6 inches (16 cm) is required on both sides of the server to afford adequate air flow.
To avoid exhaust air recirculation, do not put systems or peripherals next to each other, side by side.
-
Keep power and interface cables clear of foot traffic. Route cables inside walls, under the floor, through the ceiling, or in protective channels. Route interface cables away from motors and other sources of magnetic or radio frequency interference.
Figure 1-4 Enterprise 3500 Server Access Areas -- Top View

Using the User Naming Area
To display the name of the server, IP address, owner, or other important information on the front of the machine:
-
Remove the front bezel.
Refer to "Preparing for Service" in the Sun Enterprise 3500 System Reference Manual (see "Front Bezel").
-
Snap out the narrow transparent window.
From the rear side of the bezel, gently squeeze the top and bottom edges together as you simultaneously push the transparent window out through the front of the bezel.
-
Choose the information that will appear on the label.
Common items include the name of the server, IP address, name and contact information for the system administrator, and the group of users that the machine services.
-
Use the colored paper provided with the system to make a label.
The available area for the paper label is 12 mm x 150 mm (0.5 in x 5.9 in). Print or write the desired information in an area this size and cut the label to fit the transparent window.
-
Place the paper label inside the window, and snap the window back in place from the front side of the bezel.
- © 2010, Oracle Corporation and/or its affiliates
