Handling Precautions
The following precautions should be exercised when handling UltraSPARC II modules:
-
UltraSPARC II modules are static-sensitive and a grounding wrist strap field kit must be used when handling the modules.
-
Always handle the modules by the edges and not by the smaller black heat sinks that break easily if handled improperly.
-
Do not handle the modules by touching the gold pins on the compression connectors. Natural oils on the hands cause these connectors to oxidize and corrode over a period of time, resulting in the need for module cleaning or replacement.
Removing a Module
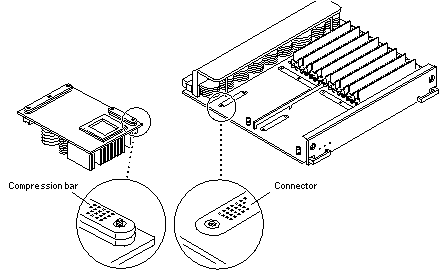
Each module is locked to the main board with a single standoff and is connected to the main board by two connectors. The pins within the connectors are compressed to the corresponding board mating surfaces by a metal compression bar which, when secured with screws, compresses the module connector pins to the board mating surfaces (Figure 3-9).
Figure 3-9 Ultra SPARC Module Connector Detail

-
Use the procedures in "Removing a Board", to remove the applicable CPU/Memory+ board.
 Caution -
 The heatsinks on the UltraSPARC II modules may be hot. Use caution when removing or installing UltraSPARC II modules and avoid contact.
-
Use a 3/32 Hex driver to loosen all screws on each of the compression connectors on the module to be removed (three screws for the 288-pin connector, two screws for the 144-pin connector) (Figure 3-8).
-
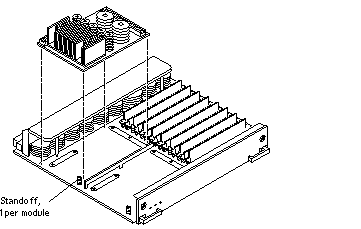
Lift the module straight up, off the board mating surface and the single standoff that locks the module to the board.
Use pressure applied with fingers to assist in removing module from standoff (Figure 3-10).
Figure 3-10 UltraSPARC II Module Removal and Replacement

-
Place the module in an antistatic bag.
Installing a Module
To maximize performance when installing UltraSPARC II modules on a CPU/Memory+ board, use all CPU 0 connectors on the lowest numbered slot to the highest numbered slot. If there are modules remaining, use the CPU 1 connectors in the same order.
Note -
Screws on the UltraSPARC II modules must be tightened to 6 inch-pounds. The torque screwdriver that came with your system is set to this specification.
-
Take the UltraSPARC II module out of the protective packaging and inspect for dust on the connectors.
If necessary, clean the connectors with a dry, stiff toothbrush.
-
Remove the applicable CPU/Memory+ board as indicated in "Removing a Board".
-
Inspect the board module mating surface and connectors. If they require cleaning, use a dry, stiff toothbrush to remove debris.
Note -There are miniature silver alignment pins on the compression connectors which, when the module is properly seated, align with related receptacles on the mating surfaces of the CPU/Memory+ board. In addition, there is a gold standoff mounted on the CPU/Memory+ board opposite the module's smaller board connector. This acts as a standoff for the module as well as an alignment pin.
-
Holding the module by the edges, align the module over the two board receptacles (use the single standoff and the alignment pins on the module compression connector as a guide). See Figure 3-9 and Figure 3-10.
-
Rest the module on the board standoff, aligning the compression connectors with the screws.
Firmly but gently press the module straight down until the standoff post snaps into place and the module connectors are fully seated.
-
Using the torque screwdriver provided with your system, partially tighten the five 3/32 hex screws:
-
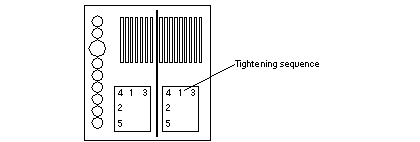
Partially tighten the screws just until they touch the compression connectors in order, beginning with screw 1.

-
Tighten the five screws an additional one-half turn in the same tightening sequence.
-
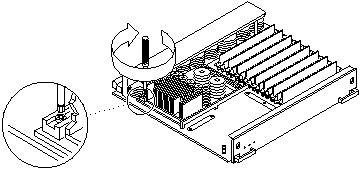
Finish the module installation by tightening all the screws to 6 inch-pounds in the same tightening sequence. See Figure 3-11.
 Caution -
 Do not over torque or under torque the screws. Excessive force can warp the connector. Insufficient force can cause an incomplete electrical connection.
Figure 3-11 Tightening Compression Connector Screws

-
-
Use the procedures in "Installing a Board", to replace the applicable CPU/Memory+ board.
- © 2010, Oracle Corporation and/or its affiliates
