Adding Undetected Linux Software
In this procedure, you add a local RPM to the knowledge base, when it has not been detected automatically. For example, you would use this procedure for uploading a third-party bundle of components from a CD.
You cannot upload RPMs with a console on Microsoft Windows. Use the Sun Update Connection – Enterprise CLI on a Linux machine to upload RPMs. See Example 5–2.
 To Upload a New RPM
-
Log in with full permissions or as the admin user.
-
From the drop-down list in the tool bar, select a Linux distribution-architecture.
The Components list shows the components relevant to your selection. The NCOs that you add with this procedure will be added to the inventory of the displayed distribution.
-
Select Local/Local RPMs/[category].
-
Do one of the following:
-
From the tool bar, click the Add Component button.
-
Right-click the selected category and choose Local -> Add.
-
From the Components menu, choose Local -> Add.
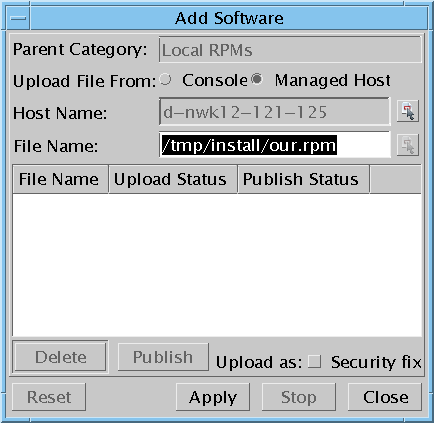
The Add Software window opens.

-
-
Select a source machine:
-
If the console has access to the RPM, select Console.
-
If a remote managed host has access to the RPM, select Managed Host.
Note –Remote upload is limited to 5 Mbytes. Console upload is unlimited. You should upload from the console whenever possible.
-
 To Upload from the Console Machine
If you selected console, follow this procedure. If you selected Managed Host, go to To Upload from a Managed Host.
-
Click the Select File button of the File Name field.
The Choose RPM window opens.
-
Browse to and select packages you want to add. Use the Control or Shift keys to make a multiple selection from one directory.
-
Click Open.
The Choose RPM window closes, and the path names appear in the File Name list of the Add Software window. Add as many packages as you want.
-
Click Apply.
The Status column indicates when the upload is done. You might have to wait until the console is updated with the changes. The time depends on your local environment configuration.
 To Upload from a Managed Host
If you selected Managed Host, follow this procedure. Note that this procedure upload only one RPM at a time.
-
Click the Select Host button of the Host Name field.
The Host Selection window opens.
-
Select the managed host that has the software, and click OK.
The Host Selection window closes and the host name appears in the Host Name field of the Add Software window.
-
In the File Name field, type the full path name of the package.
-
Click Apply.
The Status column indicates when the upload is done. You might have to wait until the console is updated with the changes; time depends on your local environment configuration.
Example 5–2 To Upload NCOs with the CLI
The Add Software Package command allows you to give a path name of a package for upload. The package should be on the local machine or on a mount point. The Distribution parameter is required in this command (the -ld command outputs a list), and you add the package to a single distribution at a time. See Add Software Package (-asp) Command.
#! /bin/bash echo -n “Enter your user name:” read user echo -n “Enter your password:” read password echo “The list of active distributions is:” uce_cli -ld -u $user -p $password echo -n “Type the exact name of the distribution for this software:” read distro echo -n “Type the source path name of the file:” read pathname echo -n “Is this software a secured version of a previous one? (y | n)” read secure if [ “$secure” = “y” ]; then uce_cli -asp -f “$pathname” -secure -D $distro -u “$user” -p “$password” else uce_cli -asp -f “$pathname” -D $distro -u “$user” -p “$password” fi |
- © 2010, Oracle Corporation and/or its affiliates
