Creating Complex Jobs
In the following procedures, you will select the objects and options of a job and then run the job on selected hosts.
Before you begin a job on a Solaris machine, make sure the PKG deployment preferences are appropriate for your local needs. See Host Preferences – PKGs on Host Preferences – PKGs.
This procedure is broken up into the following parts:
 To Set Up the Objects of a Job
-
Make sure the Jobs panel is available in the main window by choosing Jobs from the View menu.
-
Do one of the following:
-
Give the job a name and a free-text description.
-
Select a mode for the job:
-
Do the following:
-
Create tasks for the job.
-
Set job options or leave the default settings.
See To Set Job Options.
-
Set a schedule or leave the default Now schedule.
See To Set Job Schedules.
-
 To Create the Tasks of a Job
-
In the Tasks tab of the New Job window, click Add Task.
The Task Editor opens.
-
Type a name for a task.
-
Select a profile from the drop-down list, or click the profile editor button to open the Profile Editor and create a new profile.
If you select a user-defined profile and then click the button, you can edit an existing profile.
-
Select a policy from the drop-down list, or click the policy editor button to open the Policy Editor, to create or edit a policy as you would a profile.
-
Click the Hosts button to the right of the Hosts field.
The Select Hosts window opens.
-
Select hosts and groups and then click the Add button.
The hosts or groups are added to the Selected Hosts list.
-
When the Selected Hosts list contains the hosts or groups that you want to receive this job, click OK.
The Hosts window closes. The selected hosts and groups appear in the Hosts field of the Tasks tab.
-
Click OK.
The task is added to the Tasks list of the job. Add as many tasks as you want.
The order of the tasks in the list is the order that they will be executed. To change this order, select a task name and click the Up or Down buttons.
To edit a task, select the task and click the Edit button.
To remove a task from the job, select the task and click the Delete button.
-
Decide how to continue:
-
If you want to run the job with default settings, click OK now.
-
If you want to set a deployment schedule, go to To Set Job Schedules.
-
If you want to view and edit the job options, go to To Set Job Options.
-
If you want to save the tasks as a job template, click Save Template.
-
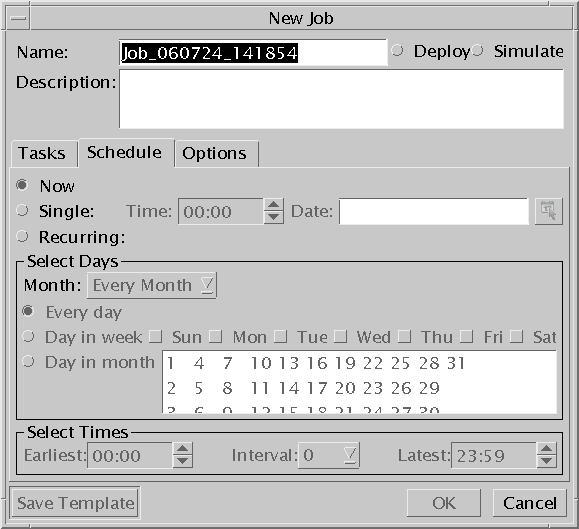
 To Set Job Schedules
 To Set a Single Schedule
-
Select Single.
-
In the Time text box, select the hour and the minutes.
Type in the desired time, or use the arrows to change the selection.The time settings are by 24 hours: 13:00 = 1pm, 14:00 = 2pm, ... 00:00 = midnight.
-
Click the button to the right of the Date box.
The Calendar opens.
-
Select a date and then click OK.
The Calendar closes. The selected date appears in the Date field.
-
In the New Job window, click OK or set job options.
See To Set Job Options.
The job will begin on the selected time and date.
 To Set a Recurring Schedule
-
Select Recurring.
-
In the Month drop-down list, select either Every Month (all year schedule) or a specific month (monthly schedule).
-
Select days of the month:
-
Select time of the day:
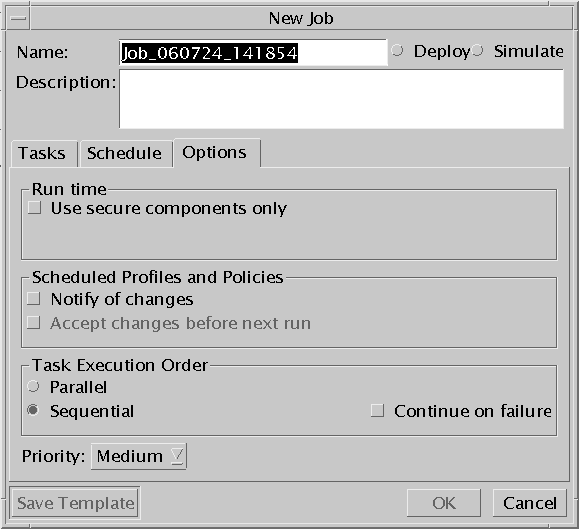
 To Set Job Options
-
Open the Options tab.

-
Select Use Secure Components only if you want to give priority to secure versions. Deselect it to give priority to cost-effective versions, which makes the job run faster.
-
If you set a recurring schedule for the job, decide how the job should be handled if selected profiles and policies are changed between now and the next run of the job.
Option
Selected Function
Deselected Function
Notify of changes
If the owner of the profiles or policies changes them, you will get an email notification. Select if using profiles/policies that other users created.
You are not notified of changes. Deselect if you own the selected profiles or policies and do not want the reminder emails.
Accept changes before next run
Use updated profiles or policies. Select for consistency and automation.
Use the profiles or policies as they were when you created the job. Deselect for predictability.
-
Specify how you want the task to run in relation to other tasks and how to handle failures.
Option
Selected Function
Deselected Function
Parallel
Run the job simultaneously with other jobs. Do not run jobs that depend on the results of other jobs in parallel. Run such jobs in sequential mode only.
Run the job after the previous job completed. By default, a job is run sequentially.
Sequential
Run the job after other jobs have completed.
Run the job in parallel mode.
Continue on failure
Continue to run a job even if one of the steps or tasks experienced a failure. This option is only available for jobs that run in sequential mode.
Terminate a job if a step or task experiences a failure.
Priority
Select or change a priority for ajob. Values are Low, Medium, and High.
By default, the priority is set to Medium.
Running a Job with the CLI
The CLI command to submit a job runs one task on a single selected host or group. See Submit Job (-sj) Command.
#! /bin/bash echo -n “Enter your user name:” read user echo -n “Enter your password:” read password echo -n “Type a name for this job:” read jobname echo -n “Do you want to run this job on a host or a group? (h|g):” read hostgroup if [ $hostgroup = “h” ];then echo “Hosts are:” uce_cli -lah -u “$user” -p “$password” else echo “Groups are:” uce_cli -lg -u “$user” -p “$password” fi echo -n “Copy host or group name to receive job:” read selected echo “Profiles are:” uce_cli -lp -u “$user” -p “$password” echo -n “Copy profile to use:” read profile echo “Policies are:” uce_cli -lc -u “$user” -p “$password” echo -n “Copy policy to use:” read policy echo “Simulating $jobname” uce_cli -sj -j “$jobname” -P “$profile” -C “$policy” -$hostgroup “$selected” -us -sm -u “$user” -p “$password” echo -n “Do you want to deploy $jobname? (y|n)” read yes if [ $yes = “y” ]; then uce_cli -sj -j “$jobname Deployed” -P “$profile” -C “$policy” -$hostgroup “$selected” -us -dp -u “$user” -p “$password” fi |
- © 2010, Oracle Corporation and/or its affiliates

