Managing Local Categories
In this section, you will learn how to add, edit, and delete categories in the Components list under Local.
Each category can hold package groups and packages, which may be either software or files, depending on the top-level default category under which you create your own categories.
These features are available only to users with full permissions and to the admin user.
Default Local Categories
Expand the Local category to see the default categories. You cannot edit or delete these categories.
-
Local RPMs or Local PKGs – Your local software components (NCOs)
-
Macros – Scripts that pull data from hosts to replace macro signs in local Configuration files
-
Pre-actions – Executables that do something to a host before the tasks of a job begin
-
Post-actions – Executables that do something to a host after the tasks of a job finish
-
Probes – Executables that test a pre-requisite condition of a host, to see whether a job should begin
User-Defined Local Categories
Under a default category, you create, edit, or delete your own categories. Choose the default category that best describes the software or files that you will be adding to the knowledge base.
Adding Categories
You customize the Local components list by adding your own categories to the default ones under Local.
 To Add a Category
-
In the Components list, under Local, select a default category.
-
Do one of the following:
-
From the tool bar, click the Add Category button.
-
From the Components menu, choose Local -> Add Category.
-
In the Components list, right-click the selected category and choose Local -> Add Category.
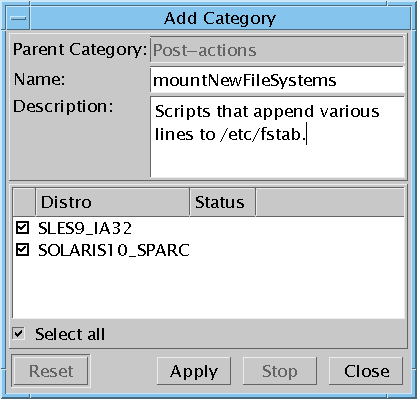
The Add Category window opens.

-
-
Type a name and description for the new category.
-
Check distributions to which you want this category to be assigned.
-
Click Apply.
The status column indicates when the category is uploaded to the knowledge base.
-
Click Close.
The Add Category window closes. You might have to wait until the Components list is updated with the new category; time depends on your local environment configuration.
Example 5–1 Adding a Category with the CLI
The create a new category CLI command puts the category into all distributions (default) if you do not use the -D parameter. To add the category to one specific distribution, use the -D parameter and the name of the distribution. (The -ld command outputs the names of distributions.) See Add Local Category (-alc) Command.
#! /bin/bash echo -n “Enter your user name:” read user echo -n “Enter your password:” read password echo -n “Type a name for the new category:” read newCatName echo -n “Enter a desription for the new category:” read newCatDesc echo “Under which category should this one be added?” echo “Valid answers: Local RPMs, Local PKGs, Probes, Pre-actions,” echo “Post-actions, Macros, Configuration files,” echo “or an existing user category under one of these: /existing_subcategory” read parent uce_cli -alc -T “$newCatName” -ds “$newCatDesc” -pT “$parent” -u “$user” -p “$password” |
Editing Categories
In this procedure, you edit Local categories. You can change the name, description, and list of distribution assignments of any category that you or another user created. You cannot change the default categories.
 To Edit a Category
-
From the Distro drop-down list, select the distribution-architecture holding the component that you want to change.
-
In the Components list, select the category that you want to change.
-
Do one of the following:
-
From the tool bar, click the Edit Local Component button.
-
Right-click the selected category and choose Edit.
-
From the Components menu, choose Edit.

-
-
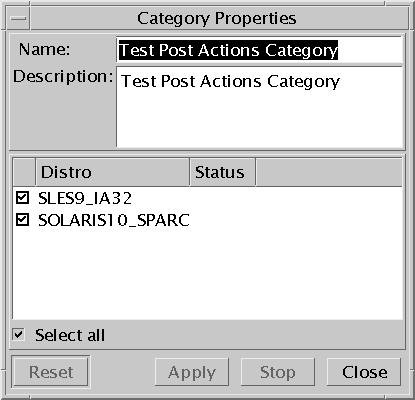
Edit as needed: Name, Description, selected Distributions.
-
Click Apply.
The status column indicates when the category has been changed for each distribution.
-
Click Close.
The Category Properties window closes. You might have to wait until the console is updated with the changes. The time depends on your local environment configuration.
Deleting Categories
In this procedure, you delete a user-defined Local categories. Everything inside of the category will be deleted as well. However, if there are many components in the category, the delete function might fail with the another process running error. To ensure this does not occur, delete the contained components before deleting the category.
 To Delete a Category
-
In the Components list, select the category that you want to delete.
-
Do one of the following:
-
From the tool bar, click the Delete Local Component button.
-
Right-click the selected category and choose Delete.
-
From the Components menu, choose Delete.
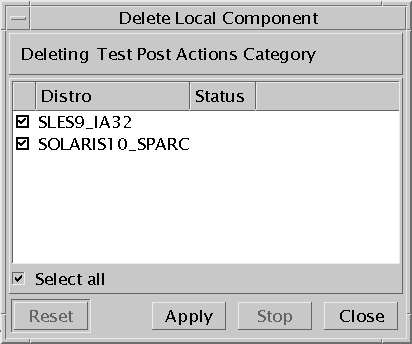
The Delete Local Component window opens.

-
-
Check the distributions from which you want to delete the category.
-
Click Apply.
The status column indicates when the category has been deleted from each distribution.
-
Click Close.
The Delete Local Component window closes. You might have to wait until the console is updated with the changes. The time depends on your local environment configuration.
- © 2010, Oracle Corporation and/or its affiliates
