Chapter 3 User Accounts
This chapter explains how to access, create, edit, and delete user accounts.
Most of the procedures described in this chapter are applicable only to users with admin user permissions. Users of other permissions can change their passwords, email addresses, and notification events.
The following topics are covered:
Managing User Accounts (Task Map)
The admin user can create, edit, and delete user accounts. You cannot create another user account with the admin user name.
User names are case insensitive. All user names must be unique, so you cannot create a new account with the Admin user name.
Users can be granted full permissions to create deployment jobs over all managed hosts.
You can also restrict user permissions.
User restrictions include the following:
-
Simulations – Restrict a user to create jobs that only simulate deployment on managed hosts. This restriction would be useful for a team manager, who could use the simulation results in time estimates and prioritization of administration tasks; or use the restriction for new team members to safely become familiar with the environment.
-
Permitted Groups – Restrict a user to have permissions only on specified groups. If you have a large IT team, this restriction could help you manage and audit the work of team members.
You can restrict a user to either simulations or to permitted groups, or to both. User accounts that are restricted, either for jobs or for groups, are also automatically restricted with Local components. Restricted users may select Local components for their jobs, but they do not have permission to add, edit, or delete components to the Local inventory.
The following table identifies the tasks that you might perform when you want to manage users as the admin user.
|
Task |
Description |
For Instructions |
|---|---|---|
|
Create a user account that has full permissions. |
An account with these permissions can run deployments jobs on any hosts. | |
|
Create a user account that can only run simulation jobs. |
Use this procedure to create a user that can only run simulation jobs. If this user needs to be able to run deployment jobs, the user needs full permissions. | |
|
Create a user account that can run jobs only on selected groups. |
You create a user account that is only permitted to run jobs on particular groups. If this user needs to be able to run jobs on all groups, the user needs full permissions. | |
|
Create a copy of a user account. |
Copy a user account to create a new one with similar preferences. | |
|
Edit a user account. |
In this procedure you edit user accounts. Use it to change the name, password, notifications, email, or list of permitted groups. | |
|
Delete a user account. |
You can use this procedure to delete a user account that you no longer need. | |
|
Delete more than one user account at the same time. |
You can use this procedure to delete more than one user account at a time. |
 To Create a Full-Permission User Account
In this procedure you create new user accounts with full permissions over all jobs, hosts, groups, and components (including Local component management).
-
Log in as the admin user.
-
Do one of the following:
-
From the tool bar, click the Users button.
-
From the Tools menu, choose Users.
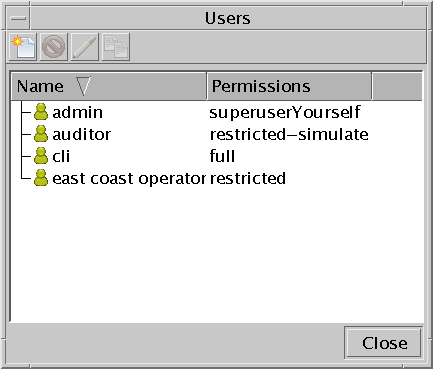
The Users window opens.

-
-
Do one of the following:
-
From the tool bar of the Users window, click the New button.
-
Right-click in a blank space in the Users window and choose New.
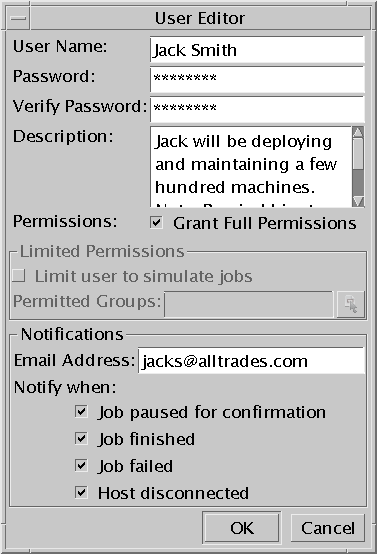
The User Editor window opens.

-
-
Type a name for the user account.
-
Type a password for the user and then verify it.
-
Type a description of the account.
-
Check the Grant Full Permissions checkbox.
-
In the Notifications section, type an email address to which the user of this account will receive Sun Update Connection – Enterprise notification emails.
-
Check the Notify when options that are relevant for this user.
-
Click OK.
The User Editor window closes. The new user name, with full permissions, is added to the Users window.
 To Create a User Account Restricted to Simulations Only
In this procedure you create new user accounts that are restricted for simulations only. These users cannot touch hosts. Restricted users cannot manage Local inventory, though they can select Local components for to include in simulation jobs.
-
Log in as the admin user.
-
Do one of the following:
-
From the tool bar, click the Users button.
-
From the Tools menu, choose Users.
The Users window opens.
-
-
Do one of the following:
-
From the tool bar of the Users window, click the New button.
-
Right-click in a blank space in the Users window and choose New.
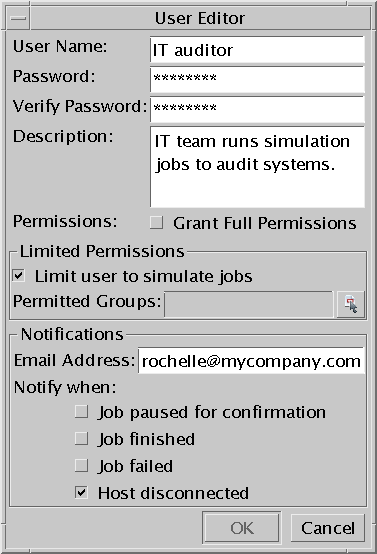
The User Editor window opens.

-
-
Type a name for the user account.
-
Type a password for the user and then verify it.
-
Type a description of the account.
-
Uncheck the Grant Full Permissions checkbox.
The Limited Permissions options are enabled.
-
Click the Groups button to the right of the Permitted Groups field.
The Select Hosts window opens.
-
Select the groups over which this user is to have permissions and click the Add button.
You must select permitted groups for restricted users, which are listed in the right-hand list of the Groups window. Groups that you do not add are invisible to this user
-
Click OK to close the Select Hosts window and return to the User Editor.
-
In the Notifications section, type the email address to which to send notification emails.
-
Check the Notify when options that are relevant for this user.
-
Click OK.
The User Editor window closes and the new user name appears in the Users window.
 To Create a User Account with Group Restrictions
In this procedure you create new user accounts with management permissions over permitted groups only. Restricted users cannot manage Local inventory, though they can use Local components in jobs.
-
Log in as the admin user.
-
Do one of the following:
-
From the tool bar, click the Users button.
-
From the Tools menu, choose Users.
The Users window opens.
-
-
Do one of the following:
-
From the tool bar of the Users window, click the New button.
-
Right-click in a blank space in the Users window and choose New.
The User Editor window opens.
-
-
Type a name for the user account.
-
Type a password for the user and then verify it.
-
Type a description of the account.
-
Uncheck the Grant Full Permissions checkbox.
The Limited Permissions options are enabled.
-
Decide if you want this user to be able to execute deployment jobs.
-
Check Limit user to simulate jobs to restrict this user to simulations.
-
Uncheck this option to allow this user to execute deployments on the permitted groups.
-
-
Click the Groups button to the right of the Permitted Groups field.
The Select Hosts window opens.
-
Select the groups over which this user is to have permissions and click the Add button.
Groups that you do not add will be invisible to this user.
-
Click OK.
The Select Hosts window closes. The permitted groups are listed in the User Editor window, in the Permitted Groups field.
-
In the Notifications section, type an email address to which the user of this account will receive Sun Update Connection – Enterprise notification emails.
-
Check the Notify when options that are relevant for this user.
-
Click OK.
The User Editor window closes and the new user name appears in the Users window.
 To Copy a User Account
In this procedure you create new user accounts based on existing ones. Use it to create multiple user accounts with similar permissions.
-
Log in as the admin user.
-
Do one of the following:
-
From the tool bar, click the Users button.
-
From the Tools menu, choose Users.
The Users window opens.
-
-
Select a user name and then do one of the following:
-
From the tool bar of the Users window, click the Copy button.
-
Right-click the selected user name and choose Copy.
The User Editor window opens with the permissions and notification options of the selected user name.
-
-
Type a new user name and password, and verify the new password.
The permissions options are not available for editing.
-
Check the email address and notification options, and change these as needed.
-
Click OK.
The User Editor window closes and the new user name is added to the Users window.
 To Edit a User Account
In this procedure you edit user accounts. Use it to change the name, password, notifications, email, or list of permitted groups.
You cannot edit the following options of user accounts:
-
You cannot change the selection of Full Permissions.
-
You cannot change the selection of Restrict user to simulate jobs.
-
You cannot edit the Permitted Groups list.
-
Log in as the admin user.
-
Do one of the following:
-
From the tool bar, click the Users button.
-
From the Tools menu, choose Users.
The Users window opens.
-
-
Select a user name and then do one of the following:
-
From the tool bar of the Users window, click the Edit button.
-
Right-click the selected user name and choose Edit.
The User Editor window opens, with the properties of the selected user name displayed.
-
-
You can change any of the account details:
-
User Name
-
Password (and Verify Password)
-
Description
-
-
You can change your email address and the Notify When options (events for which you want Sun Update Connection – Enterprise to send you an email):
-
Job paused for confirmation
-
Job finished
-
Job failed
-
Host disconnected
-
-
Click OK.
The User Editor window closes.
If you changed the user name, the new name appears in the Users window, in place of the old name.
 To Delete a User Account
In this procedure you delete user accounts.
You cannot delete user accounts in the following circumstances:
-
The user is logged in.
-
The user has an active job.
-
The user has scheduled jobs.
-
Log in as the admin user.
-
Do one of the following:
-
From the tool bar, click the Users button.
-
From the Tools menu, choose Users.
The Users window opens.
-
-
Select the user name that you want to delete.
-
Do one of the following:
-
From the tool bar of the Users window, click the Delete button.
-
Right-click the selected user name and choose Delete.
-
-
In the confirmation dialog box that opens, click Delete.
The user name is removed from the list.
 To Delete Multiple User Accounts
-
Log in as the admin user.
-
Do one of the following:
-
From the tool bar, click the Users button.
-
From the Tools menu, choose Users.
The Users window opens.
-
-
Select the user names you want to delete with the Shift or Control keys, or use the mouse to select an area in the list, and then click the Delete button in the tool bar.
-
In the dialog box that opens, choose one of the following.
-
Delete All – Delete all selected user accounts at once.
-
Delete – Confirm the delete command for each account separately.
-
Managing Your Own Account (Task Map)
When you log into the console with a user name other than admin, you can manage your own user account. You do not have access to other user account features.
This section includes the procedure to change your password. After logging in, you can open the User Editor of your own account and change the password.
The first time that any user logs into the console, Sun Update Connection – Enterprise automatically opens the Change Password window, enabling you to give your account a password that is private even from the admin user who created the account.
Type and verify a new password for this user account and then click OK. The change takes effect immediately.
Note –
If the Change Password window does not open automatically on the first login, the default behavior of Sun Update Connection – Enterprise has been changed. See DM Preferences – Clients.
The following table identifies the tasks that you might perform when you want to manage your own account.
|
Task |
Description |
For Instructions |
|---|---|---|
|
Change your password. |
You do not have to be the admin user to change the password of your own account. | |
|
Change your email address. |
Use this procedure to change the email address to which notification emails are sent. | |
|
Relogin as a different user. |
You can log in as another user when you are logged in. |
 To Change Your Password On Demand
In this procedure you change the password of your user account at any time.
-
Log in as any user.
-
Do one of the following:
-
From the tool bar, click the Users button.
-
From the Tools menu, choose Users.
The Users window opens.
-
-
Select your currently logged in user name from the list.
-
Do one of the following:
-
From the tool bar of the Users window, click the Edit button.
-
Right-click the selected user name and choose Edit.
The User Editor window opens.
-
-
Change your password and then verify it.
-
Click OK.
The change takes effect immediately.
 To Change Your Email Address
You can receive emails from Sun Update Connection – Enterprise when specific events occur. In this procedure you change the email address to which you receive event notifications.
-
Log in as any user.
-
Do one of the following:
-
From the tool bar, click the Users button.
-
From the Tools menu, choose Users.
The Users window opens.
-
-
Select your currently logged in user name from the list.
-
Do one of the following:
-
From the tool bar of the Users window, click the Edit button.
-
Right-click the selected user name and choose Edit.
The User Editor window opens.
-
-
Change your email address.
You can also change the selections of events for which you will receive notification; change the checkbox selections under Notify When:
-
Job paused for confirmation
-
Job finished
-
Job failed
-
Host disconnected
-
-
Click OK.
The change takes effect immediately.
 To Relogin with a Different User Name
In this procedure you log out of the console and automatically re-login, without having to type the shell command line to start the console, with a different user name and password.
Note –
This feature is not available in the console on Microsoft Windows.
- © 2010, Oracle Corporation and/or its affiliates
