Uninstalling Sun Update Connection – Enterprise
Separate procedures uninstall the Sun Update Connection – Enterprise software:
 To Uninstall the System Dependency Server
In this task, you uninstall the system dependency server and all libraries. When you uninstall the system dependency server, the software uninstalls both the knowledge base and the dependency manager.
-
Log in as superuser.
Start ezinstaller from the product directory where you expanded the tar file.
-
Start ezinstaller
# ./ezInstall
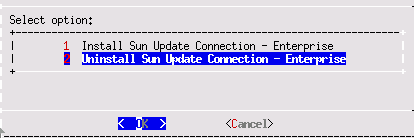
The Uninstall screen is displayed.

-
In the screen, select Uninstall.
A confirmation screen is displayed.
The complete Sun Update Connection – Enterprise suite and all files and libraries are removed.
-
To begin uninstallation, press Enter.
Uninstallation might seem to take a long time to begin. To avoid database corruptions, the system dependency server completes active tasks before ezinstaller shuts down the applications, then begins uninstalling the software.
When the process is complete, the Success screen is displayed.
-
To exit this screen, press Enter.
The Install or Uninstall option screen is displayed.
A confirmation screen appears.
-
To exit ezinstaller, press Enter.
A confirmation screen is displayed.
-
Select Yes.
The ezinstaller ends.
 To Uninstall Sun Update Connection – Enterprise Agent, Console, or CLI
With this procedure, you can uninstall any of the following the Sun Update Connection – Enterprise components:
-
Agent – If you uninstall the agent, the agent's host system is disconnected from Sun Update Connection – Enterprise management
-
Console
-
Command-line interface from a non-system dependency server system
-
Log in as superuser.
-
Decide how to begin uninstalling the files.
-
If the original ezinstaller program is still on the managed host, start uninstalling.
# ./ezInstall
-
If the tar.gz file is not on this system, copy it and then start the installer.
a. Copy the tar.gz file from the system dependency server system and expand the files. To copy and expand the files, review Step 2 through Step 5 in Installing the Agent, Console, or CLI.
b. Start the installer.
# ./ezInstall
-
-
In the screen, select Uninstall.
A confirmation screen is displayed.
-
Press Enter.
When the process is complete, the Success screen is displayed.
-
To complete uninstalling, press Enter.
The Install or Uninstall option screen is displayed.
-
To exit ezinstaller, press Enter.
A confirmation screen is displayed.
-
Select Yes.
The ezinstaller ends.
- © 2010, Oracle Corporation and/or its affiliates
