Initializing the Solaris Management Console
Initialize the SMC Server
-
In the root role in an
ADMIN_LOWworkspace, start the SMC server process in the terminal window.
# smc
Note -The smc command initializes the SMC server. The first time the server is launched, it performs several registration tasks, which can take a few minutes.
-
If toolbox icons do not appear in the Solaris Management Console,
And the Navigation pane is not visible:
-
In the Open Toolbox dialog that is displayed, click Load next to where this machine's name is listed under Server.
If this machine does not have the recommended amount of memory and swap, it may take a few minutes for the toolboxes to display. See "Recommendations for the Trusted Solaris Environment".
-
From the list of toolboxes, select Trusted Solaris Management Console, then click the Open button.
And the Navigation pane is visible, but the toolbox icons are stop signs:
-
Exit the SMC by choosing Exit from the Console pull-down men
-
Restart the SMC
# smc
-
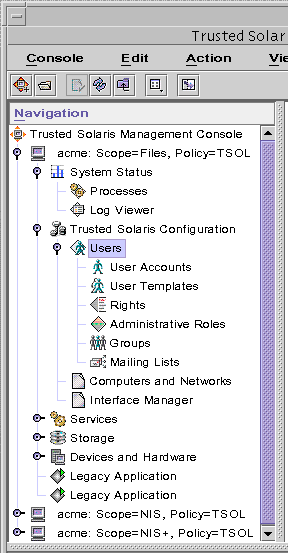
Open the Trusted Solaris Management Console toolboxes by choosing Open from the Console menu, then selecting Trusted Solaris Management Console. The following figure shows the Navigation Pane of the Solaris Management Console in the Files scope.
Figure 4-3 Solaris Management Console Tools

-
(Optional) Save the Current Toolbox
Saving the toolbox preference enables the Trusted Solaris Management Console toolboxes to load by default. The preferences are saved per role, per host (SMC server).
-
From the Console menu, choose Preferences.
-
Click the Use Current Toolbox button, then click OK.
If you are configuring the name service master, return to "(Optional) Configuring Routing" in Chapter 5, Configuring a Name Service Master. Otherwise, continue.
- © 2010, Oracle Corporation and/or its affiliates
