Using the Device Allocation Manager
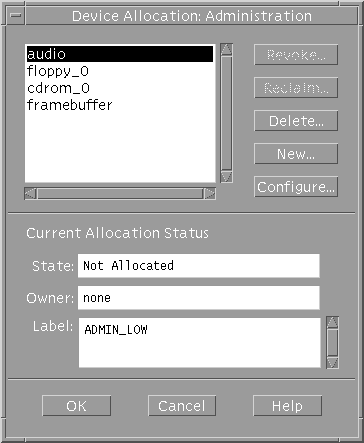
Clicking the Device Administration button launches the Device Allocation: Administration dialog box. This dialog box is used for reclaiming and revoking devices, deleting, or making entries for new devices.

Revoke - Click to force deallocation of the selected device.
Reclaim - Click to release the selected device from the allocate error state and leave it deallocated.
New and Configure - Click to create a new device or configure an existing device.
Configuring a Device
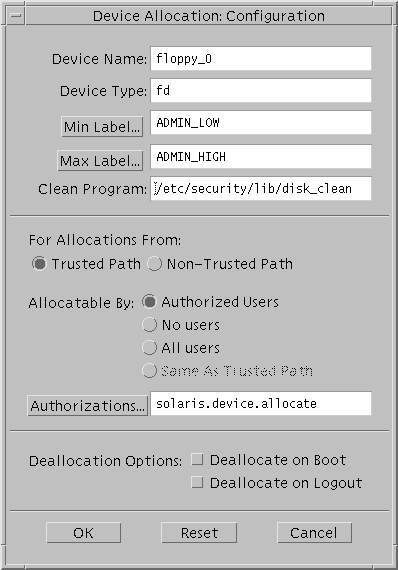
This section describes the information that can be specified for a device using the Device Allocation Configuration dialog box shown in the following figure.
Figure 12-1 Device Allocation Configuration Dialog

Device Name and Device Type - Displays the name and device type. These fields can be edited when creating a new device.
Min Label and Max Label - Click to set the label range on the device. The default label range is ADMIN_LOW to ADMIN_HIGH. See "Initial Device Configuration Decisions" for more
about setting a device's label range. These fields are valid for allocatable and nonallocatable devices.
Clean Program - Enter the path of a device_clean(1M) script for an allocatable device. If no device_clean script is specified at the time the device is created, the default is /bin/true. For how to write device clean scripts, see "Using Device-Clean Scripts".
For Allocations From: Trusted Path or Non-Trusted Path - Click (Trusted Path) to require users to use the Device Allocation Manager when allocating the device. Click remote (Non-Trusted Path) to enable users to use the allocate command in a script or when remotely logged in to allocate the device.
By default, the Allocate Devices authorizations enables allocation from the trusted path and from outside the trusted path. Sites that are concerned about the potential risk of remote device allocation can restrict it. See "Authorizing Device Allocation" for an example.
Allocatable By - Click one of Authorized Users, All Users, or No Users.
The No Users option is used most often for the framebuffer and printer, which do not have to be allocated to be used. But it is also used as shown in Table 12-3, to prevent an allocatable device from being accessed.
If no authorization is specified at the time the device is created, the default is All Users. If an authorization is specified, the default is Authorized Users.
Because the Add Allocatable action sets up a new device as allocatable by all users, the Security Administrator needs to click Allocatable By No Users when a device, such as the frame buffer and printers, should not be allocatable by anyone.
Authorizations - Click to change from the default authorization, solaris.device.allocate. See "To Add an Authorization to the Environment" for an example of creating and adding new device authorizations.
Deallocation Options - Click Deallocate on Boot or Deallocate on Logout. to specify that any devices that are allocated by a directly-logged-in user are deallocated either at logout or at system boot or both.
Note -
These options do not affect any devices allocated outside the trusted path (either during a remote login, or from a script or customer-written application) . Also, the boot command with the -r option can be used to force the deallocation of all devices at boot time.
Leaving devices allocated after logout could enable remote access to a device that otherwise can only be allocated locally. For example, a user could log in to one computer, allocate a device, then log out. The user then could log back in remotely to the first computer. During that remote session, the first computer's microphone could transmit the talk around the first computer.
- © 2010, Oracle Corporation and/or its affiliates
