Chapter 6 Post-Installation Tasks
This chapter provides the procedures for tasks that are performed after the N1 Provisioning Server software has been installed. The following topics are discussed:
Validating the N1 Provisioning Server Installation
N1 Provisioning Server validation consists of two tasks:
-
Checking that all N1 Provisioning Server packages have been correctly installed on the control plane server
-
Creating and activating a farm
You can either import and then activate a default farm configuration, or you can manually create and activate a farm. Procedures for both methods are provided.
 To Validate Package Installation on the Control Plane Server
Steps
-
Log in as root (su - root) on the control plane server.
-
Type the command /opt/terraspring/sbin/check_rel to list the installed packages and their installation states.
The output should be similar to the following.
root# /opt/terraspring/sbin/check_rel
Manifest is for Terraspring Release 3.1.1.4
Checked system for roles: SP, IDB, CC

Package      Manifest   System     Installation State
--------------------------------------------------------------------------------
NcFTPc:      3.1.5      3.1.5      completely installed
TSPRbli:     3.1.2      3.1.2      completely installed
TSPRblibs:   3.1.2      3.1.2      completely installed
    .
    .
    .
TSPRsuna:    3.1.2      3.1.2      completely installed
TSPRtools:   3.1.4      3.1.4      completely installed
root@idbqe1.qe1:~/etc/seq11017-1#
 To Validate Installation by Creating and Activating a Farm
Before You Begin
-
The N1 Provisioning Server software must be installed successfully. Chapter 4, Installing Provisioning Server Software.
-
A PC running Internet Explorer 6.0 or later must be connected and configured to the network. See Table 2–3.
Steps
-
Log in to the Control Center Management PC as administrator and start Internet Explorer.
-
Type the URL of the N1 Provisioning Server in the address field of the Internet Explorer browser.
The URL is the location where the Control Center software is installed, for example http://machine_name.domain_name where machine_name is the name of the control plane server, and domain_nameis the corporate domain name.
The Control Center login page is displayed.
-
Click on Login Page.
The login screen is displayed.
-
Type demo for the username and for the password.
The first time that you log in as an administrator, the default username is demo with password demo for the user account. You should change this information immediately after you log in for the first time. An administrator account has also been provided. The username for this account is root with password root. For further information, See Managing Accounts in N1 Provisioning Server 3.1, Blades Edition, Control Center Management Guide.
-
Click Log In to access the Control Center Administration Screen.
The Administration Welcome screen is displayed.
 Caution –
 The Internet Explorer navigation controls are intentionally disabled by the Control Center. Do not navigate by using the keyboard shortcuts such as control-K and F5. Using Internet Explorer navigation controls within the Control Center causes unpredictable behavior.
The first time that you log in, the Administration screen shows that an initial account has already been created for you. The name of this account is demo. This account is already highlighted under Accounts in the upper left corner of the screen. This initial account enables you to quickly validate the N1 Provisioning Server installation.
-
From the Editor menu, choose Edit new farm.
The Editor screen is displayed with the Create New Design dialog displayed.
-
In the Name field, type a name for your farm.
-
In the I-Fabric field, choose Initial I-Fabric.
-
Click Import Options and type a file name to import.
See Importing and Exporting Farms in N1 Provisioning Server 3.1, Blades Edition, Control Center Management Guide for further information.
-
Click OK to close the Create New Design dialog box.
The Editor screen appears.
-
From the Elements box on the left, drag and drop the External Subnet element icon (displayed as a subnet with a cloud) to the Editor work area.
-
From the Elements box on the left, drag and drop the Server Group element icon (third element down on the left column) to the Editor work area to a position about two inches below the External Subnet element.
-
Click a connection point (port) on the External Subnet element. Do not hold the mouse button 3 down.
-
Move the cursor to the Server Group element.
A connection line is displayed in red.
-
Click the Server Group element Eth0 interface node.
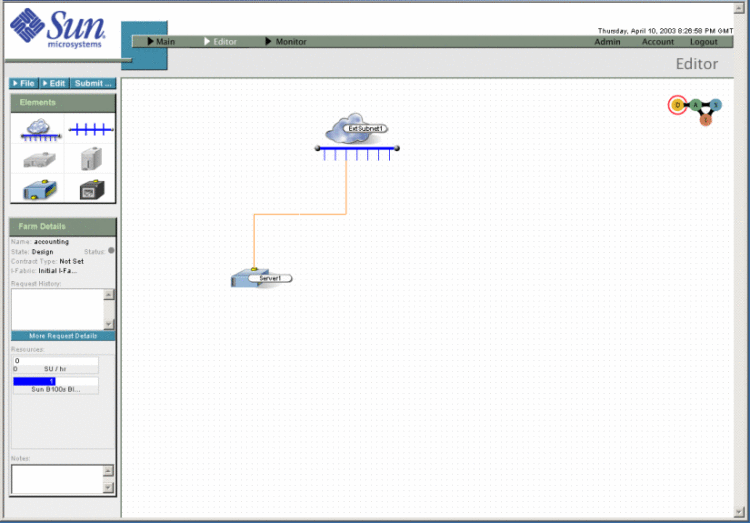
Your Control Center screen should look similar to the following screen.
Figure 6–1 Initial Create I-Fabric Screen
-
Double-click the Server Group element.
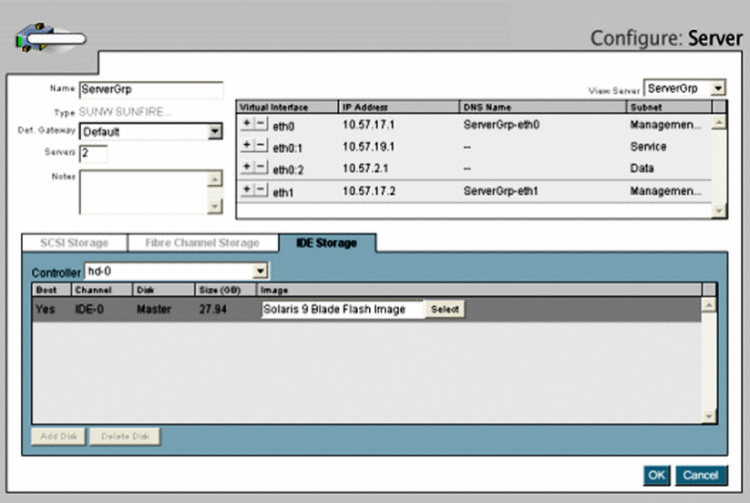
The Configure Server window on the screen is displayed.
Figure 6–2 Configure Server Window
-
Click Select an Image.
The Select Disk Image dialog is displayed. The name of the Disk Image is already highlighted.
-
Click OK to select this disk image.
The Configure Server window is displayed with the name of the Disk Image displayed in the Image field.
-
Click OK to select the Disk Image.
-
In the upper left of the Editor screen, click the Submit button.
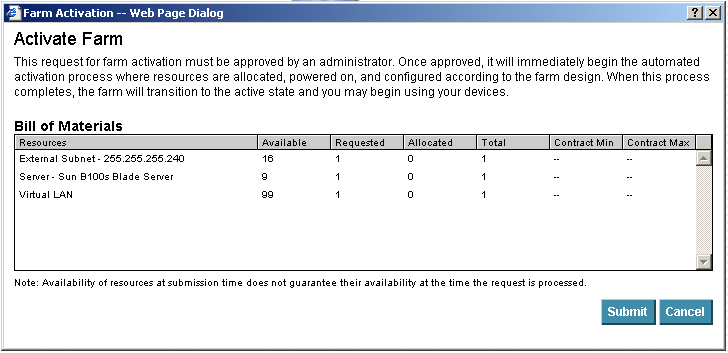
The Farm Activation dialog box is displayed.
Figure 6–3 Control Center Farm Activation Dialog Box
-
Click the Submit button.
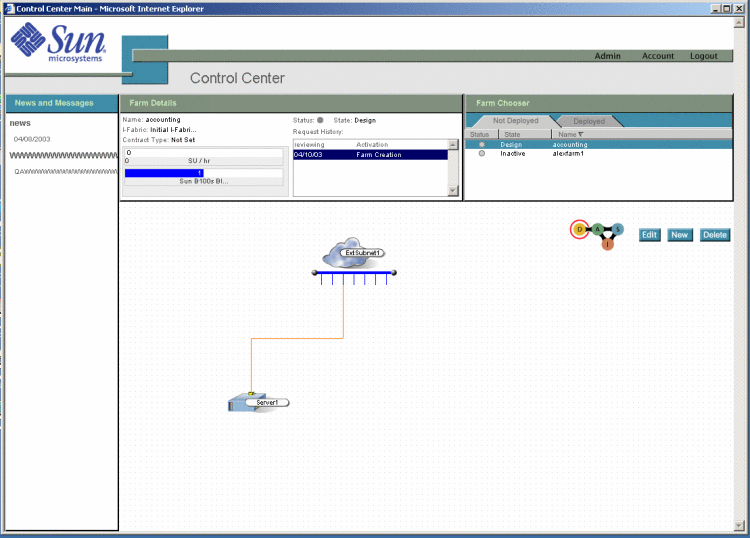
The Control Center Main screen is displayed.
Figure 6–4 Control Center Main Screen
-
Click the Admin link at the upper right of the screen.
The Administration screen is displayed.
-
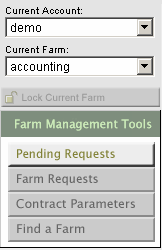
Under Farm Management Tools on the left of the Administration screen, click the Pending Requests button
Figure 6–5 Select Pending Requests Button
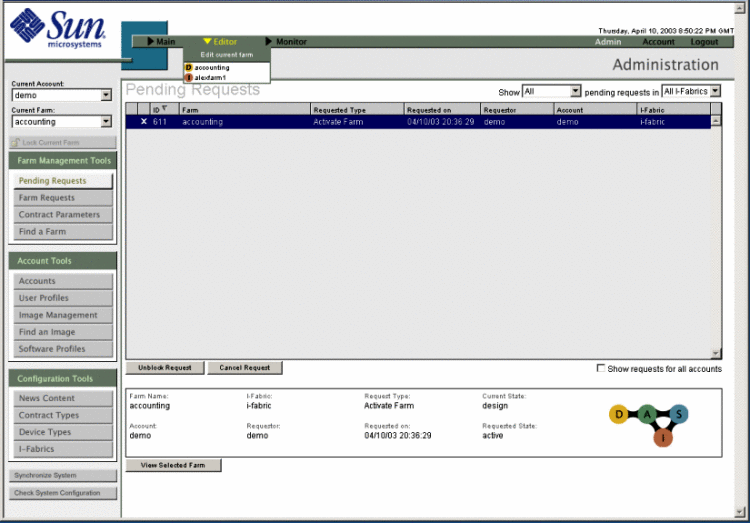
The Pending Request screen displays.
Figure 6–6 Pending Request Screen
-
Click Unblock Request to initiate farm activation.
A confirmation dialog box is displayed.
-
Click OK.
-
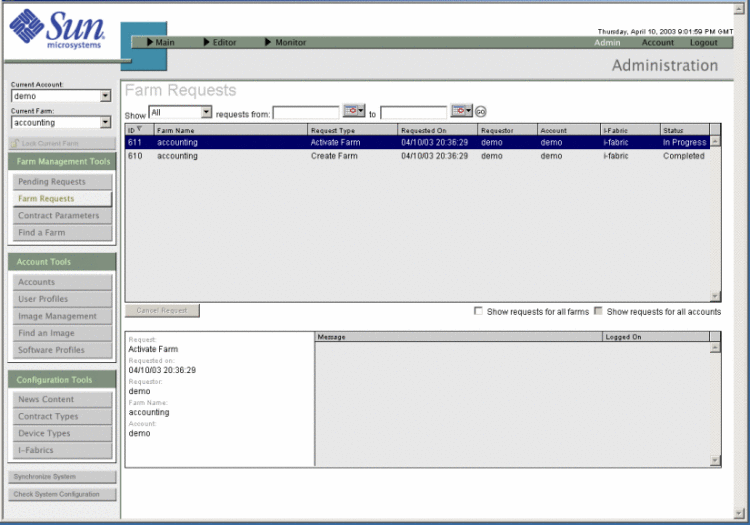
Under Farm Management Tools on the left of the Administration screen, click the Farm Requests button.
The Farm Requests screen is displayed.
Figure 6–7 Farm Requests Screen
-
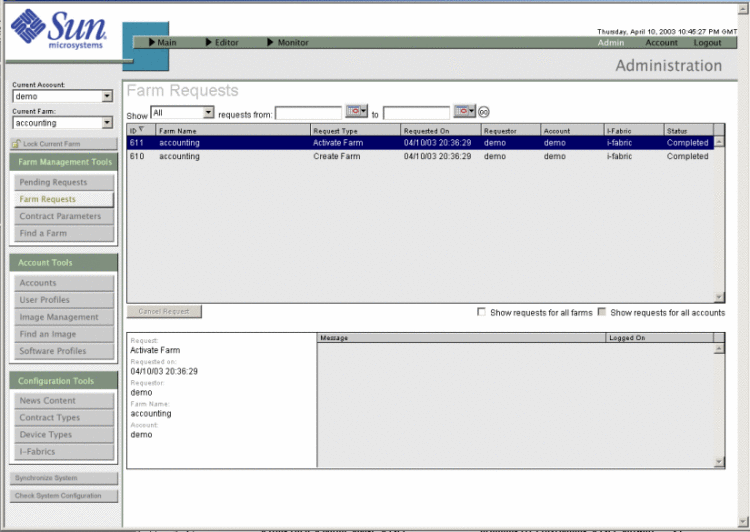
Monitor the message panel in the lower right corner.
It might take up to an hour before you see the status field show Completed as illustrated in the following figure.
Figure 6–8 Farm Request Completed Screen
-
If no failed messages appear in the message panel, the successful activation of this simple farm validates the N1 Provisioning Server Installation. You can now create your server blade farms. Follow the instructions in Chapter 4, Building, Updating, and Monitoring Server Farms in N1 Provisioning Server 3.1, Blades Edition, Control Center Management Guide.
-
If you see failed messages in the message panel, you need to correct the problem and resubmit the farm by returning to step 14. See Chapter 6, Troubleshooting in N1 Provisioning Server 3.1, Blades Edition, Control Center Management Guide for information on troubleshooting problems.
-
See Also
How To Import a Farm in N1 Provisioning Server 3.1, Blades Edition, Control Center Management Guide
Migrating From Oracle to PostgreSQL
You must upgrade from N1 Provisioning Server, Blades Edition version 3.0 to version 3.1 before you can migrate your N1 Provisioning Server 3.0 database data from Oracle to PostgreSQL (Postgres).
 To Migrate N1 Provisioning Server 3.0 Data from Oracle to
Postgres
Steps
-
Log in as root (su - root) on the control plane server.
-
Verify that the database administration group exists by typing grep dba /etc/group.
-
If the dba group exits, the response dba::100: is displayed. Go to the next step.
-
If the dba group does not exist, only the prompt is displayed. Type groupadd dba to create the database administration group.
-
-
Type useradd -g dba postgres to add the Postgres user account.
-
Change the database port.
-
Log onto the control center as administrator using a Control Center management PC.
The Control Center main screen is displayed.
-
Click Admin in the menu bar.
The Administration Screen is displayed.
-
Click I-Fabric in the Configuration Tools panel.
The I-Fabrics screen is displayed.
-
Replace the displayed port number with the Postgres port number 5432.
-
Click Commit Changes.
-
Click Logout to log out of the Control Center.
-
-
Type /opt/terraspring/sunone/bin/appserv stop to stop the control center application server.
-
Back up the control plane database.
Type the command /opt/terraspring/sbin/backupdb -o ${Oracle_Home} backup_file
where backup_file is the name you have chosen for the backup file.
-
Back up the Control Center database by typing /opt/terraspring/gwdb/bin/backupDB.sh.
The Control Center database is backed up to the file /var/opt/terraspring/gwdb/backup/tsprgwdb.backup.
-
Update the database properties file to point to the Postgres database and port.
Note –The following single-line examples have been split across two lines for display purposes.
-
In the file /etc/opt/terraspring/tspr.properties, change the following DBConnection text string.
com.terraspring.core.sys.GridOS.DBConnection=
        com.terraspring.db.oracle.OracleCpdbConnection
to
com.terraspring.core.sys.GridOS.DBConnection= com.terraspring.db.postgres.PostgresCpdbConnection -
Change to port number in the CpdbConnection text string from 1521 to 5432.
com.terraspring.db.CpdbConnection.port=1521
For example:
com.terraspring.db.CpdbConnection.port=5432
-
Save and close the file.
-
-
Install the Postgres database.
-
Create the Postgres database.
Type the command /opt/terraspring/lib/postgres/createdb -i -H localhost -o /opt/postgres -n tsprdb -f postgres_data postgres_log where postgres_data is the full path of the directory in which the database is created, and postgres_log is the full path name of the directory in which the database logs are saved.
-
Restore the control plane database data to Postgres.
Type the command /opt/terraspring/sbin/restoredb restore_file
where restore_file is the name of the control plane database backup file you created in Step 6.
-
Configure the database by typing /opt/terraspring/gwdb/bin/configure.sh.
You are prompted for configuration information. The following list shows the prompts and the required responses. Responses are case-sensitive and must be typed exactly as shown with no leading and no trailing spaces unless otherwise noted.
-
DB_TYPE: Postgres
-
DB Admin User: postgres
-
DB Admin Password: postgres
-
DB User: tcc
-
DB User Password: tcc
-
DB Host Name: localhost
-
DB Instance Name: tsprdb
-
DB Instance Listening Port: 5432
-
DB Backup Directory [/var/opt/terraspring/gwdb/backup]:
Press Enter.
-
DB Backup Filename [tsprgwdb.backup]:
Press Enter.
-
-
Initialize the Postgres database by typing /opt/terraspring/gwdb/bin/createDB.sh -y.
-
Restore the database Web configuration information by typing /opt/terraspring/gwdb/bin/restoreDB.sh.
The following messages appear:
WARNING: That will destroy the current Control Center database.
Do you want to continue anyway(y/n)? [n]:
Type y to continue.
-
Reconfigure the Control Center for Postgres.
-
Stop and reconfigure the Control Center application server by typing /opt/terraspring/sunone/bin/setup7.sh -silent.
The setup7.sh script stops and then reconfigures the Control Center (CC) application server using the files you have updated in the previous steps.
-
Type the following commands in sequence to stop and restart the monitoring manager:
/opt/terraspring/sbin/snmpd stop
/opt/terraspring/sbin/snmpd start
-
Type the following commands in sequence to stop and restart the segment manager.
/etc/rc3.d/S97sm stop
/etc/rc3.d/S97sm start
-
Type the following commands in sequence to stop and restart the monitoring manager:
/opt/terraspring/sbin/mmd stop
/opt/terraspring/sbin/mmd start
-
Restart the CC application server by typing /opt/terraspring/sunone/bin/appserv start
- © 2010, Oracle Corporation and/or its affiliates
