Creating and Managing Images
You can create and manage images using one of the following methods:
-
Using the image wizard.
-
Using image preparation and image release commands on the command line.
-
Using the Control Center graphical user interface (GUI). See the N1 Provisioning Server 3.1, Blades Edition, Control Center Management Guide for details.
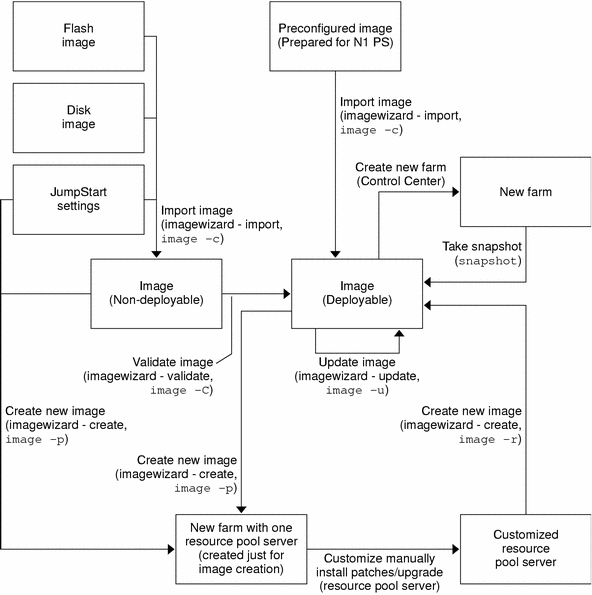
The following diagram provides an overview of the sequence of steps and the commands involved in performing the following image management tasks:
-
Creating images
-
Upgrading images
-
Importing images
-
Validating images
-
Updating image attributes
Figure 3–1 Image Management Flow Chart

As the diagram shows, you can import the following newly created images from preconfigured images into the image repository using the image wizard user interface or the image -c command from the command line.
-
disk images
-
flash images
-
JumpStart images
Note –
JumpStart and flash images apply to the Solaris operating environment only.
When an image is imported into the image repository, it is marked as either deployable or non-deployable. A deployable image contains all relevant N1 Provisioning Server agent software, customizations, and is ready for deployment to a farm using the Control Center. A non-deployable image is not ready for deployment to a farm using the Control Center. All preconfigured images being shipped with the N1 Provisioning Server contain all the relevant software packages and are therefore marked as deployable when imported into the image repository. Images such as disk, flash, and JumpStart images that might not yet contain all relevant software packages are marked as non-deployable when imported into the image repository.
The image validation process validates a non-deployable image and marks it as deployable if the validation is successful. Validating an image ensures that the image can be deployed using the Control Center during farm creation. You can use either the image wizard or the image -C command from the command line to validate images.
You can create images and add them to the image repository with either the image wizard user interface or the command line using the image -p and image -r commands. With either method, image creation follows a two-step process:
-
Create a farm with a single resource pool server and install an operating environment on the resource pool server using one of the following methods:
-
Creating a new image for the resource pool server from an existing image in the repository
-
Installing an operating environment using an existing JumpStart environment
-
Installing an operating environment manually
-
-
After you have installed the initial operating environment on the resource pool server, you can customize with other applications. You can then release a disk or flash image using the image -r command.
You also can take a snapshot of an existing image on a resource pool server in a farm using the snapshot command. A disk or flash image created in this way is marked as deployable because the resource pool server in use for a farm has the N1 Provisioning agent installed.
Each image is associated with image attributes, such as image description and size. You can update image attributes using either the image wizard or the image -u command on the command line.
For an image upgrade, such as software upgrade or patch installation, you need to create a new image. You can add the software upgrade or patches during the customization step of the image creation process. See Upgrading Images.
- © 2010, Oracle Corporation and/or its affiliates
