Chapter 6 Using Tasks
This chapter provides information on how to work with Ximian Evolution Tasks.
Overview of Tasks
You can use Tasks to create a task, view existing tasks, sort the task list, or change the status of a task.
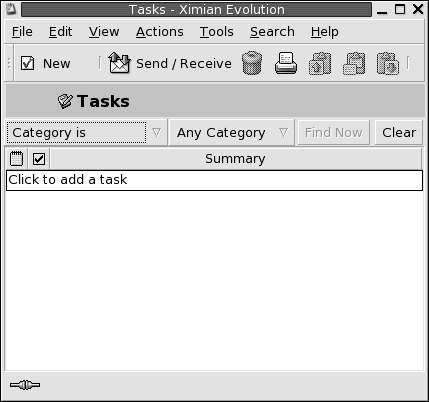
Figure 6–1 shows a typical Tasks window.
Figure 6–1 Typical Tasks Window

In the Tasks window, your tasks are organized as a table. The rows of the table display information about your tasks. The columns represent information fields for your tasks, such as the completed status of the task, the summary of the task, and so on. From left to right, the Tasks window displays the following columns by default:
-
Type
The task type is indicated by an icon. The following table lists and describes the task-type icons:
Icon
Description

Task is unassigned.

Task is assigned.
-
Complete
The completion status is indicated by an icon. The following table lists and describes the completion—status icons:
Icon
Description

Task is incomplete.

Task is complete.
-
Summary
The Summary is a short text description of the task.
For information on how to change the current view, save the current view, or create custom views, see Using Views.
Tasks are displayed in different formats in the Tasks window, depending on the status of the task. The following table lists and describes the task formats:
|
Format |
Description |
|---|---|
|
Normal |
Task is not started or is in progress. |
|
Highlighted |
Task is currently selected. |
|
Strikethrough |
Task is completed. |
|
Colored |
Task is overdue or is due today. |
Creating a Task
To create a task, perform the following steps:
-
Choose File -> New -> Task. A Task window is displayed.
-
Enter the task information in the Basic tabbed section. The following table describes the elements in the Basic tabbed section:
-
To enter more details about the task, click on the Details tab. The following table describes the elements in the Details tabbed section:
-
To save the task, choose File -> Save.
To save the task and then close the Task window, choose File -> Save and Close.
To save the task details in a file, choose File -> Save As to display the Save as window. Enter the filename, then click OK.
To close the Task window without saving the task, choose File -> Close.
-
To preview the details of the task, choose File -> Print Preview.
To print the details of the task, choose File -> Print.
Assigning a Task
You can only assign a task from a local folder. You cannot assign a
task from a Sun ONE folder.
To assign a task, perform the following steps:
-
Double-click on the task in the Tasks window to open a Task window containing the tabbed sections described in Creating a Task.
-
Choose Actions -> Assign Task to display the Assignment tabbed section.
-
Select the organizer of the task from the Organizer drop-down list.
-
The task assignments are listed in table format. You can customize the table by adding or removing columns, as described in Using Views. By default, the task assignments table contains the columns described in the following table:
-
Click on the Invite Others button to create a new entry in the assignments table.
Evolutionalso displays the Select Contacts from Addressbook dialog, which you can use to select attendees. -
Choose File -> Save and Close.
Evolutioncreates the task assignments and then asks if you would like to send the task assignment information. -
Click Yes to send the task assignment information to the specified mail addresses.
Click No to save the task assignment information without sending to the specified mail addresses. You can send the task assignment information at a later time, as described in Sending Task Information.
Sending Task Information
To send task information, perform the following steps:
-
Double-click on the task in the Tasks window to open a Task window.
-
Choose Actions -> Forward as iCalendar to display a task information window. The task information window is an email message window, similar to the Inbox Compose a message window.
Evolutionautomatically inserts text in the Subject text box and in the message content area.Evolutionincludes the task information as an attachment to the message. -
Type the email addresses to which you want to send the task information, in the To text box. If you want to send the information to more than one address, separate the addresses with a comma. Alternatively, click on the To button. Use the Select Contacts from Addressbook dialog to select addresses.
For more information about the elements in the task information window, see To Send a New Message.
-
Choose File -> Send to send the task information to the specified email addresses.
-
Choose File -> Close to close the Task window.
Marking a Task as Complete
To mark a task as complete, perform the following steps:
-
Select the task in the Tasks window.
-
Choose Edit -> Mark as Complete.
Sorting Tasks
For information on how to sort tasks, see Chapter 1, Overview of Ximian Evolution.
Deleting Tasks
You can delete individual tasks, or all tasks marked as complete.
To Delete Individual Tasks
To delete individual tasks, perform the following steps:
-
Select the tasks in the Tasks window.
-
Choose Edit -> Delete to display a confirmation alert.
-
Click Yes to delete the selected tasks.
To Delete All Tasks Marked As Complete
To delete all tasks marked as complete, perform the following steps:
-
Choose Actions -> Expunge to display a confirmation alert.
-
Click Yes to delete all tasks marked as completed.
- © 2010, Oracle Corporation and/or its affiliates
