Using the OpenSSO Web Services Security (WSS) Agent for Authentication and Authorization
To configure access-level authorization using OpenSSO Web Services Security Agent, you configure the consuming endpoint to use OpenSSO WSS Agent to authenticate the client's credentials (the username and password extracted from the HTTP Authorization header) against the user's credentials in the WSS Agent database. OpenSSO Web Services Security Agent allows the HTTP Binding Component to talk to OpenSSO Enterprise Server 8 installed on a remote or local computer.
Install OpenSSO Enterprise Server
To use the OpenSSO Web Services Security Agent, first download and install OpenSSO Enterprise Server following the directions and requirements presented in the Installing and Configuring a Single OpenSSO Enterprise Instance document.
Configure the HTTP Binding Component to use OpenSSO Web Service Security
With OpenSSO Enterprise Server installed, you can now configure the HTTP Binding Component to use the OpenSSO WSS Agent. The OpenSSO WSS Agent file contains the client configuration AMConfig.properties, and OpenSSO ClientSDK, that allow web service providers and clients to easily integrate, to validate and secure web service communications.
-
Download openssowssproviders.zip. This file is available from http://download.java.net/general/opensso/stable/opensso-build6/openssowssproviders.zip, or you can go to the OpenSSO Downloadpage and click WSS Agent to download the zip file.
-
Create a directory, such as /GlassFishESB/WSSAgent_OpenSSO/, and extract the contents of the openssowssproviders.zip file into it.
-
From the NetBeans Services window, make sure that the GlassFish server is started. If not, right-click GlassFish and choose Start from the pop-up menu.
-
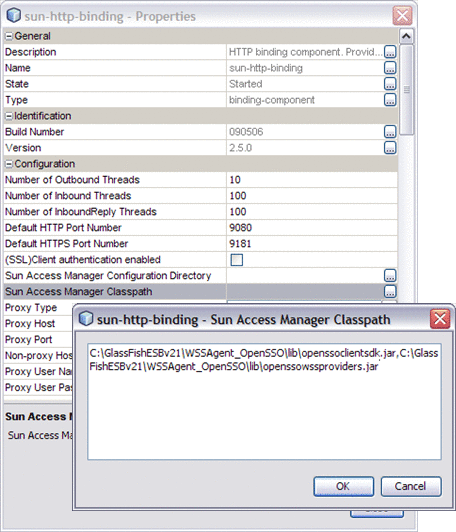
Open the HTTP Binding Component Properties. To do this, expand Servers -> GlassFish -> JBI -> Binding Components in the Services window, right-click sun-http-binding and select Properties from the pop-up menu.
The HTTP Binding Component Properties Editor appears.
-
Configure the Sun Access Manager Classpath property to point to the following JAR files that you extracted to the WSSAgent_OpenSSO directory:
-
openssoclientsdk.jar
-
openssowssproviders.jar
Note that the two files must be separated by a comma.

-
-
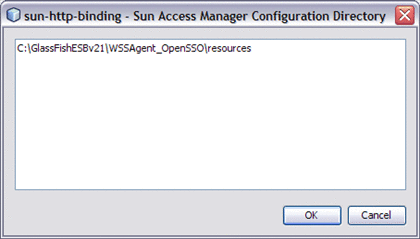
Configure the Sun Access Manager Configuration Directory property to point to the directory that contains the the AMConfig.properties file. This is located in the ./resources directory extracted to the WSSAgent_OpenSSO directory.

-
Modify the AMConfig.properties file as needed to connect to OpenSSO Enterprise Server. At a minimum, the following properties must be configured:
com.iplanet.am.naming.url=@PROTOCOL@:
   //@SERVER_HOST@:@SERVER_PORT@/@DEPLOY_URI@/namingservice
com.sun.identity.agents.app.username=@APPLICATION_USER@
com.iplanet.am.service.password=@APPLICATION_PASSWD@
am.encryption.pwd=@ENCRYPTION_KEY@
com.iplanet.am.server.protocol=@SERVER_PROTOCOL@
com.iplanet.am.server.host=@SERVER_HOST@
com.iplanet.am.server.port=@SERVER_PORT@
com.iplanet.am.services.deploymentDescriptor=@DEPLOY_URI@
com.sun.identity.loginurl=@SERVER_PROTOCOL@://@SERVER_HOST@:
   @SERVER_PORT@/@DEPLOY_URI@/UI/Login
com.sun.identity.liberty.authnsvc.url=@SERVER_PROTOCOL@://
   @SERVER_HOST@:@SERVER_PORT@/@DEPLOY_URI@/Liberty/authnsvc
-
Restart GlassFish and HTTP BC and test the modifications.
- © 2010, Oracle Corporation and/or its affiliates
