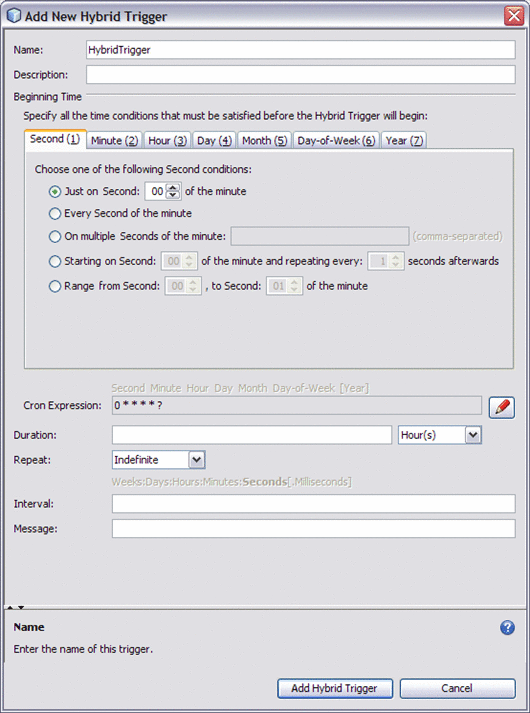
Using the Add New Hybrid Trigger Editor
The Add New Hybrid Trigger Editor is accessed from the Scheduler Control and Triggers Wizard.

To configure a hybrid trigger, complete the following fields:
-
Name: Specifies a user defined name. (This is different than the Group name for the trigger).
-
Description: The description is optional, and can be used to note the action or purpose of the trigger.
-
Beginning Time: Specify all of the time conditions that must be satisfied before the Hybrid trigger begins. The Hybrid trigger beginning time is set using the Cron condition tabs, in the same way that a Cron trigger is configured. For information about the Cron condition tab settings see Creating Cron Triggers.
-
Cron Expression: The Cron Expression field displays the Quartz-style Cron expression generated by the options selected from the condition tabs. Each asterisk is positional, representing the "Every" option for that particular field in the same order as presented by the tabs: Second, Minute, Hour, Day, Month, Day-of-Week, and Year. The asterisk is replaced by a question mark in the fourth (Day) or sixth (Day-of-Week) position, depending on whether the Day condition or Day-of-Week condition is used. The seventh (Year) value is optional, and is only displayed if that option has been selected.
The Cron expression can also be entered or edited directly by clicking the edit (pencil) button. Once your values are entered, click the view-only (eye) button to validate the expression and parse the specified expression back into the condition tabs.
-
Duration: Specifies the length of time that the trigger repeatedly fires, that is the duration of time between the configured Beginning Time and the end time. Select the time units to use to define the duration. The options are: milliseconds, seconds, minutes, hours, days, weeks.
-
Repeat: Specifies a number of times the operation fires. Enter any number in the field, or use the default value, Indefinite, indicating that the trigger repeats indefinitely until stopped.
-
Interval: Specifies the time interval between consecutive repeats of the trigger.
Units of time, from seconds to weeks, are specified in increasing magnitude from right to left. Each unit of time is delimited in between by a colon (:). Milliseconds are expressed as the decimal portion of seconds.
For example:
-
2:5:30:40 — indicates an interval of 2 days, 5 hours, 30 minutes, and 40 seconds.
-
30 — indicates an interval of 30 seconds.
-
0.400 — indicates 400 Milliseconds. Trailing zeros can be omitted.
-
12:0:0:0:0 — indicates 12 weeks.
Everything to the left of Milliseconds is increasingly optional.
Note –Months and years are not included because the number of days in a month or year are not constant. To specify longer units of time, increase your configured weeks and day.
-
-
Message: Specifies the message that is sent to the triggered endpoint. In other words, this is the message that you send to the component that is providing the service.
You can also reference here (ex. ${foo}) Application Variables, Java System Properties, or Scheduler Inbound Normalized Message Properties (see table below).
|
Property |
Description |
Type |
|---|---|---|
|
org.glassfish.openesb.scheduler.inbound.date |
Intended triggering date |
String |
|
org.glassfish.openesb.scheduler.inbound.name |
Trigger name |
String |
|
org.glassfish.openesb.scheduler.inbound.group |
Trigger group |
String |
Example Hybrid Trigger Configuration
As an example of configuring a Hybrid trigger, say you wanted to set a trigger to send a message throughout the months of July and August, Monday through Thursday, from 9:00 AM to 3:00 PM, at 30 minute intervals, every 2.5 seconds for 10 seconds. In English, we communicate this time from the largest unit of time (days) to the smallest (seconds), but when you create a trigger in the Scheduler Binding Component, it is often configured from the smallest setting to the largest.
Configure the Hybrid trigger as follows:
-
From the Minute tab, select and set “Starting on Minute: 00 of the hour and repeating every: 30 Minutes afterwards”.
-
From the Hour tab, select and set “Range from Hour: 09, to Hour: 15 of the day”.
-
From the Day-of-Week tab, select and set “Range from: MON, to: THU each week”.
-
From the Month tab, select and set “On multiple Months of the year: 7,8”.
This creates the Cron expression: * 0/30 9–15 ? 7,8 2–5.
-
For Duration, enter 10 Second(s).
-
For Interval, enter 2.5.
-
For Message, enter “Use Sunscreen”.
- © 2010, Oracle Corporation and/or its affiliates
