Managing User Role Assignments
Roles are assigned to users in the Accounts area of Identity Manager.
 To Assign Roles to a User
Use the following procedure to assign one or more roles to a user (or users).
End-users can also make role assignment requests for themselves. (Only optional roles where the parent role is already assigned to the user can be requested.) See Requests Tab in the Identity Manager End-User Interface section for information on how end-users can request available roles.
-
In the Administrator interface, click the Accounts tab.
The List Accounts subtab opens.
-
To assign a role to an existing user, follow these steps:
-
Click the user’s name in the User List.
-
Click the Roles tab.
-
Click Add to add one or more roles to the user account.
By default, only Business Roles can be directly assigned to users. (If your installation of Identity Manager was upgraded from a pre-8.0 version, both Business Roles and IT Roles can be directly assigned to users.)
-
In the table of roles, select the roles you want to assign to the user and then click OK.
To sort the table alphabetically by Name, Type, or Description, click the column headers. Click a second time to reverse sort. To filter the list by role type, make a selection from the Current drop-down menu.
The table updates to show the selected role assignments, plus any required role assignments that are connected to the parent role assignments.
-
Click Add to view optional role assignments that can also be assigned to the user.
Select the optional roles to be assigned to the user and click OK.
-
(Optional) In the Activate On column, select the date that the role should become active. If you do not specify a date, the role assignment will become active as soon as a designated role approver approves the role assignment.
To make the role assignment temporary, select the date that the role should become inactive in the Deactivate On column. Role deactivation takes effect at the beginning of the selected day.
See To Activate and Deactivate Roles on Specific Dates for more information.
-
Click Save.
-
To Activate and Deactivate Roles on Specific Dates
When assigning a role to a user, you can specify an activate date and a deactivate date. Role-assignment work-item requests are created when the assignment is made. If a role assignment is not approved by the scheduled activation date, however, the role is not assigned. Role activations and deactivations take place a little after midnight (12:01 AM) on the date scheduled.
By default, only Business Roles can have activate dates and deactivate dates. All other role-types inherit the activate date and deactivate date of the Business Role that is directly assigned to the user. Identity Manager can be configured to allow other role types to have directly assignable activate and deactivate dates. For instructions, see Configuring Role Types.
 To Edit the Schedule for the Deferred Task Scanner
The Deferred Task Scanner scans user role assignments and activates and deactivates roles as needed. By default, the Deferred Task Scanner task runs every hour.
-
In the Administrator interface, click Server Tasks.
-
Click Manage Schedule in the secondary menu.
-
In the Tasks Available For Scheduling section, click on the Deferred Task Scanner TaskDefinition.
The “Create New Deferred Task Scanner Task Schedule” page opens.
-
Complete the form. For help, refer to the i-Helps and online help.
To specify a date and time when the task should run, in Start Date use the format mm/dd/yyyy hh:mm:ss. For example, to schedule a task to start running at 7:00 P.M. on September 29, 2008, type 09/29/2008 19:00:00.
In the Result Options drop-down menu, select rename. If you select wait, future instances of this task will not run until you remove the previous results. See online help for more information on the various Result Options settings.
-
Click Save to save the task.
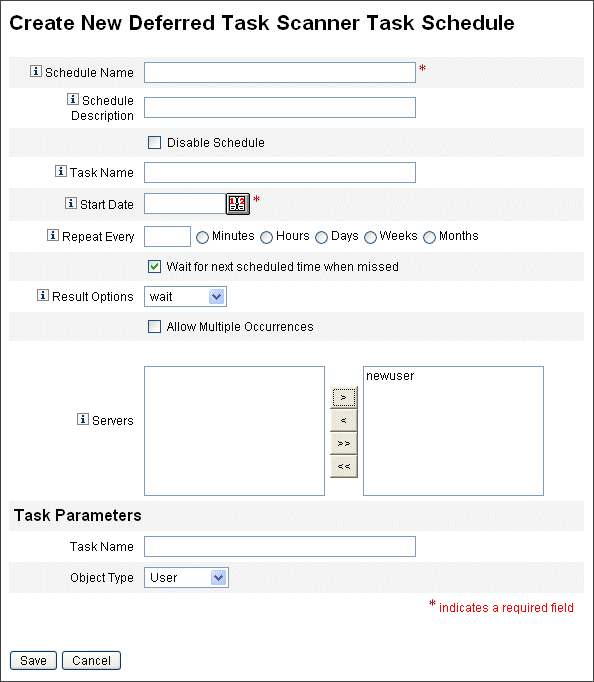
Figure 5–9 shows the scheduled task form for the Deferred Task Scanner task.
Figure 5–9 The Deferred Task Scanner Scheduled Task Form
To Update Roles Assigned to Users
When editing roles assigned to users you can choose to update users with the new role changes immediately, or defer the update to run during a scheduled maintenance window.
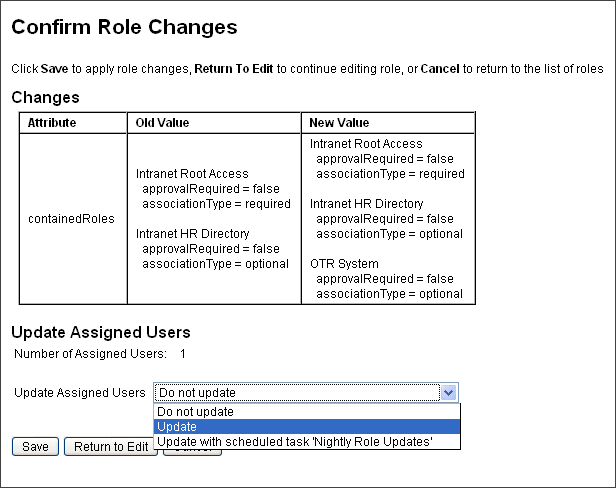
Upon making changes to a role, the Confirm Role Changes page opens. The Confirm Roles Changes page is shown in To Update Roles Assigned to Users.
-
The Update Assigned Users section of this page displays the number of users who currently have the role assigned.
-
Use the Update Assigned Users menu to select whether to immediately update users with the new role changes (Update), to defer updating users until a later time (Do not update), or to select a custom scheduled update task.
-
Because Update updates users immediately, you should avoid choosing this option if a large number of users will be affected. Updating users can be time and resource-intensive. If many users need to be updated, it is preferable to schedule the update for off-peak hours.
-
When Do not update is selected for a role, users assigned to the role will not receive role updates until an administrator views the user’s user profile or until the user is updated by the Update Role Users task. For information on scheduling the Update Role Users task, see the next section.
-
If you have created an Update Role Users task schedule, you can select it from the menu. The selected Update Role Users task will update users assigned to the role according to the schedule defined for the task. See the next section for more information.
To Update Roles Assigned to Users shows the Confirm Role Changes page. The Update Assigned Users section displays the number of users who currently have this role assigned. The Update Assigned Users drop-down menu has two default options: Do not update and Update. You can also select from a list of scheduled Update Role Users tasks. For instructions on creating scheduled Update Role Users tasks, see To Schedule an Update Role Users Task.
-
 To Manually Update Assigned Users
You can update users assigned to roles by selecting one or more roles and clicking the Update Assigned Users button. This procedure runs an instance of the Update Role Users Task for the roles specified.
-
Search for the role (or roles) whose assigned users should be updated by following the instructions on To Search for Roles or To View Roles.
-
Select the role (or roles) using the checkboxes.
-
Click Update Assigned Users.
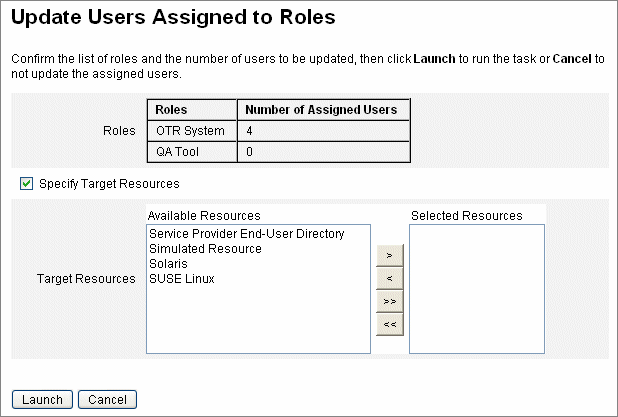
The Update Users Assigned to Roles page (Figure 5–10) displays.
-
Click Launch to start the update.
-
Check the status of the Update Role Users task by clicking Server Tasks in the main menu, then click All Tasks in the secondary menu.
Figure 5–10 The Update Users Assigned to Roles Page
 To Schedule an Update Role Users Task
Note –
You should schedule an Update Role Users task to run on a regular basis.
Schedule the update Role Users task to update users with outstanding role changes as follows:
-
In the Administrator interface, click Server Tasks.
-
Click Manage Schedule in the secondary menu.
-
In the Tasks Available For Scheduling section, click on the Update Role Users TaskDefinition.
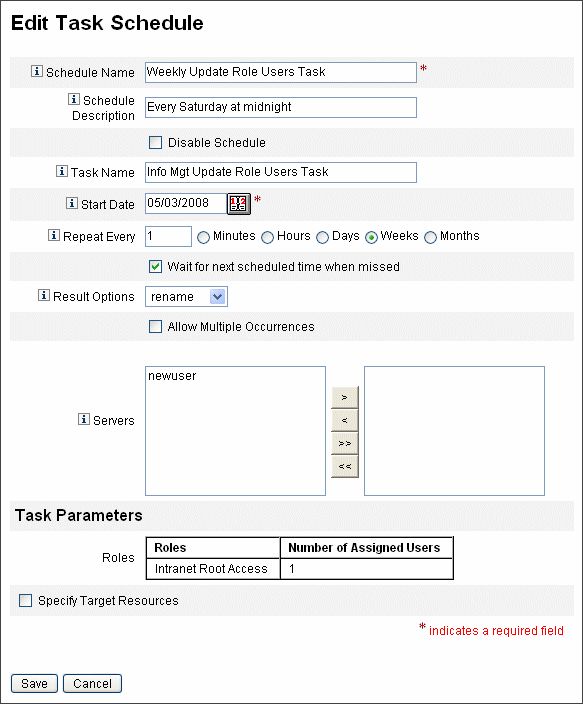
The “Create New Update Role Users Task Schedule” page opens, or, if you are editing an existing task, the “Edit Task Schedule” page opens (Figure 5–11).
-
Complete the form. For help, refer to the i-Helps and online help.
To specify a date and time when the task should run, in Start Date use the format mm/dd/yyyy hh:mm:ss. For example, to schedule a task to start running at 7:00 P.M. on September 29, 2008, type 09/29/2008 19:00:00.
In the Result Options drop-down menu, select rename. If you select wait, future instances of this task will not run until you remove the previous results. See online help for more information on the various Result Options settings.
-
Click Save to save the task.
Figure 5–11 shows the scheduled task form for the Update Role Users task. Specific roles can be assigned to specific Update Role Users tasks (as shown in the Task Parameters section.) See To Update Roles Assigned to Users for more information.
Figure 5–11 The Update Role Users Scheduled Task Form
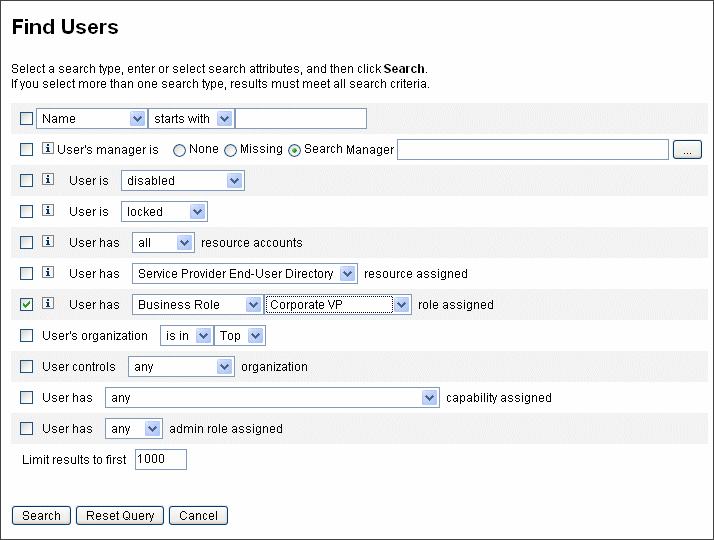
 To Find Users Assigned to a Specific Role
You can search for users who have a specific role assigned.
-
In the Administrator interface, click Accounts.
-
Click Find Users in the secondary menu. The Find Users page opens.
-
Locate the search type User has [Select Role Type] role assigned.
-
Select the option box and use the Select Role Type drop-down menu to filter the list of available roles.
A second role menu opens.
-
Select a role.
-
Clear the other search-type checkboxes, unless you want to narrow your search further.
-
Click Search.
Figure 5–12 Searching for users assigned a role using the Find Users page
 To Remove One or More Roles From a User
Using the Edit User page, one or more roles can be removed from a user account. Only a directly assigned role can be removed. Indirectly assigned roles (that is, conditional and/or required contained roles) are removed when the parent role is removed. Another way for an indirectly assigned role to be removed from a user is if the role is removed from the parent role (see To Remove a Role Assigned to Another Role).
End-users can also request that assigned roles be removed from their user accounts. See Requests Tab in the Identity Manager End-User Interface section.
For information on removing a role using a scheduled deactivation date, see To Activate and Deactivate Roles on Specific Dates.
-
In the Administrator interface, click the Accounts tab.
The List Accounts subtab opens.
-
Click the user from which you want to remove a rule (or rules).
The Edit User page opens.
-
Click the Roles tab.
-
In the table of roles, select the roles you want to remove from the user and then click OK.
To sort the table alphabetically by Name, Type, Activate On, Deactivate On, Assigned By, or Status, click the column headers. Click a second time to reverse sort. To filter the list by role type, make a selection from the Current drop-down menu.
The table shows the parent role assignments (those roles that can be selected), plus any role assignments that are connected to the parent role assignments (those roles that cannot be selected).
-
Click Remove.
The table of assigned roles updates to show the remaining assigned roles.
-
Click Save.
The Update Resource Accounts page opens. Deselect any resource accounts that you do not want removed.
-
Click Save to save your changes.
- © 2010, Oracle Corporation and/or its affiliates
