 To Configure Approval Timeouts
Use the following steps to configure approval timeouts in the Approval times out after section.
-
Select the Approval times out after checkbox.
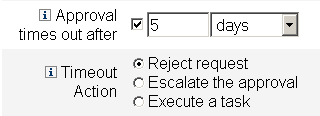
The adjacent text field and menu become active, and the Timeout Action options display, as shown in the following figure.
Figure 9–16 Approval Timeout Options

-
Use the Approval times out after text field and menu to specify a timeout period as follows:
-
Use the Timeout Action buttons to specify what happens when the approval request times out.
Click one of the following:
-
Reject Request. Identity Manager automatically rejects the request if it is not approved before the specified timeout period.
-
Escalate the approval. Identity Manager automatically escalates the request to another approver if the request is not approved before the specified timeout period.
When you enable this button, new options display because you must specify how Identity Manager will determine approvers for an escalated approval. Continue to To Configure the Determine Escalation Approvers From Section for instructions.
-
Execute a task. Identity Manager automatically executes an alternate task if the approval request is not approved before the specified timeout period.
Enable this button and the Approval Timeout Task menu displays so you can specify a task to execute if the approval request times out. Continue to To Configure the Approval Timeout Task Section for instructions.
-
- © 2010, Oracle Corporation and/or its affiliates
