Edit Main Configuration
 To Edit Configuration Objects for a Service Provider Implementation
-
In the Administrator interface, click Service Provider in the menu.
-
Click Edit Main Configuration.
The Service ProviderConfiguration page opens.
-
Complete the Service Provider Configuration form.
Use the instructions provided in the following sections:
Directory Configuration
In the Directory Configuration section, provide information to configure the LDAP Directory and specify Waveset attributes for service provider users.
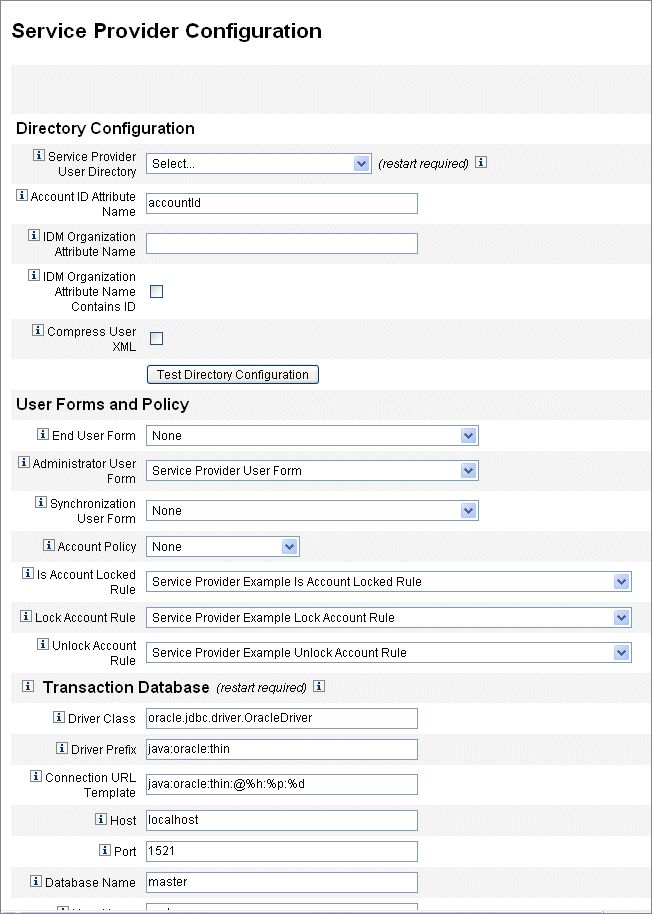
Figure 17–1 shows this area of the Service Provider Configuration page, as well as the User Forms and Policy area discussed in the next section.
Figure 17–1 Service Provider Configuration (Directory, User Forms and Policy)

 To Complete the Directory Configuration Form
-
Select the Service Provider End-User Directory from the list.
Select the LDAP directory resource where all Service Provider user data is stored.
-
Enter the Account ID Attribute Name.
This is the name of the LDAP account attribute that contains a unique short identifier for the account. This is considered the name of the user for authentication and account access through the API. The attribute name must be defined in the schema map.
-
Specify an IDM Organization Attribute Name.
This option specifies the name of the LDAP account attribute that contains the name or ID of an organization within Waveset to which the LDAP account belongs. It is used for delegated administration of LDAP accounts. The attribute name must exist in the LDAP resource schema map and is the Waveset system attribute name (the name on the left side of the schema map).
Note –Specify the Waveset Organization Attribute Name (and IDM Organization Attribute Name Contains ID, if needed) if you want to enable delegated administration through organization authorization.
-
If you choose to select IDM Organization Attribute Name Contains ID, enable this option.
Select this option if the LDAP resource attribute, that refers to the Waveset organization to which the LDAP account belongs, contains the ID of the Waveset organization, and not the name.
-
If you choose to select Compress User XML, enable this option.
Select this option if you choose to compress user XML stored in the directory.
-
Click Test Directory Configuration to verify your entries for the configuration.
Note –You may test your Directory, Transaction, and Audit Configurations as appropriate to your needs. To fully test all three, click all three tests configuration buttons.
User Forms and Policy
In the User Forms and Policy area, shown in Figure 17–1 above, specify the forms and policies to use for service provider user administration.
 To Specify Forms And Policies for Service Provider
User Administration
-
Select the End User Form from the list.
This form is used everywhere except for the Delegated Administrator pages and during synchronization. If None is selected, no default user form is used.
-
Select the Administrator User Form from the list.
This is the default user form that is used in Administrator contexts. This includes the Service Provider Accounts edit pages. If None is selected, no default user form is used.
Note –If you do not choose an Administrator User Form, then administrators will not be able to create or edit Service Provider users from Waveset.
-
Select a Synchronization User Form from the list.
The Synchronization User Form is the default form used if no form is specified for a resource running Service Provider synchronization. If an input form is specified on a resource’s synchronization policy, that form will be used instead. Resources usually require different synchronization input forms. In this case, you should set the synchronization user form on each resource instead of selecting a form from the list.
-
Select an Account Policy from the list.
The choices include any Identity Account Policy defined through Configure > Policies.
-
Select an Is Account Locked Rule from the list.
Select a rule to be run against the Service Provider User view that can determine if an account is locked.
-
Select a Lock Account Rule.
Select a rule to be run against the Service Provider User view that can set attributes in the view that cause the account to be locked.
-
Select a Unlock Account Rule.
Select a rule to be run against the Service Provider User view that can set attributes in the view that cause the account to be unlocked.
Transaction Database
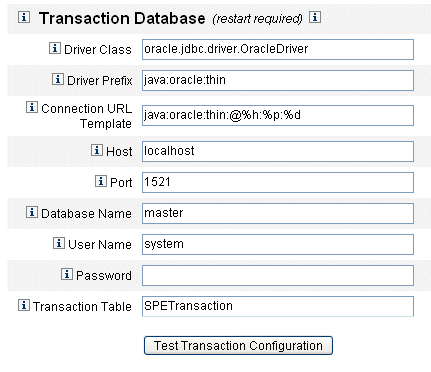
Use this section of the Service Provider Configuration page, shown in Figure 17–2, to configure a transaction database. These options are required only when using the JDBC Transaction Persistent Store. Changing any of these values requires that you restart the server to apply them.
The database table for transactions must be set up according to the schema shown in the create_spe_tables DDL scripts (located in the sample directory of your Waveset installation). The appropriate script may have to be customized for the target environment.
Figure 17–2 Service Provider Configuration (Transaction Database)

 To Configure a Transaction Database
-
Enter the database information.
Complete the following fields:
-
Driver Class. Specify the JDBC Driver class name.
-
Driver Prefix. This field is optional. If specified, the JDBC DriverManager is queried before registering a new driver.
-
Connection URL Template. This field is optional. If specified, the JDBC DriverManager is queried before registering a new driver.
-
Host. Enter the name of the host where the database is running.
-
Port. Enter the port number the database server is listening on.
-
Database Name. Enter the name of the database to use.
-
User Name. Enter the ID of a database user with permission to read, update, and delete rows from the transaction and audit tables in the selected database.
-
Password. Enter the database user password.
-
Transaction Table. Enter the name of the table in the selected database to use for storing pending transactions.
-
-
If appropriate, click Test Transaction Configuration to verify your entries.
Continue to the next section of the Service Provider Configuration page to configure tracked events.
Configuring Tracked Event Configurations
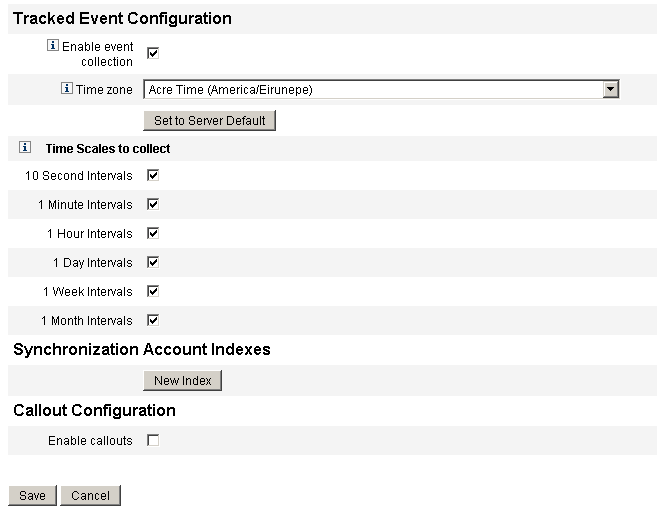
When event collection is enabled, it allows you to track statistics in real time thereby helping to maintain expected or agreed-upon levels of service. Event collection is enabled by default, as shown in Figure 17–3. Clearing the Enable event collection check box disables collection.
Figure 17–3 Service Provider Configuration (Tracked Events, Account Indexes, and Callout Configuration)

 To Specify a Time Zone and Collection Intervals for
Service Provider Tracked Events
-
Select the Time zone from the list.
Select the time zone to use when recording tracked events, or select Set to Server Default to use the time zone set on the server.
-
Select the Time Scales to collect options.
Collection is aggregated over the following time intervals: every 10 seconds, every minute, every hour, daily, weekly, and monthly. Disable any of the intervals for which you do not want collection to occur.
Synchronization Account Indexes
When synchronizing resources in a Service Provider implementation, it may be necessary to define Account Indexes to properly correlate events sent by the resource to users in the Service Provider directory.
By default, resource events are required to contain a value for the attribute accountId which matches the accountId attribute in the directory. In some resources, accountId is not consistently sent. For example, delete events from Active Directory contain only the Active Directory generated account GUID.
Resources that do not include the accountId attribute must include a value for either of the following attributes.
-
guid. This attribute typically contains a system generated unique identifier.
-
identity. This attribute is normally the same as accountId for all resources except LDAP resources, where identity contains the full DN of the object.
If you need to correlate using either guid or identity you must define an account index for those attributes. An index is simply the selection of one or more directory user attributes that may be used to store resource specific identities. Once the identities are stored in the directory, they can be used in search filters to correlate synchronization events.
To define account indexes, first determine which resources will be used for synchronization, and which of those require an index. Then edit the Resource definition for the Service Provider directory and add attributes in the schema map for the GUID or identity attributes for each of the Active Sync resources. For example, if you were synchronizing from Active Directory, you might define an attribute named AD-GUID mapped to an unused directory attribute such as manager.
 To Define Index Attributes for a Resource
After defining all of the index attributes in the Service Provider resource, perform the following steps:
-
In the Synchronization Account Indexes area of the configuration page, click the New Index button.
The form expands to contain a resource selection field, followed by two attribute selection fields. The attribute selection fields remain empty until a resource is selected
-
Select a Resource from the list.
The attributes fields now contain values defined in the schema map for the selected resource.
-
Select the appropriate index attribute for either the Guid Attribute or the Full Identity Attribute.
It is not usually necessary to set both. If both are set, the software first attempts to correlate using the GUID, then the full identity.
-
You may click New Index again to define index attributes for other resources.
-
To delete an index, click the Delete button to the right of the Resource selection field.
Deleting an index only removes the index from the configuration, it does not modify all of the existing directory users that may currently have values stored in the index attributes.
Note –Deleting an index only removes the index from the configuration, it does not modify all of the existing directory users that may currently have values stored in the index attributes.
Callout Configuration
Select this option in the Callout Configuration section to enable callouts. When callouts are enabled, the callout mappings appear enabling you to select pre-operational and post-operational options for each transaction type listed.
By default, the pre- and post-operation options are set to None.
If you specify post-operation callouts, use the Wait for post-operation callout option to specify that the transaction must wait for the post-operation callout processing to complete before finishing. This ensures that any dependent transaction is executed only after the post-operation callout has successfully completed.
Note –
After completing your selections for all sections on the Service Provider Configuration page, click Save to complete the configuration.
- © 2010, Oracle Corporation and/or its affiliates
