Configuring External Resources
This section describes the process for configuring the external resource data store and the external resources provisioner notification.
Configuring the External Resources Data Store
Oracle Waveset's external resource data store is a single data store that holds information about external resources and assignments to external resources. This data store can be a database or a directory.
-
If the external resource data store is a database, that data store is managed by the ScriptedJdbcResourceAdapter.
-
If the external resource data store is a directory, that data store is managed the LDAPResourceAdapter.
Note –
You must have the External Resource Administrator capability to configure the external resource data store.
The external resource data store allows you to store data in whatever attribute values you want and you can store those values in one or more tables.
For example, if you are using a MySQL database, Oracle Waveset stores external resource information in the following tables:
-
The extres.accounts table contains accountIDs and resourceIDs. Because external resource data store is a single data store, Oracle Waveset provides a unique ID key, <accountId>@<resourceId>, that uniquely identifies an account by its resourceID.
-
The extres.attributes table contains a collection of name/value pair attributes. You define these attributes in the schema mapping when creating an external resource.
Sample scripts used to create the database tables are co-packaged with Oracle Waveset in the following location:
wshome/sample/ScriptedJdbc/External |
Oracle Waveset supports multiple database types, and provides sample scripts for each type. You can modify these scripts as needed for your specific environment.
The external resource data store also supports LDAP using the LDAPResourceAdapter, which enables you to store data in existing or custom classes. A sample LDIF script is also co-packaged with Oracle Waveset in the following location:
wshome/sample/other/externalResourcePerson.ldif |
You can modify this script as part of configuring an external resources directory data store.
 To Configure a Database-Type Data Store
Although you can easily make changes, the external resource data store is typically configured only once. If you modify the configuration, Oracle Waveset automatically updates all existing external resources to use the newly configured data store.
Use the following steps to configure a database-type data store:
-
Select Configure -> External Resources from the menu bar in the Oracle Waveset Administrator interface.
-
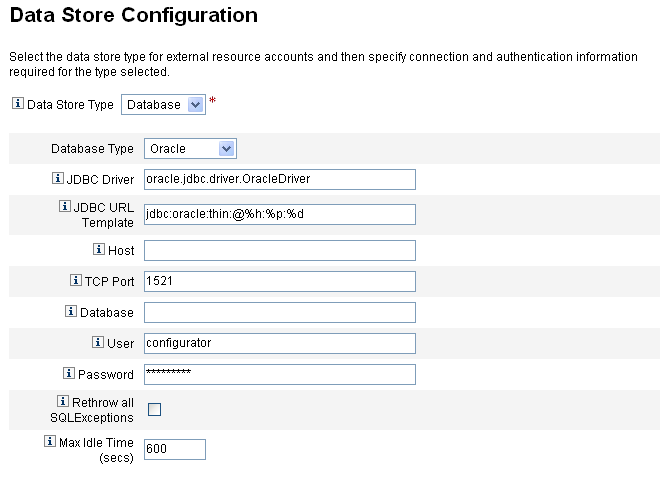
When the Data Store Configuration page displays, choose Database from the Data Store Type menu. Additional options display.
Figure 5–14 Data Store Configuration Page: Database
-
Specify the following connection and authentication information:
Note –Oracle Waveset automatically populates the JDBC Driver, JDBC URL template, port, and Max Idle Time (secs) fields with default values. You can change these default values if necessary.
-
JDBC Driver. Specify the JDBC Driver class name.
-
JDBC URL Template. Specify the JDBC Driver URL template.
-
Host. Enter the name of the host where you are running the database.
-
TCP Port. Enter the port number where the database is listening.
-
Database. Enter the name of the database on the database server that contains the data store table.
-
User. Enter the ID of a database user with permissions sufficient to read, update, and delete rows from the data store table. For example, root.
-
Password. Enter the database user's password.
-
Rethrow all SQLExceptions. Check this box to rethrow SQL exceptions to SQL statements if the exception error codes are 0.
If you do not enable this option, Oracle Waveset catches and suppresses these exceptions.
-
Max Idle Time. Specify the maximum time, in seconds, that you want JDBC connections to remain unused in a pool.
If the connection is not used before the specified time elapses, Oracle Waveset closes the connection and removes the connection from the pool.
-
Default value is 600 seconds
-
A -1 value prevents the connection from ever expiring
-
-
-
After successfully connecting to the data store, you must specify one or more scripts to be executed for each supported resource action. See To Configure the Action Scripts for instructions.
 To Configure the Action Scripts
You must specify a set of BeanShell (bsh) scripts that Oracle Waveset can use to track and execute the Get, Create, Update, Delete, Enable, Disable, and Test states of a given request.
Sample action scripts are available in
wshome/sample/ScriptedJdbc/External/beanshell |
Note –
You can modify these samples to create your own custom action scripts. Custom scripts are added to the Action Scripts selection tool, and they are displayed below the line in the Available and Selected lists.
Oracle Waveset provides sample scripts for the resource actions of any database types that are supported for external resources. To access these scripts, use the ResourceAction scripts provided in the following location:
wshome/sample/ScriptedJdbc/External/beanshell |
The default database name, username, and password are all extres.
-
If you choose any of the other database options or prefer using a different user name or database name, you must modify the sample database creation scripts and the ResourceAction scripts with different values.
For example, if you choose a MySQL database, but want to change the existing database name, username, and password, you must perform the following changes: You must update the create_external_tables.mysql script by changing the default database name, username, and password from extres to externalresources, externaladmin, and externalpassword respectively.
-
Next, you must change the ResourceAction scripts from the default extres.accounts and extres.attributes values to externalresources.accounts and externalresources.attributes respectively.
Use the following steps to configure the Action scripts:
-
Use the Action Scripts selection tools on the Data Store Configuration page to specify one or more action scripts for each resource action. You must select at least one script per resource action.
Figure 5–15 Action Scripts Area
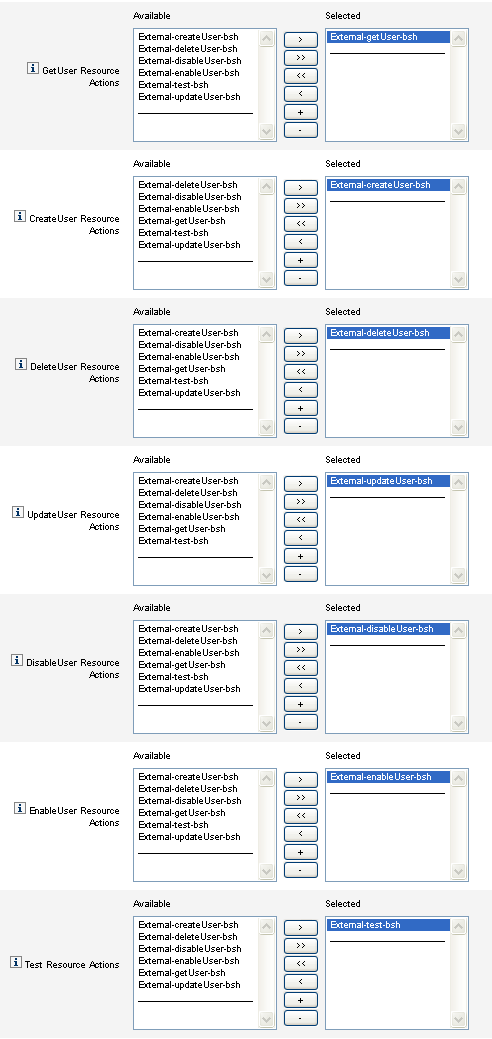
You must select the default action script that matches the resource action. For example, you must use
-
External-getUser-bsh for GetUser Resource Actions
Note –GetUser Resource Actions are used for Search operations.
-
External-createUser-bsh for CreateUser Resource Actions
-
External-deleteUser-bsh for DeleteUser Resource Actions
-
External-updateUser-bsh for UpdateUser Resource Actions
-
External-disableUser-bsh for DisableUser Resource Actions
-
External-enableUser-bsh for EnableUser Resource Actions
-
External-test-bsh for Test Resource Actions
Note –Test Resource Actions are used to enable full functionality for the Test Connection button.
Selecting any of the other bsh scripts from the sample scripts in the list will not work.
-
-
Choose an Action Context Mode from the menu to specify how attribute values will be passed to the action scripts.
-
Strings. Passes attribute values as string values.
-
Direct. Passes attribute values as a com.waveset.object.AttributeValues object.
-
-
Now is a good time to test your data store connection configuration. Click the Test Connection button, located at the bottom of the page.
A message displays to confirm that the connection is successful or to report an error with the configuration.
-
When you are finished, click Next to continue to the Provisioner Notification Configuration page.
 To Configure a Directory-Type Data Store
Use the following steps to configure a Directory-type data store.
-
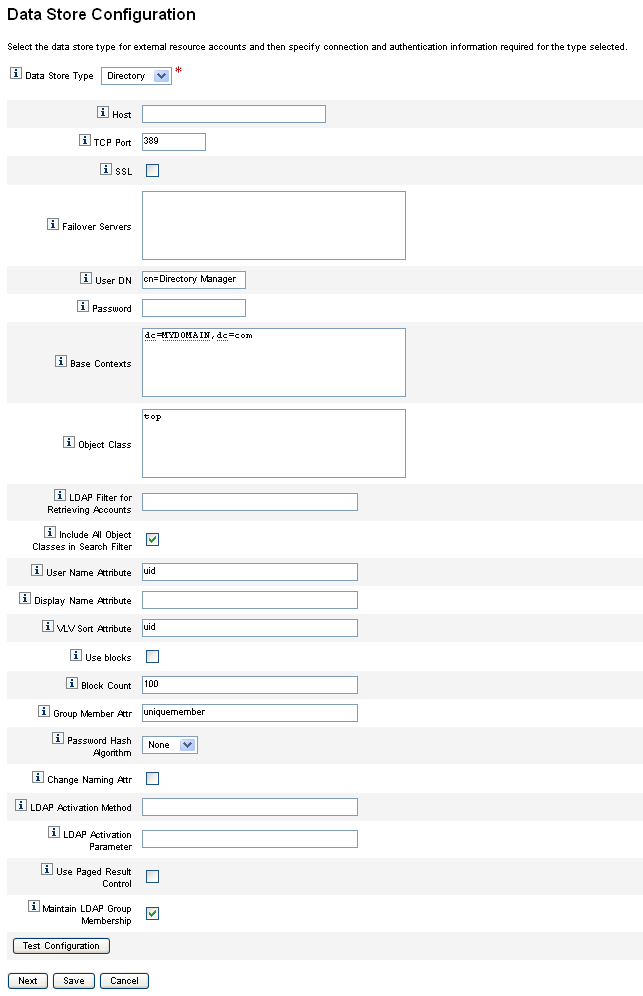
Choose Directory from the Data Store Type menu. Additional options display.
Figure 5–16 Data Store Configuration Page: Directory
-
You must specify connection and authentication information for a Directory-type data store.
Configure the following options:
-
Host. Enter the IP address or the name of the host where the LDAP server is running.
-
TCP Port. Enter the TCP/IP port being used to communicate with the LDAP server.
-
If you are using SSL, this port is typically 636.
-
If you are using non-SSL, this port is typically 389.
-
-
SSL. Check this option to connect to the LDAP server using SSL.
-
Failover Servers. List all of the servers being used for failover if the preferred server fails. Enter this information in the following format, which follows the standard LDAP version 3 URLs described in RFC 2255:
ldap://ldap.example.com:389/o=LdapFailover
Only the host, port, and distinguished name (dn) portion of the URL are relevant in this setting.
If the preferred server fails, JNDI will automatically connect to the next server in this list.
-
User DN. Enter the dn used to authenticate to the LDAP server when making updates. (Defaults to cn=Directory Manager)
-
Password. Enter the principal's password.
-
Base Contexts. Specify one or more starting points that Oracle Waveset can use when searching the LDAP tree for users. (Defaults to dc=MYDOMAIN,dc=com)
Oracle Waveset performs searches when trying to discover users from the LDAP server or when looking for groups in which users are members.
-
Object Class. Enter one or more object classes to use when creating new user objects in the LDAP tree. (Defaults to top)
Each entry must be on a separate line. Do not use commas or spaces to separate entries.
Some LDAP servers require you to specify all of the object classes in a class hierarchy. For example, you might be required to specify top, person, organizationalperson, and inetorgperson instead of just using inetorgperson.
-
LDAP Filter for Retrieving Accounts. Enter an LDAP filter to control which accounts are returned from the LDAP resource. If you do not specify a filter, Oracle Waveset returns all accounts that include all of the specified object classes.
-
Include All Object Classes in Search Filter. Check this box to require all accounts to include every specified object class and to match the filter specified in the LDAP Filter for Retrieving Accounts field.
Note –You must enable this option when no search filter is specified. If you disable this option, accounts that do not include all of the specified object classes can be loaded into Oracle Waveset by using the reconciliation or load from resource features.
After loading, the account's objectclass attribute is not automatically updated. If an attribute on a missing object class is exposed through the Administrator interface, then providing a value for this attribute without modifying the objectclass attribute will fail. To avoid this problem, override the objectclass value in the Reconciliation or Load from Resource form.
-
User Name Attribute. Enter the name of the LDAP attribute that maps to the name of the Oracle Waveset user when discovering users from the directory. This name is frequently uid or cn.
-
Display Name Attribute. Enter the resource account attribute name whose value is used when displaying this account name.
-
VLV Sort Attribute. Enter the name of a sort attribute to use for VLV indexes on the resource.
-
Use blocks. Check this box to retrieve and process users in blocks.
When you are performing operations on a large number of users, processing users in blocks reduces the amount of memory used by the operation.
-
Block Count. Enter the maximum number of users to be grouped in blocks for processing.
-
Group Member Attr. Enter the name of the group member attribute to be updated with the user distinguished name (DN) when a user is added to the group.
The attribute name depends on the group's object class. For example, the Sun Java System Enterprise Edition Directory Server and other LDAP servers use groups with the groupOfUniqueNames object class, and the uniqueMember attribute. Other LDAP servers use groups with the groupOfUniqueNames object class and the member attribute.
-
Password Hash Algorithm. Enter an algorithm that Oracle Waveset can use to hash the password.
Supported values include:
-
SSHA
-
SHA
-
SMD5
-
MD5
If you specify 0 or leave this field blank, Oracle Waveset will not hash passwords and will store cleartext passwords in LDAP unless the LDAP server performs the hash. For example, Directory Server hashes passwords.
-
-
Change Naming Attr. Check this box to allow modifications to change the user attribute representing the leftmost relative distinguished name (DN). Modifications frequently change naming attributes to uid or cn.
-
LDAP Activation Method. Use this field to configure activation actions for a resource.
-
Leave this field blank if you want the resource to use password assignment for enable or disable actions.
-
Enter the nsmanageddisabledrole keyword, the nsaccountlock keyword, or the class name to use when performing an activation action for users of this resource.
-
-
LDAP Activation Parameter. Enter a value, based on how you completed the LDAP Activation Method field.
-
If you specified the nsmanageddisabledrole keyword, you must enter a value in the following format:
IDMAttribute=CN=nsmanageddisabledrole,baseContext
-
If you specified the nsaccountlock keyword, you must enter a value in the following format:
IDMAttribute=true
-
If you specified a class name, you must enter a value in the following format:
IDMAttribute
Note –For more information about the LDAP Activation Method and the LDAP Activation Parameter, see the Oracle Waveset 8.1.1 Resources Reference.
-
-
Use Paged Result Control. Check this box to use LDAP Paged Results Control instead of VLV Control to iterate accounts during reconciliation.
Note –The resource must support simple paging control.
-
Maintain LDAP Group Membership. Check this box to have the adapter maintain LDAP group memberships when renaming or deleting users.
If you do not enable this option, the LDAP resource maintains the group memberships.
-
-
Test your data store connection configuration by clicking the Test Connection button.
A message displays to confirm that the connection is successful or to report an error with the configuration.
-
When you are finished, click Save and then click Next to continue to the Provisioner Notification Configuration page.
Note –You must set up valid account attributes and an identity template before you can create users on an LDAP resource.
Configuring Provisioner Notification
After configuring the data store for external resources, you must configure provisioner notifications. You can also configure requester notifications. This section describes the process for configuring notifications using email or Remedy.
 To Configure Email Notification
Note –
For more information about Email templates, see Configuring Task Templates.
Use the following instructions to configure and send email notifications to one or more provisioners:
-
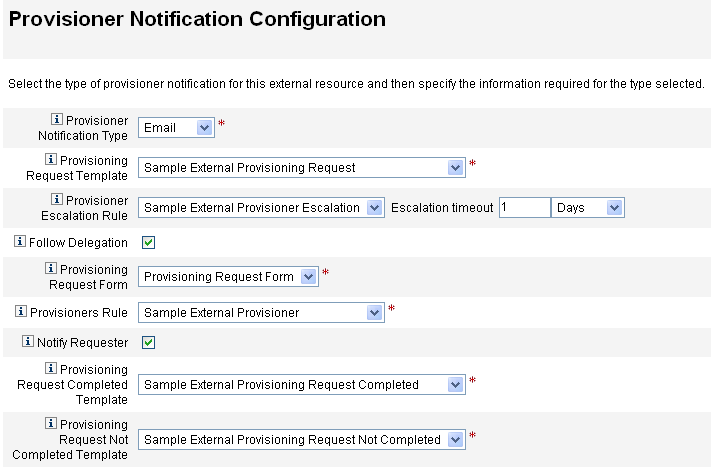
From the Provisioner Notification Configuration page, select Email from the Provisioner Notification Type menu. Additional options display, as shown in the following figure.
Figure 5–17 Provisioner Notification Configuration Page: Email Notification Type
-
Configure the following options.
-
Provisioning Request Template. Choose Sample External Provisioning Request from the menu. You use this email template to configure the email used to notify provisioners of external resource requests.
-
Follow Delegation. Check this box if you want Oracle Waveset to follow delegations defined for the provisioner.
-
Provisioner Escalation Rule (optional). Choose a rule to determine to which provisioner a request is escalated if the current provisioner does not respond to the request before the specified timeout period.
Note –Although there are several sample rules available on this menu, you must choose the Sample External Provisioner Escalation rule or use your own custom rule. The Sample External Provisioner Escalation rule uses an External Provisioner Escalation rule to determine a provisioner for escalations.
-
Escalation timeout. Specify the maximum time to wait before escalating a provisioning request to the next provisioner.
Note –-
If you leave this field blank or enter a zero, the request never escalates.
-
If you specify a timeout, but do not select a Provisioner Escalation Rule, Oracle Waveset escalates the request to the Configurator when the request exceeds the specified timeout. If a Configurator does not exist, the request is classified as “not complete” once the timeout expires.
-
-
Provisioning Request Form. Choose a form that external resource provisioners can use to mark a provisioning request as completed or not completed.
-
Provisioners Rule. You must choose a rule to define the provisioner to whom provisioning requests are sent when external resources are assigned to users.
Note –-
You can write your own rules for this purpose. You can also define multiple provisioners. As any provisioner completes the task, that task is removed from all provisioner's queues. For more information about writing custom rules, see Chapter 4, Working with Rules, in Oracle Waveset 8.1.1 Deployment Reference.
-
Although there are several sample rules available on this menu, you must choose the Sample External Provisioner rule or use your own custom rule. The Sample External Provisioner rule makes Configurator the provisioner.
-
-
Notify Requester. Check this box to send email back to the original requester with information about what happened with the request. For example, whether the provisioning request completed or not completed, is additional information needed, and so forth.
When you enable this option, the following additional fields are displayed:
Note –-
Provisioning Request Completed Template. Choose the Sample External Provisioning Request Completed template to notify requestors when their requests are completed.
-
Provisioning Request Not Completed Template. Choose the Sample External Provisioning Request Not Completed template to notify requestors when their requests are not completed.
-
-
-
Click Save.
The Configure page displays indicating that you can go on to perform another configuration task.
-
Go to the Resources -> List Resources tab. You are now ready to create individual external resources based on this configuration. See To Create a Resource for instructions.
 To Configure Remedy Notification
Use the following instructions to create and send a Remedy ticket to provisioners:
-
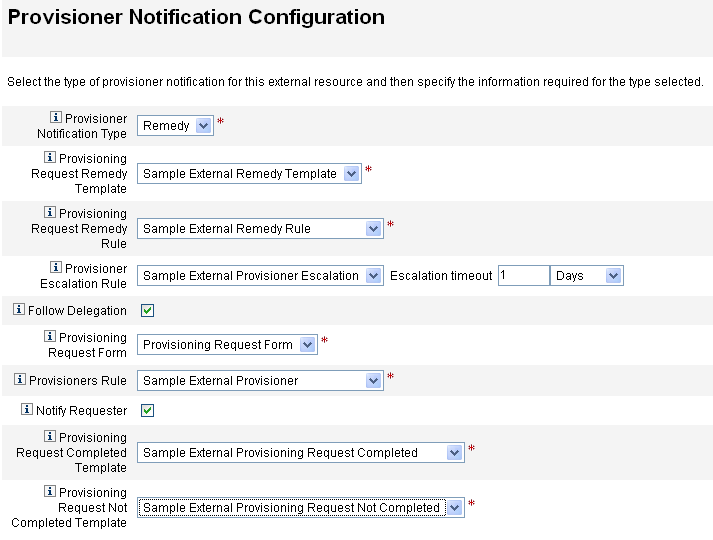
Select Remedy from the Provisioner Notification Type menu. Additional options display, as shown in the following figure.
Figure 5–18 Provisioner Notification Configuration Page: Remedy Notification Type
-
Configure the following options.
-
Provisioning Request Remedy Template. Choose Sample External Remedy template from the menu.
Note –Oracle Waveset provides a Sample Remedy Template that you can use or modify as needed.
A Remedy template contains a set of fields that are used to create a Remedy ticket. Oracle Waveset also uses this template to query Remedy for ticket status, to see if a task has been completed or not completed.
-
Provisioning Request Remedy Rule. You must choose a rule from this menu to define configuration settings for Remedy.
Note –Although there are several sample rules available on this menu, you must choose the Sample External Remedy Rule rule or use your own custom rule. The Sample External Remedy Rule uses a Remedy rule to determine whether the current status of a Remedy tick is completed or not completed.
A Remedy template contains a set of fields that are used to create a Remedy ticket. Oracle Waveset also uses this template to query Remedy for ticket status, to see if a task has been completed or not completed.
Oracle Waveset uses this rule to query a Remedy ticket for status information. If the ticket status is completed or not completed, Oracle Waveset marks the work item completed or not completed, respectively.
Note –You can write your own rules for this purpose. A sample rule, called Sample External Remedy Rule is provided for you to use or modify as needed. For more information about writing custom rules, see Chapter 4, Working with Rules, in Oracle Waveset 8.1.1 Deployment Reference.
-
Follow Delegation. Check this box if you want Oracle Waveset to follow delegations defined for the provisioner.
-
Provisioner Escalation Rule (optional). Choose a rule to determine to which provisioner a request is escalated if the current provisioner does not respond to the request before the specified timeout period.
Note –Although there are several sample rules available on this menu, you must choose the Sample External Provisioner Escalation rule or use your own custom rule. The Sample External Provisioner Escalation rule uses an External Provisioner Escalation rule to determine a provisioner for escalations.
-
Escalation timeout. Specify the maximum time to wait before escalating a provisioning request to the next provisioner.
Note –-
If you leave this field blank or enter a zero, the request never escalates.
-
If you specify a timeout, but do not select a Provisioner Escalation Rule, Oracle Waveset escalates the request to the Configurator when the request exceeds the specified timeout. If a Configurator does not exist, the request is classified as “not complete” once the timeout expires.
-
-
Provisioning Request Form. Choose a form that external resource provisioners can use to mark a provisioning request as completed or not completed.
-
Provisioners Rule. Choose a rule that determines one or more provisioners for this external resource request.
Note –You can write your own rules for this purpose. You can also define multiple provisioners. As any provisioner completes the task, that task is removed from all provisioner's queues. For more information about writing custom rules, see Chapter 4, Working with Rules, in Oracle Waveset 8.1.1 Deployment Reference.
-
Sample External Provisioner. Makes Configurator the provisioner.
-
Sample External Provisioner Escalation. Uses an External Provisioner Escalation rule to determine a provisioner for escalations.
-
Sample External Remedy Rule. Defines configurator settings for Remedy.
-
-
Notify Requester. Check this box if you want to send email to the requester when their request is completed or not completed. When you enable this option, the following additional fields are displayed:
-
Provisioning Request Completed Template. Choose the email template to use when requests are completed.
-
Provisioning Request Not Completed Template. Choose the email template to use when requests are not completed.
Note –For more information about Email templates, see Configuring the Task Templates.
-
-
-
Click Save.
The Configure page displays indicating that you can go on to perform another configuration task.
-
Go to the Resources -> List Resources tab. You are now ready to create individual external resources based on this configuration. See Creating External Resources for instructions.
- © 2010, Oracle Corporation and/or its affiliates
