Examples: Securing Web Applications
There is some basic setup required before any of the example applications will run correctly. Refer to Setting Up Your System for Running the Security Examples to make sure you have completed these steps prior to continuing with the examples.
The following examples use annotations, programmatic security, and/or declarative security to demonstrate adding security to existing web applications:
Here are some links to other locations where you will find examples of securing different types of applications:
-
Example: Using the isCallerInRole and getCallerPrincipal Methods
-
GlassFish samples: https://glassfish-samples.dev.java.net/
Setting Up Your System for Running the Security Examples
To set up your system for running the security examples, you basically need to configure a user database that can be used by the application for authenticating users. Here are the steps you need to complete before continuing:
-
If you have not already done so, make sure you have read and followed the directions for installing the tutorial examples, Ant, and NetBeans IDE, and that you understand how to start the Enterprise Serverand Administration Console. These instructions can be found in Chapter 2, Using the Tutorial Examples.
-
If you have not already done so, add an authorized user to the Enterprise Server. For this example, add users to the file realm of the Enterprise Server and assign the user to the group TutorialUser. Be sure to write down the user name and password for the user you create so that you can use it for testing the example applications. Authentication is case-sensitive for both the user name and password, so write down the user name and password exactly. This topic is discussed more in Managing Users and Groups on the Enterprise Server.
-
Set up Default Principal to Role Mapping on the Enterprise Server. From the Admin Console, select Configuration, then Security, then check the enable box beside Default Principal to Role Mapping.
Example: Basic Authentication with a Servlet
This example discusses how to use basic authentication with a servlet. With basic authentication of a servlet, the web browser presents a standard login dialog that is not customizable. When a user submits their name and password, the server determines if the user name and password are those of an authorized user and sends the requested web resource if the user is authorized to view it.
-
Follow the steps in Setting Up Your System for Running the Security Examples.
-
Create a web module as described in Chapter 3, Getting Started with Web Applications for the servlet example, hello2.
-
Add the appropriate security elements to the web.xml deployment descriptor. The deployment descriptor for the example application can be viewed at tut-install/examples/web/hello2_basicauth/web/WEB-INF/web.xml. The security elements are described in Specifying Security in the Deployment Descriptor.
-
Build, package, and deploy the web application by following the steps in Building, Packaging, and Deploying the Servlet Basic Authentication Example Using NetBeans IDE or Building, Packaging, and Deploying the Servlet Basic Authentication Example Using Ant.
-
Run the web application by following the steps described in Running the Basic Authentication Servlet.
-
If you have any problems running this example, refer to the troubleshooting tips in Troubleshooting the Basic Authentication Example.
In general, the following steps are necessary for adding basic authentication to an unsecured servlet, such as the one described in Chapter 3, Getting Started with Web Applications. In the example application included with this tutorial, many of these steps have been completed for you and are listed here simply to show what needs to be done should you wish to create a similar application. The completed version of this example application can be found in the directory tut-install/examples/web/hello2_basicauth/.
Specifying Security in the Deployment Descriptor
The elements of the deployment descriptor that add basic authentication to this example tells the server or browser to perform the following tasks:
-
Send a standard login dialog to collect user name and password data
-
Verify that the user is authorized to access the application
-
If authorized, display the servlet to the user
Deployment descriptors elements are described in Introduction to Web Application Deployment Descriptors.
The following sample code shows the security elements for the deployment descriptor used in this example of basic authentication, which can be found in tut-install/examples/web/hello2_basicauth/web/WEB-INF/web.xml.
    <security-constraint>
        <display-name>SecurityConstraint</display-name>
        <web-resource-collection>
             <web-resource-name>WRCollection</web-resource-name>
            <url-pattern>/greeting</url-pattern>
        </web-resource-collection>
        <auth-constraint>
            <role-name>TutorialUser</role-name>
        </auth-constraint>
        <user-data-constraint>
             <transport-guarantee>CONFIDENTIAL</transport-guarantee>
        </user-data-constraint>
    </security-constraint>
    <login-config>
        <auth-method>BASIC</auth-method>
        <realm-name>file</realm-name>
    </login-config>
		<security-role>
			<role-name>TutorialUser</role-name>
		</security-role>
This deployment descriptor shows that all the request URI /greeting can only be accessed by users who have entered their user name and password and have been authorized to access this URL because they have been verified to be in the role TutorialUser. The data will be sent over a protected transport in order to keep the user name and password data from being read in transit.
Building, Packaging, and Deploying the Servlet Basic Authentication Example Using NetBeans IDE
-
Follow the steps in Setting Up Your System for Running the Security Examples.
-
Open the project in NetBeans IDE by selecting File->Open Project.
-
Browse to the tut-install/examples/web/hello2_basicauth/ directory.
-
Make sure that Open as Main Project is selected.
-
Select Open Project.
-
Right-click hello2_basicauth in the Projects pane, then select Clean and Build.
-
Right-click hello2_basicauth in the Projects pane, then select Deploy.
-
To run the servlet, follow the steps in Running the Basic Authentication Servlet.
To build, package, and deploy the web/hello2_basicauth example application using NetBeans IDE, follow these steps:
Building, Packaging, and Deploying the Servlet Basic Authentication Example Using Ant
-
Follow the steps in Setting Up Your System for Running the Security Examples.
-
From a terminal window or command prompt, change to the tut-install/examples/web/hello2_basicauth/ directory.
-
Build and package the web application by entering the following command at the terminal window or command prompt:
ant
-
To deploy the example using Ant, enter the following command at the terminal window or command prompt:
ant deploy
The deploy target in this case gives you an incorrect URL to run the application. To run the application, please use the URL shown in Running the Basic Authentication Servlet.
-
To run the web application, follow the steps in Running the Basic Authentication Servlet.
To build, package, and deploy the web/hello2_basicauth example using the Ant tool, follow these steps:
Running the Basic Authentication Servlet
-
Open a web browser.
-
Enter the following URL in your web browser:
https://localhost:8181/hello2_basicauth/greeting
You may be prompted to accept the security certificate for the server. If so, accept the security certificate.
-
A default login form displays. Enter a user name and password combination that corresponds to a user that has already been created in the file realm of the Enterprise Server and has been assigned to the group of TutorialUser.
Basic authentication is case-sensitive for both the user name and password, so enter the user name and password exactly as defined for the Enterprise Server.
The server returns the requested resource if all of the following conditions are met:
-
There is a user defined for the Enterprise Server with the user name you entered.
-
The user with the user name you entered has the password you entered.
-
The user name and password combination you entered is assigned to the group of TutorialUser on the Enterprise Server.
-
The role of TutorialUser, as defined for the application, is mapped to the group of TutorialUser, as defined for the Enterprise Server.
When these conditions are met, and the server has authenticated the user, the application will display as shown in Figure 25–6.
-
-
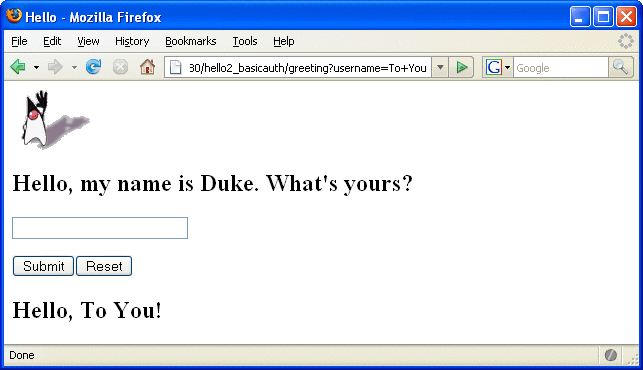
Enter your name and click the Submit button. Because you have already been authorized, the name you enter in this step does not have any limitations. You have unlimited access to the application now.
The application responds by saying “Hello” to you, as shown in Figure 25–7.
To run the web client, follow these steps:
Figure 25–6 Running the Application
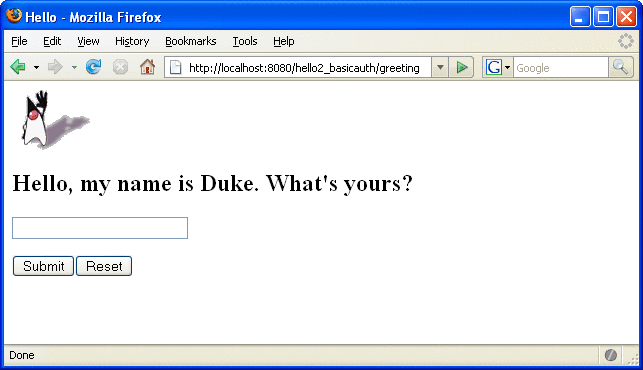
Figure 25–7 The Running Basic Authentication Response
Note –
For repetitive testing of this example, you may need to close and reopen your browser. You should also run the ant clean and ant undeploy targets or the NetBeans IDE Clean and Build option to get a fresh start.
Troubleshooting the Basic Authentication Example
-
Close your web browser.
-
Clean and recompile the files from the previous build by right-clicking hello2_basicauth and selecting Clean and Build.
-
Redeploy the application by right-clicking hello2_basicauth and selecting Undeploy and Deploy.
-
Open your web browser and reload the following URL:
https://localhost:8181/hello2_basicauth/greeting
When doing iterative development with this web application, follow these steps if you are using NetBeans IDE:
-
Close your web browser.
-
Undeploy the web application. To undeploy the application, use the following command in the directory:
ant undeploy
-
Clean out files from the previous build, using the following command:
ant clean
-
Recompile, repackage, and redeploy the application, using the following commands:
ant
ant deploy
-
Open your web browser and reload the following URL:
https://localhost:8181/hello2_basicauth/greeting
Follow these steps if you are using the Ant tool:
Example: Basic Authentication with JAX-WS
This section discusses how to configure a JAX-WS-based web service for HTTP basic authentication. When a service that is constrained by HTTP basic authentication is requested, the server requests a user name and password from the client and verifies that the user name and password are valid by comparing them against a database of authorized users.
For this tutorial, you will add the security elements to the JAX-WS service; build, package, and deploy the service; and then build and run the client application.
This example does not include a finished application, but provides instructions in the event that you want to secure a JAX-WS web service, such as the one that can be found in the directory tut-install/examples/jaxws/helloservice and is discussed in Creating a Simple Web Service and Client with JAX-WS. You build on this simple application by adding the necessary elements to secure the application using basic authentication.
-
Create an application like the one in Creating a Simple Web Service and Client with JAX-WS.
-
Follow the steps in Setting Up Your System for Running the Security Examples.
-
Add security elements that specify that basic authentication is to be performed to the application deployment descriptor, web.xml. This step is discussed in Adding Security Elements to the Deployment Descriptor.
-
Build, package, and deploy the web service. See Building and Deploying helloservice with Basic Authentication Using NetBeans IDE or Building and Deploying helloservice with Basic Authentication Using Ant for the steps to accomplish this.
-
Build and run the client application. See Building and Running the helloservice Client Application with Basic Authentication Using NetBeans IDE or Building and Running the helloservice Client Application with Basic Authentication Using Ant for the steps to accomplish this.
In general, the following steps are necessary to add basic authentication to a JAX-WS web service.
Adding Security Elements to the Deployment Descriptor
To enable basic authentication for the service, add security elements to the application deployment descriptor, web.xml. The security elements that need to be added to the deployment descriptor include the <security-constraint>, <login-config>, and <security-role> elements. These security elements are discussed in more detail in Introduction to Web Application Deployment Descriptors and in the Java Servlet Specification. The code is added to the original deployment descriptor to enable HTTP basic authentication. The resulting deployment descriptor looks like this:
<?xml version="1.0" encoding="UTF-8"?><web-app
     xmlns="http://java.sun.com/xml/ns/javaee" version="2.5"
     xmlns:xsi="http://www.w3.org/2001/XMLSchema"
     xsi:schemaLocation="http://java.sun.com/xml/ns/javaee
     http://java.sun.com/xml/ns/javaee/web-app_2_5.xsd">
    <display-name>HelloService</display-name>
    <listener>
        <listener-class>
            com.sun.xml.ws.transport.http.servlet.WSServletContextListener
        </listener-class>
    </listener>
    <servlet>
        <display-name>HelloService</display-name>
        <servlet-name>HelloService</servlet-name>
        <servlet-class>com.sun.xml.ws.transport.http.servlet.WSServlet</servlet-class>
    </servlet>
    <servlet-mapping>
        <servlet-name>HelloService</servlet-name>
        <url-pattern>/hello</url-pattern>
    </servlet-mapping>
    <session-config>
        <session-timeout>30</session-timeout>
    </session-config>
    <security-constraint>
        <display-name>SecurityConstraint</display-name>
        <web-resource-collection>
             <web-resource-name>WRCollection</web-resource-name>
            <url-pattern>/hello</url-pattern>
        </web-resource-collection>
        <auth-constraint>
            <role-name>TutorialUser</role-name>
        </auth-constraint>
        <user-data-constraint>
            <transport-guarantee>CONFIDENTIAL</transport-guarantee>
        </user-data-constraint>
    </security-constraint>
    <login-config>
        <auth-constraint>BASIC</auth-constraint>
        <realm-name>file</realm-name>
    </login-config>
		<security-role>
			<role-name>TutorialUser</role-name>
		</security-role>
</web-app>
This security constraint protects resources at the URI /hello. Anyone who tries to access this resource will be prompted for their user name and password and must be authenticated by the Enterprise Server before they will be granted access to the resource. The request is sent over a protected transport to ensure that the username and password are not intercepted in transit.
Building and Deploying helloservice with Basic Authentication Using NetBeans IDE
-
Follow the steps in Setting Up Your System for Running the Security Examples.
-
In NetBeans IDE, select File->Open Project.
-
In the Open Project dialog, navigate to the project.
-
Click Open Project.
-
In the Projects tab, right-click the project and select Clean and Build.
-
In the Projects tab, right-click the project and select Deploy.
This step builds and packages the application into a WAR file, and deploys this war file to your Enterprise Server instance.
To build, package, and deploy the example using NetBeans IDE, follow these steps, or the steps described in Building, Packaging, and Deploying the Service.
Building and Deploying helloservice with Basic Authentication Using Ant
-
Follow the steps in Setting Up Your System for Running the Security Examples.
-
From a terminal window or command prompt, go to the project directory.
-
Build, package, and deploy the JAX-WS service by entering the following at the terminal window or command prompt in the project directory:
ant all
To build, package, and deploy the project using the Ant tool, follow these steps, or the steps described in Building, Packaging, and Deploying the Service.
You can test the service in the Admin Console. For more information on how to do this, read Testing the Service without a Client.
Building and Running the helloservice Client Application with Basic Authentication Using NetBeans IDE
-
In NetBeans IDE, select File->Open Project.
-
In the Open Project dialog, navigate to the project.
-
Click Open Project.
-
In the Projects tab, right-click the project and select Clean and Build.
-
In the Projects tab, right-click the project and select Run.
You will be prompted for your user name and password.
-
Enter the user name and password of a user that has been entered into the database of users for the file realm and has been assigned to the group of TutorialUser.
If the username and password you enter are authorized, you will see the output of the application client in the Output pane.
To build and run the client application using NetBeans IDE, follow these steps. The service must be deployed onto the Enterprise Server before compiling the client files. For information on deploying the service, read Building and Deploying helloservice with Basic Authentication Using NetBeans IDE.
Building and Running the helloservice Client Application with Basic Authentication Using Ant
-
Build the client by changing to the project directory and entering the following at the terminal window or command prompt:
ant
This command calls the default target, which builds and packages the application into a JAR file.
-
Run the client by entering the following at the terminal window or command prompt:
ant run
A Login for User dialog displays.
-
Enter a user name and password that correspond to a user set up on the Enterprise Server with a group of TutorialUser. Click OK.
To build and run the client application using the Ant tool, follow these steps. The secured service must be deployed onto the Enterprise Server before you can successfully compile the client application. For more information on deploying the service, read Building and Deploying helloservice with Basic Authentication Using Ant.
Example: Form-Based Authentication with a Servlet
This example discusses how to use form-based authentication with a basic servlet. With form-based authentication, you can customize the login screen and error pages that are presented to the web client for authentication of their user name and password. When a user submits their name and password, the server determines if the user name and password are those of an authorized user and, if authorized, sends the requested web resource.
In general, the steps are necessary for adding form-based authentication to an unsecured servlet are similar to those described in Example: Basic Authentication with a Servlet, so just follow all of the steps in Example: Basic Authentication with a Servlet, except use the deployment descriptor described in Specifying Security in the Deployment Descriptor instead and create the login form and login error form pages as described in Creating the Login Form and the Error Page. The completed version of this example application can be found in the directory tut-install/examples/web/hello2_formauth/.
Creating the Login Form and the Error Page
When using form-based login mechanisms, you must specify a page that contains the form you want to use to obtain the user name and password, as well as which page to display if login authentication fails. This section discusses the login form and the error page used in this example. The section Specifying Security in the Deployment Descriptor shows how you specify these pages in the deployment descriptor.
The login page can be an HTML page, a JSP page, or a servlet, and it must return an HTML page containing a form that conforms to specific naming conventions (see the Java Servlet 3.0 specification for more information on these requirements). To do this, include the elements that accept user name and password information between <form></form> tags in your login page. The content of an HTML page, JSP page, or servlet for a login page should be coded as follows:
<form method=post action="j_security_check" >
    <input type="text"  name= "j_username" >
    <input type="password"  name= "j_password" >
</form>
The full code for the login page used in this example can be found at tut-install/examples/web/hello2_formauth/web/loginform.html. An example of the running login form page is shown later in Figure 25–8. Here is the code for this page:
<html>
<head>
    <title>Login Page</title>
</head>

<h2>Hello, please log in:</h2>
<br><br>
<form action="j_security_check" method=post>
    <p><strong>Please Enter Your User Name: </strong>
    <input type="text" name="j_username" size="25">
    <p><p><strong>Please Enter Your Password: </strong>
    <input type="password" size="15" name="j_password">
    <p><p>
    <input type="submit" value="Submit">
    <input type="reset" value="Reset">
</form>
</html>
The login error page is displayed if the user enters a user name and password combination that is not authorized to access the protected URI. For this example, the login error page can be found at tut-install/examples/web/hello2_formauth/web/loginerror.html. For this example, the login error page explains the reason for receiving the error page and provides a link that will allow the user to try again. Here is the code for this page:
<html>
<head>
    <title>Login Error</title>
</head>
<body>
    <c:url var="url" value="/index.jsp"/>
    <h2>Invalid user name or password.</h2>

    <p>Please enter a user name or password that is authorized to access this
    application. For this application, this means a user that has been created in the
    <code>file</code> realm and has been assigned to the <em>group</em> of
    <code>TutorialUser</code>.  Click here to <a href="${url}">Try Again</a></p>
</body>
</html>
Specifying Security in the Deployment Descriptor
This example takes a very simple servlet-based web application and adds form-based security to this application. All security for this example is declared in the deployment descriptor for the application. A security constraint is defined in the deployment descriptor that tells the server to send a login form to collect user data, verify that the user is authorized to access the application, and, if so, display the JSP page to the user.
Deployment descriptor elements are described in Introduction to Web Application Deployment Descriptors.
The following sample code shows the deployment descriptor used in this example of form-based login authentication, which can be found in tut-install/examples/web/hello2_formauth/web/WEB-INF/web.xml.
<!-- FORM-BASED LOGIN AUTHENTICATION EXAMPLE -->
<?xml version="1.0" encoding="UTF-8"?>
 <web-app xmlns="http://java.sun.com/xml/ns/javaee" version="2.5"
    xmlns:xsi="http://www.w3.org/2001/XMLSchema-instance"
    xsi:schemaLocation="http://java.sun.com/xml/ns/javaee
     http://java.sun.com/xml/ns/javaee/web-app_2_5.xsd">

    <display-name>hello2_formauth</display-name>
       <servlet>
             <display-name>index</display-name>
            <servlet-name>index</servlet-name>
            <jsp-file>/index.jsp</jsp-file>
      </servlet>
     <security-constraint>
             <display-name>SecurityConstraint</display-name>
            <web-resource-collection>
                  <web-resource-name>WRCollection</web-resource-name>
                 <url-pattern>/*</url-pattern>
         </web-resource-collection>
            <auth-constraint>
                  <role-name>TutorialUser</role-name>
            </auth-constraint>
            <user-data-constraint>
                <transport-guarantee>CONFIDENTIAL</transport-guarantee>
            </user-data-constraint>
       </security-constraint>
      <login-config>
            <auth-method>FORM</auth-method>
         <form-login-config>
                  <form-login-page>/loginform.html</form-login-page>
                 <form-error-page>/loginerror.html</form-error-page>
          </form-login-config>
     </login-config>
     <security-role>
        <role-name>TutorialUser</role-name>
    </security-role>
</web-app>
Building, Packaging, and Deploying the Form-Based Authentication Example Using NetBeans IDE
-
Follow the steps in Setting Up Your System for Running the Security Examples.
-
Open the project in NetBeans IDE by selecting File->Open Project.
-
Browse to the tut-install/examples/web/hello2_formauth/ directory.
-
Make sure that Open as Main Project is selected.
-
Select Open Project.
-
Right-click hello2_formauth in the Projects pane, then select Clean and Build.
-
Right-click hello2_formauth in the Projects pane, then select Deploy.
-
Follow the steps in Testing the Form-Based Authentication Web Client.
To build, package, and deploy this application using NetBeans IDE, follow these steps:
Building, Packaging, and Deploying the Form-Based Authentication Example Using Ant
-
Follow the steps in Setting Up Your System for Running the Security Examples.
-
From a terminal window or command prompt, change to the tut-install/examples/web/hello2_formauth/ directory.
-
Enter the following command at the terminal window or command prompt:
ant
This target will spawn any necessary compilations, copy files to the tut-install/examples/web/hello2_formauth/build/ directory, create the WAR file, and copy it to the tut-install/examples/web/hello2_formauth/dist/ directory.
-
Deploy the WAR named hello2_formauth.war onto the Enterprise Server using Ant by entering the following command at the terminal window or command prompt:
ant deploy
-
Follow the steps in Testing the Form-Based Authentication Web Client.
To build, package, and deploy this application using the Ant tool, follow these steps:
Testing the Form-Based Authentication Web Client
-
Open a web browser.
-
Enter the following URL in your web browser:
https://localhost:8181/hello2_formauth
The login form displays in the browser, as shown in Figure 25–8.
-
Enter a user name and password combination that corresponds to a user that has already been created in the file realm of the Enterprise Server and has been assigned to the group of TutorialUser.
-
Click the Submit button. Form-based authentication is case-sensitive for both the user name and password, so enter the user name and password exactly as defined for the Enterprise Server.
If you entered My_Name as the name and My_Pwd for the password, the server returns the requested resource if all of the following conditions are met:
-
There is a user defined for the Enterprise Server with the user name of My_Name.
-
The user with the user name of My_Name has a password of My_Pwd defined for the Enterprise Server.
-
The user My_Name with the password My_Pwd is assigned to the group of TutorialUser on the Enterprise Server.
-
The role of TutorialUser, as defined for the application, is mapped to the group of TutorialUser, as defined for the Enterprise Server.
When these conditions are met, and the server has authenticated the user, the application will display as shown in Figure 25–9.
-
-
Enter your name and click the Submit button. Because you have already been authorized, the name you enter in this step does not have any limitations. You have unlimited access to the application now.
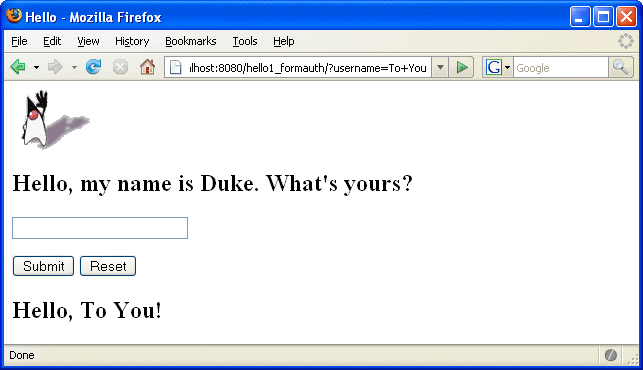
The application responds by saying “Hello” to you, as shown in Figure 25–10.
To run the web client, follow these steps:
For additional testing, close and reopen your browser, enter the application URL, and enter a username and password that are not authorized to see the login error page generated.
Figure 25–8 Form-Based Login Page
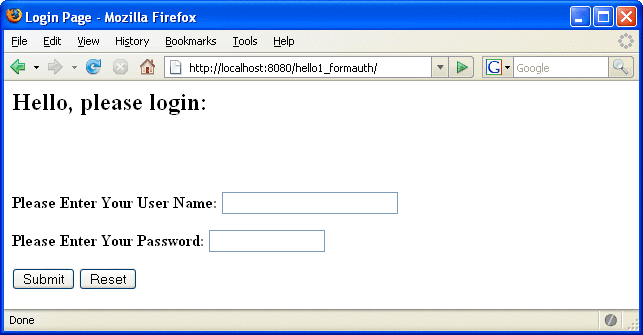
Figure 25–9 Running Web Application
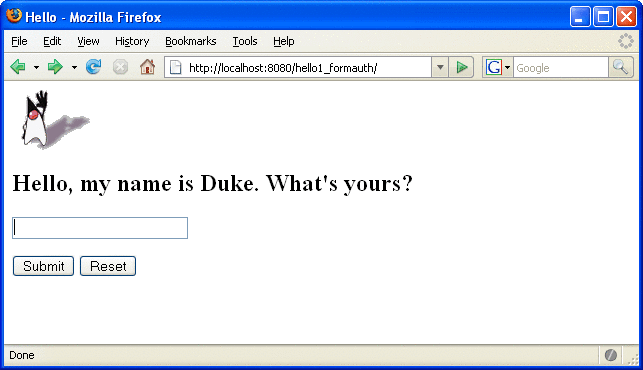
Figure 25–10 The Running Form-Based Authentication Example
Note –
For repetitive testing of this example, you may need to close and reopen your browser. You should also run the ant clean and ant undeploy commands to ensure a fresh build if using the Ant tool, or select Clean and Build then Undeploy and Deploy if using NetBeans IDE.
- © 2010, Oracle Corporation and/or its affiliates
