The “Hello world!” Template
 Creating the “Hello world!” template
Before You Begin
Assume that you want to make the proxy configuration settings of StarOffice available to the Configuration Manager.

The following template provides a first implementation of the GUI:
<?xml version="1.0" encoding="UTF-8"?>
<!DOCTYPE apt:template SYSTEM "policytemplate.dtd">
<apt:template>
  <category apt:name="StarOffice" apt:label="StarOffice">
    <category apt:name="Internet" apt:label="Internet">
      <page apt:name="Proxy" apt:label="Proxy">
        <section apt:name="Settings" apt:label="Settings">
          <property apt:name="ProxyServer" apt:label="Proxy Server"
                    apt:dataPath="org.openoffice.Inet/Settings/ooInetProxyType"
                    oor:type="xs:int">
            <visual apt:type="radioButtons"/>
            <constraints>
              <enumeration oor:value="0" apt:label="None"/>
              <enumeration oor:value="2" apt:label="Manual"/>
            </constraints>
          </property>
          <property apt:name="HTTPProxy" apt:label="HTTP Proxy"
                    apt:dataPath="org.openoffice.Inet/Settings/ooInetHTTPProxyName"
                    oor:type="xs:string"/>
          <property apt:name="HTTPPort" apt:label="HTTP Port"
                    apt:dataPath="org.openoffice.Inet/Settings/ooInetHTTPProxyPort"
                    oor:type="xs:int"/>
          <property apt:name="FTPProxy" apt:label="FTP Proxy"
                    apt:dataPath="org.openoffice.Inet/Settings/ooInetFTPProxyName"
                    oor:type="xs:string"/>
          <property apt:name="FTPPort" apt:label="FTP Port"
                    apt:dataPath="org.openoffice.Inet/Settings/ooInetFTPProxyPort"
                    oor:type="xs:int"/>
          <property apt:name="NoProxyFor" apt:label="No Proxy For"
                    apt:dataPath="org.openoffice.Inet/Settings/ooInetNoProxy"
                    oor:type="xs:string"/>
        </section>
      </page>
    </category>
  </category>
</apt:template>
|
The following steps are necessary to announce the new template to the Configuration Manager:
Steps
-
Login as root to the machine on which you installed the Configuration Manager.
-
Create a directory that is called HelloWorld/templates/StarOffice/Internet/Proxy under/usr/share/webconsole/apoc/packages.
-
Create a file called proxy.xml with the XML template content that was listed previously. Copy the file to the Proxy directory.
-
Grant the user “noaccess” read/execute permission to the Proxy directory.
-
Grant the user "noaccess" read access to the proxy.xml file.
-
Execute /usr/sbin/smreg add -a /usr/share/webconsole/apoc.
-
Restart the webserver with the /usr/sbin/smcwebserver restart command.
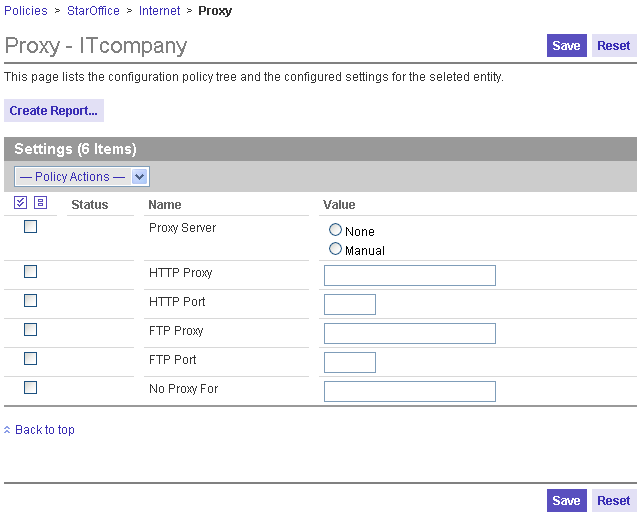
After you log in to the Configuration Manager, you should see a new top-level category that is called "StarOffice". Browsing down that category displays the "Proxy" page that you defined with the template that you created.
Figure 2–1 Proxy page

Explaining the “Hello world!” Template
The first two lines of the template are initial XML definitions. The third line contains the root element of the template called apt:template, which encloses the whole definition of the policy made in a template file.
The next four lines contain the main template structure elements. By nesting apt:category elements, you create the nodes of the configuration policy tree. The configuration policy tree represents the visual hierarchy of the policies in the GUI of the Configuration Manager (see Trees). If you specify an apt:name attribute, the attribute is used to uniquely designate that element. The apt:label attribute specifies the displayed text as a category in the GUI. If you do not specify the apt:label attribute, the displayed text is defined by the apt:name attribute. Therefore, always specify an apt:label element, because this element is used for localization. See Localization.
Every apt:category element must contain one or more apt:category elements or an apt:page element. The apt:page element represents a leaf in the configuration policy tree. The “Proxy” page that was shown previously is an example of a leaf. The Configuration Manager renders a page as a single HTML page that has to be divided in at least one apt:section. An apt:section element renders all its child elements in a table with a table heading. Using more than one section enables you to group settings on one page.
The apt:section element contains apt:property elements, which represent the configuration settings. The "Hello, world!" template contains six properties: ProxyServer, HTTPProxy, HTTPPort, FTPProxy, FTPPort, and NoProxyFor. Every property contains an apt:dataPath attribute. This attribute is required and specifies the data location in the configuration tree. The configuration tree in turn represents the hierarchy of the configuration settings as it is stored in the configuration repository. See Trees for more information.
The oor:type attribute defines the data type of the configuration setting in the configuration repository. ProxyServer, HTTPPort, and FTPPort are of type xs:int, the other properties are of type xs:string. Integer and string types are displayed as edit fields by default.
The visual element is used to instruct the Configuration Manager how to display the property. Without specifying this element, the property ProxyServer would have been rendered using an edit field instead of a radio button group.
Tip –
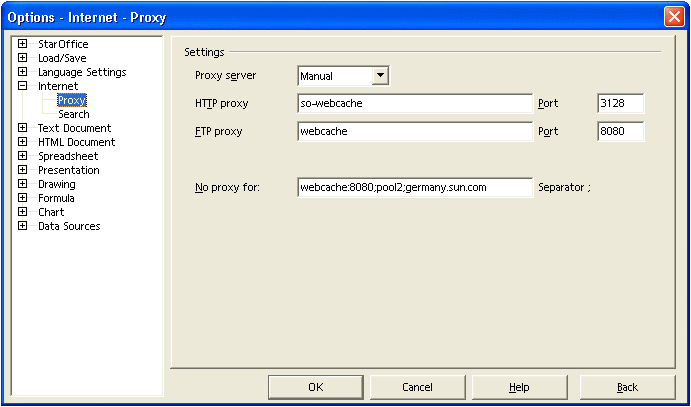
The GUI of the Configuration Manager deviates from the original StarOffice GUI by rendering the two possible integer values as a radio
button group instead of using a drop-down list. For visualizing a dual value, improved
usability is achieved using radio buttons instead of a drop-down list. An example,
for instance, is one click compared with two clicks for changing a value.
The constraints element, in combination with the enumeration sub-element, is used to specify the number of radio buttons rendered and the integer values stored in the back end, depending on which radio button is selected. The apt:label attribute specifies the string rendered on the GUI for every radio button.
- © 2010, Oracle Corporation and/or its affiliates
