Creating a Boot Environment With RAID-1 Volume File Systems
Solaris Live Upgrade uses Solaris Volume Manager technology to create a boot environment that can contain file systems encapsulated in RAID-1 volumes. Solaris Volume Manager provides a powerful way to reliably manage your disks and data by using volumes. Solaris Volume Manager enables concatenations, stripes, and other complex configurations. Solaris Live Upgrade enables a subset of these tasks, such as creating a RAID-1 volume for the root (/) file system.
A volume can group disk slices across several disks to transparently appear as a single disk to the OS. Solaris Live Upgrade is limited to creating a boot environment for the root (/) file system that contains single-slice concatenations inside a RAID-1 volume (mirror). This limitation is because the boot PROM is restricted to choosing one slice from which to boot.
How to Manage Volumes With Solaris Live Upgrade
When creating a boot environment, you can use Solaris Live Upgrade to manage the following tasks.
-
Detach a single-slice concatenation (submirror) from a RAID-1 volume (mirror). The contents can be preserved to become the content of the new boot environment if necessary. Because the contents are not copied, the new boot environment can be quickly created. After the submirror is detached from the original mirror, the submirror is no longer part of the mirror. Reads and writes on the submirror are no longer performed through the mirror.
-
Create a boot environment that contains a mirror.
-
Attach a maximum of three single-slice concatenations to the newly created mirror.
You use the lucreate command with the -m option to create a mirror, detach submirrors, and attach submirrors for the new boot environment.
Note –
If VxVM volumes are configured on your current system, the lucreate command can create a new boot environment. When the data is copied to the new boot environment, the Veritas file system configuration is lost and a UFS file system is created on the new boot environment.
|
For step-by-step procedures | |
|
For an overview of creating RAID-1 volumes when installing | |
|
For in-depth information about other complex Solaris Volume Manager configurations that are not supported if you are using Solaris Live Upgrade |
Chapter 2, Storage Management Concepts, in Solaris Volume Manager Administration Guide |
Mapping Solaris Volume Manager Tasks to Solaris Live Upgrade
Solaris Live Upgrade manages a subset of Solaris Volume Manager tasks. Table 2–1 shows the Solaris Volume Manager components that Solaris Live Upgrade can manage.
Table 2–1 Classes of Volumes|
Term |
Description |
|---|---|
|
A RAID-0 volume. If slices are concatenated, the data is written to the first available slice until that slice is full. When that slice is full, the data is written to the next slice, serially. A concatenation provides no data redundancy unless it is contained in a mirror. |
|
|
A RAID-1 volume. See RAID-1 volume. |
|
|
A class of volume that replicates data by maintaining multiple copies. A RAID-1 volume is sometimes called a mirror. A RAID-1 volume is composed of one or more RAID-0 volumes that are called submirrors. |
|
|
A class of volume that can be a stripe or a concatenation. These components are also called submirrors. A stripe or concatenation is the basic building block for mirrors. |
|
|
A state database stores information about disk about the state of your Solaris Volume Manager configuration. The state database is a collection of multiple, replicated database copies. Each copy is referred to as a state database replica. The state database tracks the location and status of all known state database replicas. |
|
|
state database replica |
A copy of a state database. The replica ensures that the data in the database is valid. |
|
See RAID-0 volume. |
|
|
A group of physical slices or other volumes that appear to the system as a single logical device. A volume is functionally identical to a physical disk in the view of an application or file system. In some command-line utilities, a volume is called a metadevice. |
Examples of Using Solaris Live Upgrade to Create RAID-1 Volumes
The following examples present command syntax for creating RAID-1 volumes for a new boot environment.
Create RAID-1 Volume on Two Physical Disks
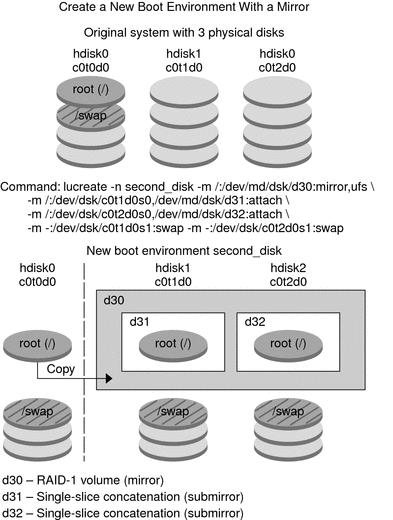
Figure 2–5 shows a new boot environment with a RAID-1 volume (mirror) that is created on two physical disks. The following command created the new boot environment and the mirror.
# lucreate -n second_disk -m /:/dev/md/dsk/d30:mirror,ufs \ -m /:/dev/dsk/c0t1d0s0,/dev/md/dsk/d31:attach -m /:/dev/dsk/c0t2d0s0,/dev/md/dsk/d32:attach \ -m -:/dev/dsk/c0t1d0s1:swap -m -:/dev/dsk/c0t2d0s1:swap |
This command performs the following tasks:
-
Creates a new boot environment, second_disk.
-
Creates a mirror d30 and configures a UFS file system.
-
Creates a single-device concatenation on slice 0 of each physical disk. The concatenations are named d31 and d32.
-
Adds the two concatenations to mirror d30.
-
Copies the root (/) file system to the mirror.
-
Configures files systems for swap on slice 1 of each physical disk.
Figure 2–5 Create a Boot Environment and Create a Mirror

Create a Boot Environment and Use the Existing Submirror
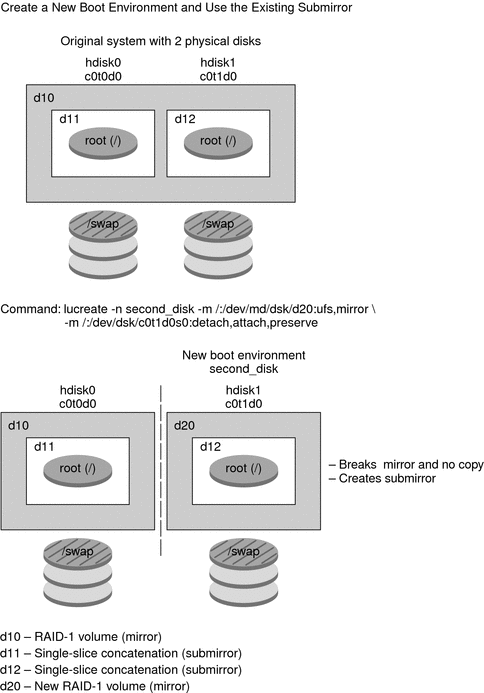
Figure 2–6 shows a new boot environment that contains a RAID-1 volume (mirror). The following command created the new boot environment and the mirror.
# lucreate -n second_disk -m /:/dev/md/dsk/d20:ufs,mirror \ -m /:/dev/dsk/c0t1d0s0:detach,attach,preserve |
This command performs the following tasks:
-
Creates a new boot environment, second_disk.
-
Breaks mirror d10 and detaches concatenation d12.
-
Preserves the contents of concatenation d12. File systems are not copied.
-
Creates a new mirror d20. You now have two one-way mirrors d10 and d20.
-
Attaches concatenation d12 to mirror d20.
Figure 2–6 Create a Boot Environment and Use the Existing Submirror

- © 2010, Oracle Corporation and/or its affiliates
