Installing Directory Server Enterprise Edition Using Native Packages
To install Directory Server Enterprise Edition 6.3 using native packages, you must have 6.0, 6.1, or 6.2 installed on your computer and then upgrade to 6.3. Refer to the following procedure to install Directory Server Enterprise Edition 6.3 successfully
-
Install Directory Server Enterprise Edition 6.0, 6.1, or 6.2. In this guide, the installation instructions for Directory Server Enterprise Edition 6.2 are shown.
On Windows, you cannot install Directory Server Enterprise Edition 6.2 directly, so you must install version 6.0 then directly upgrade to 6.3.
-
Upgrade all the shared components to successfully upgrade to Directory Server Enterprise Edition 6.3. For detailed information, refer to To Upgrade Shared Components Using Patches.
-
Upgrade your Directory Server Enterprise Edition installation to 6.3 by applying the respective patches as mentioned in To Upgrade Directory Server Enterprise Edition Using Native Packages.
You can install Directory Service Control Center, Directory Server, and Directory Proxy Server on the same host but in the following procedure it is shown as if all the three components are being installed on different computers. If you install all the three components on the same computer, in the components selection screen shown in the following procedure, select all the three components to install.
 To Install Only Directory Server From
Native Packages
This procedure covers installation of Directory Server from native packages. You must be root to perform this procedure.
Note –
If you installed Directory Service Control Center, you automatically installed Directory Server from native packages. You can use the Directory Server software that is installed alongside DSCC to create your own additional Directory Server instances on the system.
Before You Begin
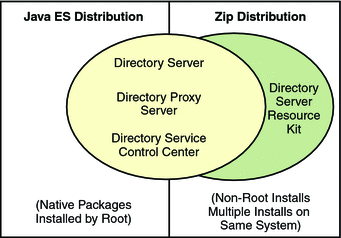
Obtain the Java Enterprise System update 1 distribution for this installation, as shown in the following figure:
Complete the following worksheet for your installation.
|
Requisite Information |
Hints |
Your Answers |
|---|---|---|
|
Fully qualified hostname of the system where you install Directory Server |
Example: ds.example.com | |
|
(Optional) Cacao common agent container port number to access from Directory Service Control Center |
Default: 11162 | |
|
File system paths where you create Directory Server instances |
Example: /local/ds/ Create instances only on local file systems, never on network–mounted file systems such as NFS. Each path is henceforth referred to as an instance-path. | |
|
LDAP port number |
Default: 389 - root installation; 1389 - non-root installation | |
|
LDAP/SSL port number |
Default: 636 - root installation; 1636 - non-root installation | |
|
Directory Manager DN |
Default: cn=Directory Manager | |
|
Directory Manager password |
Must be at least 8 characters long | |
|
Base suffix DN |
Example: dc=example,dc=com | |
|
(UNIX systems) Server user (uid) |
Example: noaccess | |
|
(UNIX systems) Server group (gid) |
Example: noaccess |
-
Install prerequisite patches or service packs for your platform.
-
Using the Java Enterprise System distribution, run the Java ES installer as root.
root# ./installer
-
Select the Directory Server component for installation.
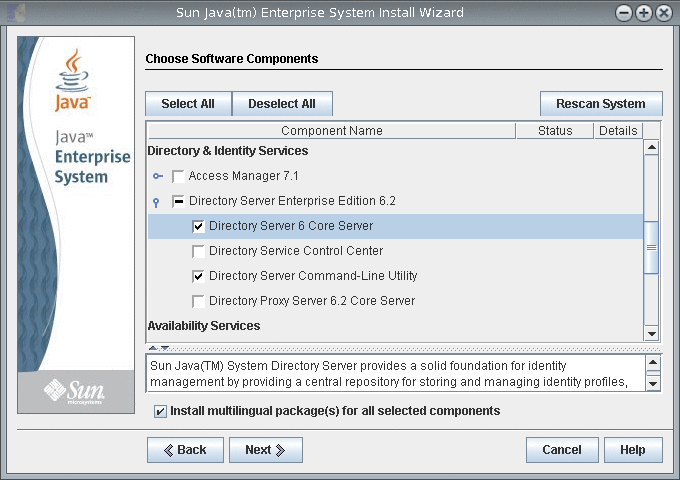
If you do not want to install the multilingual packages, deselect the Install multilingual package(s) for all selected components check box.
-
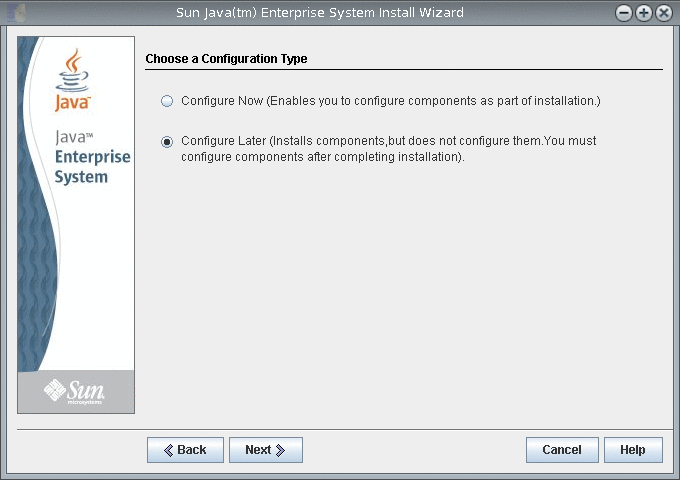
Choose to configure the software later, as you will upgrade the software to 6.3.
-
Complete installation with the Java ES installer.
 To Install Only Directory Proxy Server From
Native Packages
This procedure covers installation of Directory Proxy Server from native packages. You must be root to perform this procedure.
Before You Begin
Obtain the Java Enterprise System update 1 distribution for this installation, as shown in the following figure:

Complete the following worksheet for your installation.
|
Requisite Information |
Hints |
Your Answers |
|---|---|---|
|
Fully qualified hostname of the system where you install Directory Proxy Server |
Example: dps.example.com | |
|
(Optional) Cacao common agent container port number to access from Directory Service Control Center |
Default: 11162 | |
|
File system paths where you create Directory Proxy Server instances |
Example: /local/dps/ Create instances only on local file systems, never on network–mounted file systems such as NFS. Each path is henceforth referred to as an instance-path. | |
|
LDAP port number |
Default: 389 - root installation; 1389 - non-root installation | |
|
LDAP/SSL port number |
Default: 636 - root installation; 1636 - root installation | |
|
Directory Proxy Manager DN |
Default: cn=Proxy Manager | |
|
Directory Proxy Manager password |
Must be at least 8 characters long | |
|
(UNIX platforms) Server user (uid) |
Example: noaccess | |
|
(UNIX platforms) Server group (gid) |
Example: noaccess | |
|
(Optional) Connection information for each server to access through the proxy |
Example: ds1.example.com:1389, ds2.example.com:1636 |
-
Install prerequisite patches or service packs for your platform.
-
Using the Java Enterprise System distribution, run the Java ES installer as root.
root# ./installer
-
Select the Directory Proxy Server component for installation.
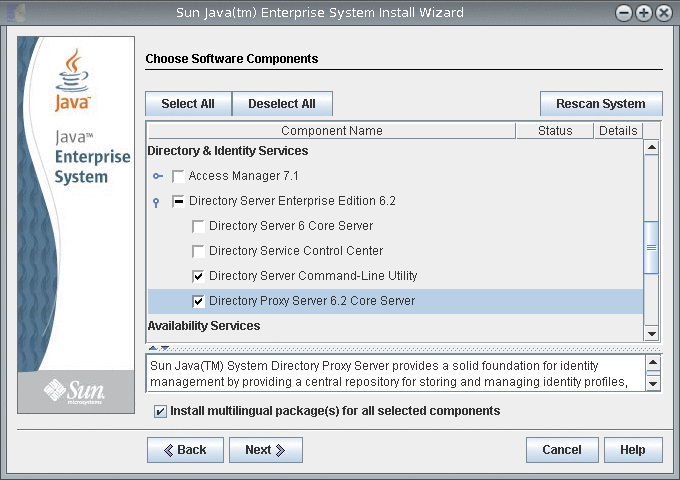
If you do not want to install the multilingual packages, deselect the Install multilingual package(s) for all selected components check box.
-
Choose to configure the software later, as you will upgrade the software to 6.3.

-
Complete installation with the Java ES installer.
 To Install Directory Service Control Center From Native Packages
This procedure covers installation of Directory Service Control Center, also known as DSCC, and remote administration command-line tools.
You must be root to perform this procedure.
You can also install Directory Service Control Center with the Zip distribution by deploying the WAR file provided with the software packages. For more information, see Installing Directory Service Control Center From Zip Distribution.
When you install DSCC, you automatically install Directory Server from native packages. DSCC uses its own local instance of Directory Server to store information about your directory service configuration. The instance is referred to as the DSCC Registry.
You can use the Directory Server software that is installed alongside DSCC to create your own additional Directory Server instances on the system.
Before You Begin
Obtain the Java Enterprise System update 1 distribution for this installation, as shown in the following figure:

Complete the following worksheet for your installation.
|
Requisite Information |
Hints |
Your Answers |
|---|---|---|
|
Hostname of the system where you install DSCC |
| |
|
root password for the system |
| |
|
Java Web Console URL |
Default: https://hostname:6789 | |
|
Directory Service Manager password |
|
-
Install prerequisite patches or service packs for your platform.
-
With the Java Enterprise System distribution, run the Java ES installer as root.
# ./installer
-
Select the Directory Service Control Center component for installation.
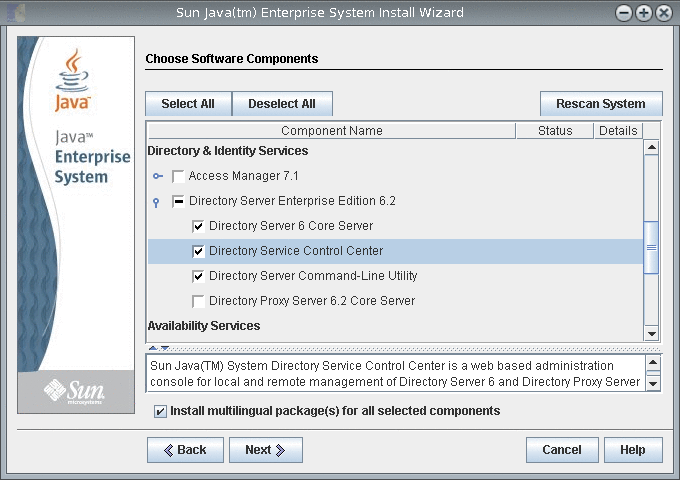
If you do not want to install the multilingual packages, deselect the Install multilingual package(s) for all selected components check box.
-
Choose to configure the software later, as you will upgrade the software to 6.3.

-
Complete installation with the Java ES installer.
The native packages are installed on the system.
 To Upgrade Shared Components Using
Patches
Before You Begin
Before upgrading Directory Server Enterprise Edition to 6.3 using native packages, you must upgrade the shared components. You must be root to perform this procedure.
Using patches, you can upgrade shared components on Solaris, Linux, and Windows. On Linux, to install patches you must use installpatch, when available.
Select the platform as per your requirements and install all the patches specified for that platform. If newer patch revisions become available, use the newer ones instead of those shown in the table.
|
Description |
Solaris 10 SPARC and Solaris 9 SPARC |
Solaris 10 x86, AMD x64 and Solaris 9 x86 |
Linux |
|---|---|---|---|
|
International Components for Unicode (ICU) |
119810-04 (Solaris 10) 114677-14 (Solaris 9) |
119811-04 (Solaris 10) 114678-14 (Solaris 9) | |
|
Sun Java Web Console (SJWC) |
125952-05 (Solaris 10) 125950-05 (Solaris 9) |
125953-05 (Solaris 10) 125951-05 (Solaris 9) | |
|
Network Security Services/Netscape Portable Runtime/Java Security Services (NSS/NSPR/JSS) |
Refer to the table below for complete patch information. |
Refer to the table below for complete patch information. | |
|
Java Dynamic ManagementTM Kit Runtime | |||
|
Common Agent Container Runtime | |||
|
Sun Java Monitoring Framework (MFWK) |
125446-11 (Solaris 10 64–bit and Solaris 10 32–bit) 125445-11 (Solaris 10 32–bit and Solaris 9 32-bit) |
Choose the right NSS/NSPR/JSS patch for your system by getting the package version of SUNWpr and SUNtls on your system.
# pkginfo -l SUNWpr | grep VERSION # pkginfo -l SUNWtls | grep VERSION |
Then choose the right patch series from the table below.
|
Solaris |
Package Version |
Network Security Services/Netscape Portable Runtime/Java Security Services (NSS/NSPR/JSS) patch |
|---|---|---|
|
Solaris 9 SPARC |
SUNWpr: VERSION=4.1.2,REV=2002.09.03.00.17 SUNWtls: VERSION=3.3.2,REV=2002.09.18.12.49 | |
|
Solaris 9 x86 |
SUNWpr: VERSION=4.1.3,REV=2003.01.09.13.59 SUNWtls: VERSION=3.3.3,REV=2003.01.09.17.07 | |
|
Solaris 10 SPARC |
SUNWpr: VERSION=4.5.1,REV=2004.11.05.02.30 SUNWtls: VERSION=3.9.5,REV=2005.01.14.17.27 | |
|
Solaris 10 x86 |
SUNWpr: VERSION=4.5.1,REV=2004.11.05.03.44 SUNWtls: VERSION=3.9.5,REV=2005.01.14.19.03 | |
|
Solaris 9 SPARC and Solaris 10 SPARC |
SUNWpr: VERSION=4.6.4,REV=2006.11.16.20.40 SUNWtls: VERSION=3.11.4,REV=2006.11.16.20.40 | |
|
Solaris 9 x86 and Solaris 10 x86 |
SUNWpr: VERSION=4.6.4,REV=2006.11.16.21.41 SUNWtls: VERSION=3.11.4,REV=2006.11.16.21.41 |
On Windows, before you upgrade Common Agent Container Runtime shared component, you must run the following command:
cacaoadm.exe prepare-uninstall |
|
Description |
Windows |
|---|---|
|
Windows Installer Patch | |
|
Sun Java Web Console (SJWC) | |
|
Network Security Services/Netscape Portable Runtime/Java Security Services (NSS/NSPR/JSS) | |
|
Common Agent Container Runtime | |
|
Sun Java Monitoring Framework (MFWK) |
Before upgrading Directory Server Enterprise Edition 6.2 to 6.3, you need to upgrade only the Common Agent Container shared component.
-
Shut down any processes using the shared components.
-
If applicable, shut down the shared components.
-
Obtain the latest upgrade patches as shown in the table above.
For more information on how to obtain the patches, see Getting the Software in Sun Java System Directory Server Enterprise Edition 6.3 Release Notes.
-
Apply the appropriate patches for the shared components.
Read the README.patchID file for detailed patch installation procedures.
-
Verify that the patch upgrades were successful.
Read the README.patchID file for verification procedure.
-
If applicable, restart the shared components.
 To Upgrade Directory Server Enterprise Edition Using Native Packages
Before You Begin
Make sure all the shared components are up-to-date. For more information, see To Upgrade Shared Components Using Patches.
If you already have Directory Server Enterprise Edition 6.0, 6.1, or 6.2 installed, upgrade to version 6.3 using the following procedure.
You must be root to perform these steps.
All the Directory Server instances, Directory Proxy Server instances, and configuration information remain unaffected after you complete the Directory Server Enterprise Edition upgrade.
The following table displays the patch numbers that are required to upgrade Directory Server Enterprise Edition on different platforms. If newer patch revisions become available, use the newer ones instead of those shown in the table.
|
Description |
Directory Server Enterprise Edition core |
Directory Server Enterprise Edition localization |
|---|---|---|
|
Patch ID: Solaris SPARC | ||
|
Patch ID: Solaris 9 x86 | ||
|
Patch ID: Solaris 10 x86 or AMD x64 | ||
|
Patch ID: Linux | ||
|
Patch ID: Windows The Directory Server Enterprise Edition 6.1 patch was not delivered for Windows so this patch is not applicable to upgrade 6.1 installation. |
Note –
To make the localized Directory Server Enterprise Edition work successfully, install the localized patches before installing the core patches.
Each localization patch contains all the supported languages for the selected platform.
-
Stop the DSCC registry.
-
On Solaris
# dsadm stop /var/opt/SUNWdsee/dscc6/dcc/ads
-
On Linux
# dsadm stop /var/opt/sun/dscc6/dcc/ads
-
On Windows
dsadm.exe stop C:\Program Files\Sun\JavaES5\DSEE\var\dscc6\dcc\ads
-
-
Stop any running instances of Directory Server and Directory Proxy Server.
-
Upgrade the shared components. See To Upgrade Shared Components Using Patches.
-
Download the Directory Server Enterprise Edition 6.3 patch.
See Getting the Software in Sun Java System Directory Server Enterprise Edition 6.3 Release Notes for more details.
-
Change to the directory where you have saved the patch.
-
Run the following command to install the patch.
-
Solaris OS
Before upgrading Directory Server Enterprise Edition, you must install 119254-38 on Solaris 10 SPARC and 119255-38 on Solaris 10 x86. See Getting the Software in Sun Java System Directory Server Enterprise Edition 6.3 Release Notes for information on downloading patches.
Alternatively, use -G with the patchadd command on Solaris 10 SPARC and Solaris 10 x86 while applying the Directory Server Enterprise Edition upgrade patch.
For example, # patchadd -G patch-id
For rest of the Solaris OS, use the following command:
# patchadd patch-id
-
Linux
-
Open the directory where the installpatch file is located.
-
Run installpatch.
# ./installpatch
During installation, if installpatch reports an error, you must resolve the error and install the patch again.
-
-
Windows
-
Open the folder where the patch-id.exe executable file is located.
-
Double click patch-id.exe.
The localized patches are delivered within the base patch.
-
After the successful installation of the patch, run the following commands:
# dsccsetup console-unreg
# dsccsetup console-reg
-
-
Start the Directory Server instances and Directory Proxy Server instances, if any.
-
Restart the DSCC registry.
-
On Solaris
# dsadm start /var/opt/SUNWdsee/dscc6/dcc/ads
-
On Linux
# dsadm start /var/opt/sun/dscc6/dcc/ads
-
On Windows
dsadm.exe start C:\Program Files\Sun\JavaES5\DSEE\var\dscc6\dcc\ads
-
Next Steps
After installing the software, see Environment Variables.
- © 2010, Oracle Corporation and/or its affiliates
