Asset Publisher Portlet
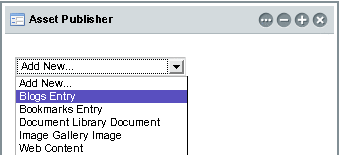
Use the Asset Publisher portlet to add, create, edit, and delete content assets such as blogs, bookmarks, documents, images, and web content. The main function of the Asset Publisher portlet is to display the content assets, depending on the settings applied for a portlet instance.
Figure 6–7 Asset Publisher Portlet

Asset Publisher can be used to create/publish the following:
-
Blogs Entry
-
Bookmarks Entry
-
Document Library Document
-
Image Gallery Image
-
Web Content
 To add the Asset Publisher Portlet to a Page
-
Log in to Web Space Server.
-
Choose Add Applications and expand the Content Management folder.
-
Add the Asset Publisher portlet to your page.
The Asset Publisher portlet is added to your page.
Configuring the Asset Publisher Portlet
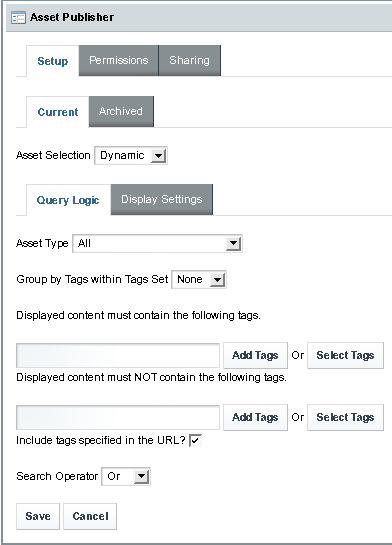
To configure the asset selection criteria of the Asset Publisher portlet, click the Configuration button from the portlet menu bar. The Configuration screen appears.
Figure 6–8 Configuring the Asset Publisher Portlet

You can set different asset selection criteria for different instances of the Asset Publisher portlet, so that you display only the selected asset type on each instance of the portlet. For example, if you select Blogs Entry from the Asset Type list and click Save, that particular instance of the Asset Publisher portlet displays only the blog entries, and allows you to add only blogs.
Asset selection criteria can be Dynamic or Manual, with “Dynamic” being the default value. When you select Manual, you have to select existing entries for an asset type, or create new entries for a selected asset type. You can add new content assets only for the type selected in Asset Type.
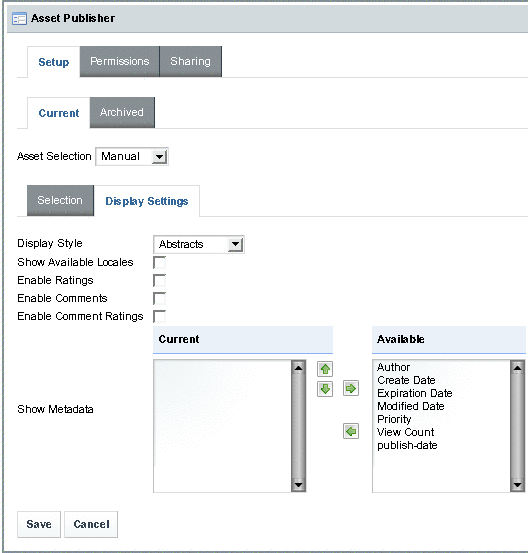
You can apply various display settings by clicking the Display Settings tab.
Figure 6–9 Display Settings

For example, you can apply some metadata for the assets on display by moving some items such as Author and Create Date from the Available list to the Current list. The items on the Current list will be used as metadata for displayed items.
 To add a Blogs Entry
-
Log in to Web Space Server.
-
Choose Add Applications and expand the Content Management folder.
-
Add the Asset Publisher portlet to your page.
The Asset Publisher portlet is added to your page.
-
Select Blogs Entry from the list on the Asset Publisher portlet.
The Blogs Entry page has many advanced options. You can apply styles and formatting on your blog entry. You can add Tags and Suggestions to your blog.
-
Complete your blog entry and click Publish.
You are displayed on the Asset Publisher portlet.
-
To view the blog entry, click on the blog title or click Read More.
-
To edit the blog entry, click the Edit button.
 To add a Bookmarks Entry
-
Log in to Web Space Server.
-
Choose Add Applications and expand the Content Management folder.
-
Add the Asset Publisher portlet to your page.
The Asset Publisher portlet is added to your page.
-
Select Bookmarks Entry from the list on the Asset Publisher portlet.
-
Type the Name, URL, and Description for a bookmark.
-
Indicate a folder in which to store the bookmarks,
-
To select a folder from the available folders click Select.
-
To create a new folder:
-
-
Click the Choose button corresponding to a folder to choose the folder.
-
Click Save.
The bookmark is added to the selected folder, and the saved bookmark appears on the Asset Publisher portlet.
-
Click the Go link to view the bookmarked page.
 To Delete a Bookmarks Entry
-
Log in to Web Space Server.
-
Choose Add Applications and expand the Content Management folder.
-
Add the Asset Publisher portlet to your page.
The Asset Publisher portlet is added to your page. You can see the bookmarks already on the page.
-
Click the Edit Bookmark button.
-
Select the folder containing the bookmark.
-
Delete the folder.
All the bookmarks contained in the folder are deleted.
 To add a Document Library Document
-
Log in to Web Space Server.
-
Choose Add Applications and expand the Content Management folder.
-
Add the Asset Publisher portlet to your page.
The Asset Publisher portlet is added to your page.
-
Select Document Library Document from the list on the Asset Publisher portlet.
-
Click the Browse button to browse a document.
-
Type a name and description for the document.
-
Indicate a folder in which to store the document library document,
-
To select a folder from the available folders click Select.
-
To create a new folder:
-
-
Click the Choose button corresponding to a folder to choose the folder.
-
Click Save.
The document is added to the selected folder, and the saved document appears on the Asset Publisher portlet.
-
Click the Download link to download the document.
 To Delete a Document Library Document
-
Log in to Web Space Server.
-
Choose Add Applications and expand the Content Management folder.
-
Add the Asset Publisher portlet to your page.
The Asset Publisher portlet is added to your page. You can see the documents published on the page.
-
Click the Edit Document button.
-
Select the folder containing the document.
-
Delete the folder.
All the documents contained in the folder are deleted.
 To add an Image Gallery Image
-
Log in to Web Space Server.
-
Choose Add Applications and expand the Content Management folder.
-
Add the Asset Publisher portlet to your page.
The Asset Publisher portlet is added to your page.
-
Select Image Gallery Image from the list on the Asset Publisher portlet.
-
Click the Browse button to browse an image.
-
Type a name and description for the image.
-
Indicate a folder in which to store the image gallery image,
-
To select a folder from the available folders click Select.
-
To create a new folder:
-
-
Click the Choose button corresponding to a folder to choose the folder.
-
Click Save.
The image is added to the selected folder, and the saved image appears on the Asset Publisher portlet.
-
Click the View link to see the image.
 To Delete an Image Gallery Image
-
Log in to Web Space Server.
-
Choose Add Applications and expand the Content Management folder.
-
Add the Asset Publisher portlet to your page.
The Asset Publisher portlet is added to your page. You can see the images published on the page.
-
Click the Edit Image button.
-
Select the folder containing the document.
-
Delete the folder.
All the images contained in the folder are deleted.
 To add Web Content
-
Log in to Web Space Server.
-
Choose Add Applications and expand the Content Management folder.
-
Add the Asset Publisher portlet to your page.
-
Select Web Content from the list on the Asset Publisher portlet.
Write an article using the options available on the screen. You can set an Expiration Date and Review Date for the journal article.
-
Click Save and Approve.
The Web Content article is displayed on the Asset Publisher portlet.
-
Click the Read More link to read the article.
Note –Make sure that you click Save and Approve after creating the article. If the article is not approved, you get an error message appears saying “The requested resource is not found” when you click the Read More link for the article.
-
Click the edit button to make changes to the article.
The default version number of the Web Content is set to 1.0. You can select the Increment Version on Save option to increment the version number of the article each time you update the article. You can use the Expire button to make the article expire immediately. You can use the Delete button to delete the article.
- © 2010, Oracle Corporation and/or its affiliates
