|
|
| iPlanet Certificate Management System Installation and Setup Guide |
Appendix D Smart Card Login with Windows 2000
This appendix provides detailed instructions for configuring Certificate Server 4.7 to generate certificates that can be used for Smart Card login in a Windows 2000 environment.
Overview
Enabling this feature in Certificate Server 4.7 is a three-part process.
Set up the Windows 2000 environment to work with Certificate Server 4.7. This document provides information resources for Part 1, detailed instructions for Part 2, and some general notes for Part 3.
Part 1. Set Up the Windows 2000 Environment
For detailed instructions, see the following documents on the Microsoft website:
"Requirements for Domain Controller Certificates from a Third-Party CA (Q291010)" at http:// support.microsoft.com / support / kb / articles / Q291 / 0 / 10.ASP
"Guidelines for Enabling Smart Card Logon with Third-Party Certification Authorities (Q281245) " at http:// support.microsoft.com / support / kb / articles / Q281 / 2 / 45.ASP
Part 2. Configuring Certificate Server 4.7
In this part, you configure a number of policies for the Smart Card Certificate.
Set up the Key Usage policy for the Smart Card certificat.
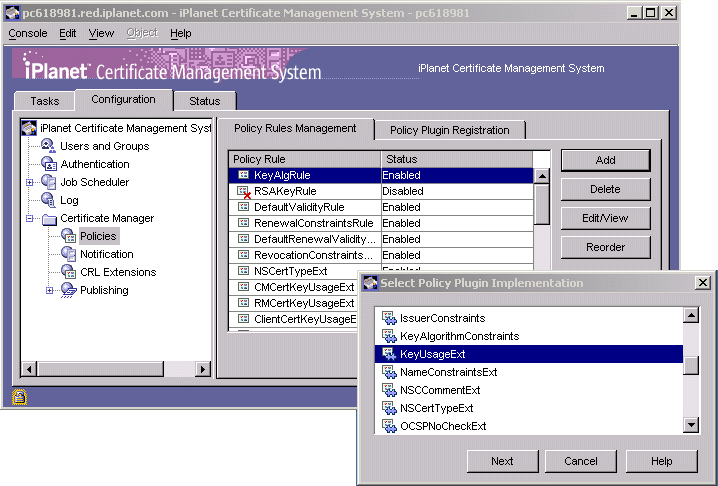
In the Certificate Server window, in the navigation tree, navigate to the Policy Rules Management tab by clicking Configuration>Policies>Certificate Manager.
In the Policies Management tab, click Add.
In the Select Policy Plug-in Implementation window, select KeyUsageExt, and then click Next.
In the Policy Rule Editor window, set the Digital Signature key usage for Smart Card. Enter values as in the following figure, and then click OK:

Set up the Extended Key Usage policy for the Smart Card Certificate.
In the Policies Management tab, click Add.
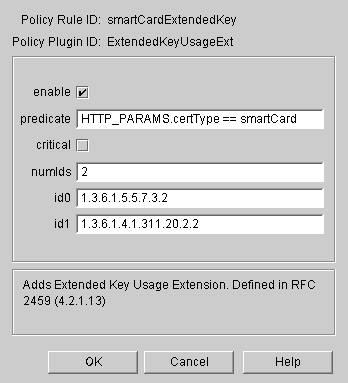
In the Select Policy Plug-in Implementation window, select ExtendedKeyUsage.
In the Policy Rule Editor window, Set extended key usages for Client Authentication (1.3.6.1.5.5.7.3.2) and Smart Card Logon (1.3.6.1.4.1.311.20.2.2). Enter values as in the following figure, and then click OK:
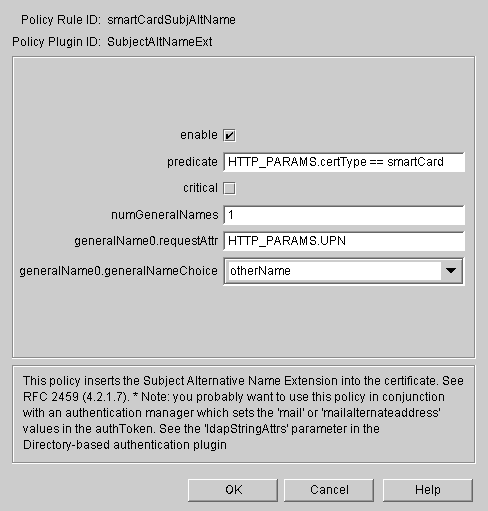
Set up the Subject Alt Name policy for the Smart Card certificate.
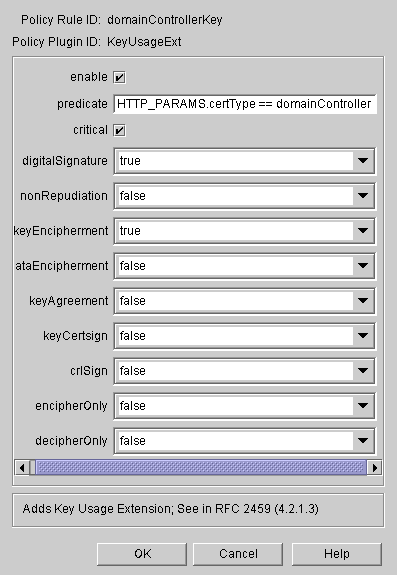
Set up the Key Usage policy for the domain controller certificate.
In the Policies Management tab, click Add.
In the Select Policy Plug-in Implementation window, select KeyUsageExt.
In the Policy Rule Editor window, set digitalSignature and keyEnciphment. Enter values as in the following figure, and then click OK:
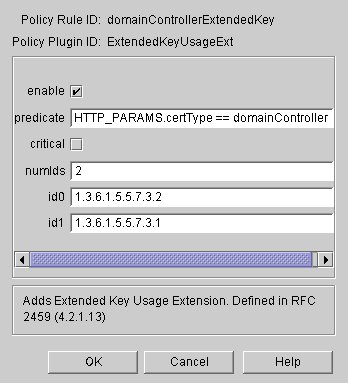
Set up the Extended Key Usage policy for the domain Controller Certificate.
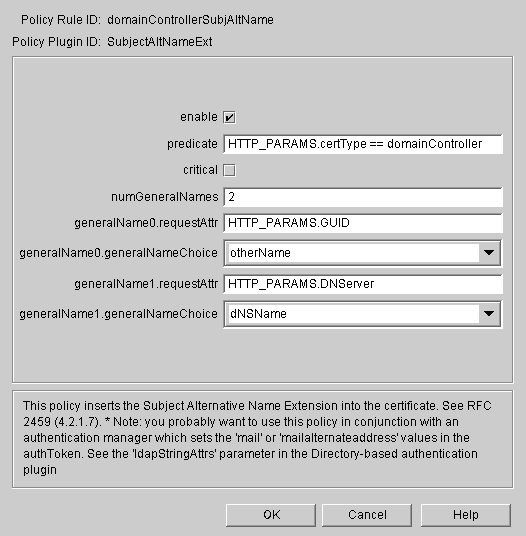
Set up the Subject Alt Name policy for the Domain Controller certificate.
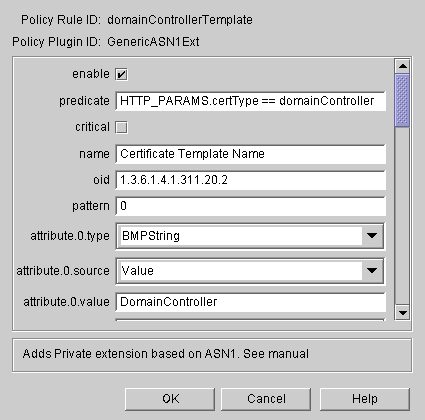
Set up the Certificate Template Name policy for the Domain Controller certificate.
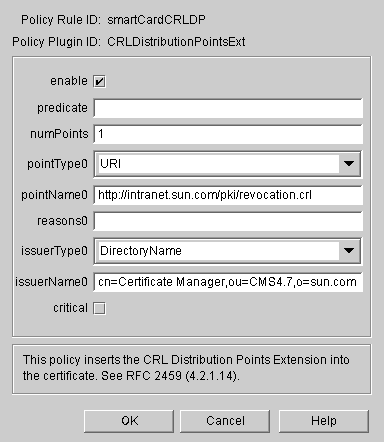
Set up the CRL Distribution Point policy for both Smart Card and Domain Controller certificates.
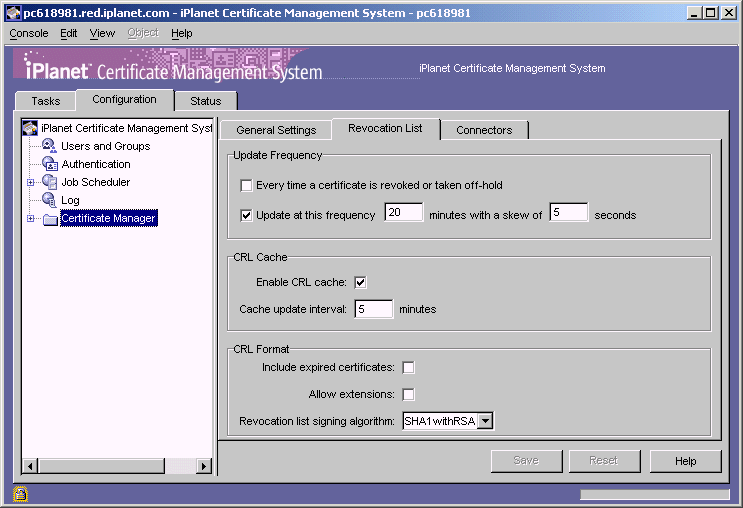
Make sure that the CRL list is accessible and valid. When the CRL is generated, the Revocation List Update frequency must be set as in the following graphic:
Enable the following policies in CMS for all the certificates:
Part 3. Customization Notes
Once you've set up the Windows 2000 environment and configured Certificate Server to work with it, you can begin issuing certificates. It's likely, however, that you'll want to customize your certificate enrollment forms to better suit your own requirements.
Part 3 is intended to illustrate how certificate issuance for a Windows 2000 environment works with minimal modifications. The notes included here are presented as sample instructions, a starting point from which you can begin to identify your own customization needs and develop custom solutions.
Certificate Server 4.7 provides two sample enrollment forms. One is for the Smart Card Certificate and one is for the Domain Controller Certificate. Both are stored in the following directory:
<CMS_Root>/<CMS_Instance>/web/ee.
3a. Construct the Domain Controller GUID ASN1 String
In the sample Domain Controller Enrollment form, the value of GUID must be entered. For demonstration purposes, we assume the GUID of the Domain Controller is fb4cdafc-2e1d-4151-a958-b20bfb9e5890. For more information on this value is derived, see http://support.microsoft.com/default.aspx?scid=kb;en-us;Q224544.
Use the command GenAsn1 provided by CMS4.7 to calculate the ASN1 string for GUID. Example:
$ GenAsn1 -o 1.3.6.1.4.1.311.25.1 -t Octet FC:DA:4C:FB:1D:2E:51:41:A9:58:B2:0B:FB:9E:58:90
BgkrBgEEAYI3GQGgEgQQ/NpM+x0uUUGpWLIL+55YkA==
Use the output string as the value of GUID in the Domain Controller Certificate Enrollment form. Make sure the value of "GUID-DataType" is "ASN1". Pay special attention to the octet string passed to this command. It is derived from the GUID value.
3b. Construct the UPN Value for the Smart Card Certificate
The User's Principal Name (UPN) field in the Smart Card Certificate Enrollment form accepts an ASN1 string. This string can be generated with the command GenAsn1 as above.
Assume the UPN value for the user of the Smart Card Certificate is user1@sun.com. You can generate the ASN1 string as follows:
$ GenAsn1 -o 1.3.6.1.4.1.311.20.2.3 -t UTF8 user1@sun.com
BgorBgEEAYI3FAIDoA8MDXVzZXIxQHN1bi5jb20=
Note: The UPN used here, user1@sun.com, must be the Windows logon user ID within that Active Directory domain. And its data type in ASN1 is a UTF8String.
In the Domain Controller Enrollment form, replace the value for DNServer with the fully qualified domain name of the Windows Domain Controller machine.
Use Microsoft Internet Explorer to enroll for a Domain Controller Certificate from Certificate Server.
Export the certificate from Internet Explorer with its private key, and then import it into the Domain Controller's local computer store.
As a precaution, remove the Domain Controller Certificate from Internet Explorer after it has exported.
In Internet Explorer, enroll for a Smart Cart certificate using the Smart Card Certificate Enrollment form.
3d. Certificate Verification
After the certificates are issued, use Internet Explorer to view the extension of SubjectAltName in the Smart Card Certificate and in the extensions of SubjectAltName and Certificate Template Name in Domain Controller Certificate. They should show up in clear text, not in hexadecimal or ASCII raw data.
About otherName in Subject Alt Name Extension
Originally only ASN1 sequence was supported for otherName type in Subject Alt Name extension. In CMS4.7, we support another ASN1 string without the leading character of 0x30, which is mainly for Windows 2000 support, and ASCII string. To specify the differnet types in the HTML form, a hidden variable of "xxx-DataType" is added, where "xxx" is the parameter being used in the extension. The 3 possible values for the data type are
Sequence, for ASN1 sequence with the leading "0x30" character. The old CMS versions support this format and this is the default in CMS4.7.
Previous Contents Index Next
Copyright © 2002 Sun Microsystems, Inc. All rights reserved.
Last Updated October 07, 2002
