Database Scripts
The oracle510.zip file contains scripts for creating a database instance that uses the eXchange Integrator database schema. This eXchange Integrator database is required; it collects and persists data about messages and delivery history, and it provides information and control over duplicate-checking, batching, and resending. The usual name of the database schema is the default: eXchange
The areas to be configured are:
-
Creating and Configuring the eXchange Integrator Database Instance
-
Running Database Scripts to Set Up the eXchange IntegratorDatabase
Do not confuse the eXchange Integrator database schema (required) with the database schema for the eInsight engine (optional): The eInsight engine allows you to collect and persist data from your business processes; because the data is persisted, you can also use Enterprise Manager to monitor business processes even if logical or physical components are shut down and restarted. To configure BPs to use the eInsight engine for persistence and monitoring, see the eInsight Business Process Manager User's Guide.
Creating and Configuring the eXchange Integrator Database Instance
Before you begin: You need to have already created an Oracle database instance with an entry in the tnsnames.ora file. Your TNSlistener service must be running, and you need to know the name of the database instance (default: eXchange) and to temporarily use the system username/password (default: sys/manager or system/manager).
If you have never installed an Oracle database, ask your Oracle database administrator for help. The following constitutes a brief reminder of how to use the Oracle 9i wizard.
 To create a new database instance for eXchange Integrator
-
(“Operations”): Choose Create a database.
-
(“Database Templates”): Choose New Database.
-
(“Database Identification”): Enter (for example) eXchange
-
(“Database Features”): Deselect all checkboxes and reply Yes to all prompts.
-
(“Database Connection Options”): Choose Dedicated [...].
-
(“Initialization Parameters”): Keep all values unchanged.
-
(“Database Storage”): Under Datafiles, click \{DB_Name}\undotbs01.dbf (the fifth entry). In the General tab, reduce File Size from 200 to 100.
-
(“Creation Options”): Choose Create Database, and then click Finish.
Modifying the init.ora File for the eXchange Integrator Database
If you create a new database, you must increase the open_cursors parameter for the eXchange Integrator database to a value of 500.
-
Some versions of Oracle allow you to do this by using a text editor to modify the init.ora file; see the procedure immediately below.
-
Other versions of Oracle require you to use the configuration utility.
 To edit the value of open_cursors in the init.ora file
for the eXchange Integrator database
-
Navigate to Oracle home\admin\eXchange database name\pfile\. For example:
cd C:\oracle\admin\exchange\pfile
-
Use a text editor to open the init.ora file in this folder. For example:
notepad init.ora
-
Search for the text open_cursors; if not found, add a new line. Edit the line so that it reads as follows:
open_cursors = 500
-
Save the file.
-
Restart the database.
Next: Continue with the steps in Extracting, Customizing, and Running Database Setup Scripts; at this release, you must extract and run database scripts whether you are installing from scratch or upgrading a previous release of eXchange Integrator.
 To configure the value of open_cursors in
the eXchange Integrator database
-
Start the Oracle configuration utility and open the eXchange database.
-
Navigate to Databases⇒;(EXCHANGE...)⇒Instance⇒Configuration.
-
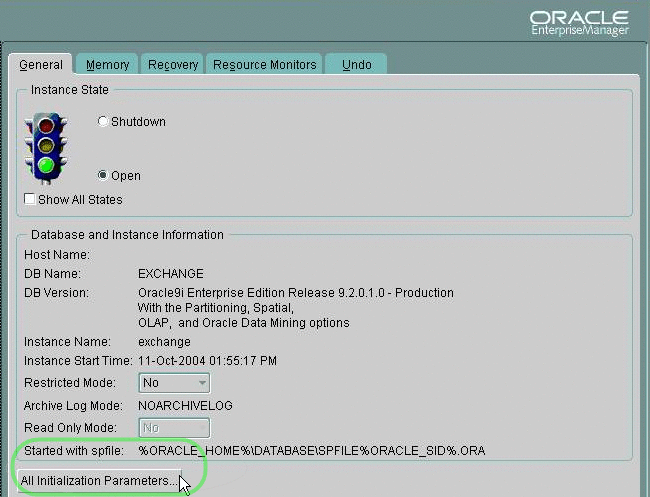
In the General tab, at the bottom, verify the “Started with spfile” parameter has a value such as %ORACLE_HOME%\DATABASE\SPFILE%ORACLE_SID%.ORA.
Figure 2–8 Oracle Configuration of Initialization Parameters: General Tab

-
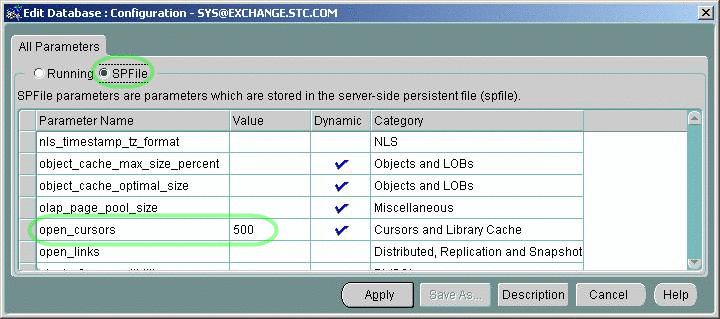
In the “Edit Database: Configuration [...]” dialog box, click the SPFile option button, scroll to the open_cursors parameter, and change its value to 500.

-
Click the Apply button. In response to the prompt (“Would you like to apply this change to the current database?”), click Yes.
Extracting, Customizing, and Running Database Setup Scripts
Note –
Do not skip this section. To use eeXchange Integrator, you must extract and eventually run the createdb script to set up the eXchange database.
What scripts are supplied, and what do they do?
eXchange Integrator supplies the file oracle510.zip in the Project Explorer tree under SeeBeyond⇒eXchange⇒Download Scripts. The oracle510.zip file contains a collection of command scripts (.cmd files) and SQL scripts (.sql files).
You install the eXchange Integrator schema on the database by doing one of the following:
-
Edit setenv.cmd so it reflects your system environment (see Table 2–2), and then run the two other command scripts (see Running Database Scripts to Set Up the eXchange IntegratorDatabase);— or—
-
Run the SQL scripts directly, supplying system information at run time; see Running Database Scripts to Set Up the eXchange IntegratorDatabase.
Assumptions
The scripts assume they are run on a machine whose command path includes sqlplus. The network\admin\tnsnames.ora file must include a stanza such as the following:
eXchange_myOracleHostname.domain
  (DESCRIPTION =
    (ADDRESS_LIST =
       (ADDRESS =
         (PROTOCOL = TCP)
        (HOST = myOracleHostname)
        (PORT = 1521))
        ...
     ) )
    (CONNECT_DATA =
       (SID = ORCL)
      ...
  ) )
|
Some scripts and samples assume defaults or supply values as shown in Table 2–2.
Table 2–2 Typical, Default, or Presupplied Values for eXchange Integrator Database Setup|
Item |
Typical or presupplied value |
|---|---|
|
UserID/password combination for Oracle system |
sys/manager or system/manager |
|
Name of eXchange database instance (see Creating and Configuring the eXchange Integrator Database Instance) |
eXchange |
|
SID (also called service ID, servicename, or database name) |
ORCL (or not presupplied) |
|
TNS name |
(not presupplied) |
|
UserID/password for administering the eXchange database |
ex_admin/ex_admin |
|
UserID/password for first generic eXchange end user |
ex510a/ex510a |
|
UserID/password for second generic eXchange end user |
ex510b/ex510b |
 To extract the scripts
-
In Enterprise Explorer, in the project tree, expand the following folders: SeeBeyond⇒eXchange ⇒Download Scripts
-
Right-click oracle510.zip and, on the popup context menu, click Export; then use the Save dialog box to save the file to a local directory, such as C:\JC512\Exported\Oracle510\.
-
Extract the files in oracle510.zip into this local directory, yielding:
-
CleanTrackData.sql
-
Cleanup.sql
-
cleanup_coreServices_tables.sql
-
create_coreServices_tables.sql
-
createdb.cmd
-
createdb.sql
-
createtablespaces.cmd
-
createtablespaces.sql
-
createuser.sql
-
eXchange50Runtime.sql
-
in_user_seq.sql
-
setenv.cmd
-
 To edit the setenv command script
-
Open a command prompt and change directories to the local directory where you saved the scripts in the previous procedure.
-
Use a text editor to edit the as-supplied version of setenv.cmd:
@REM SET YOUR DATABASE CONNECTION INFORMATION HERE
*
echo * This file should be edited to use appropriate
echo * database connection settings. *
echo * SETENV.CMD

 @REM TNS_NAME
@set TNS_NAME= TNS NAME

@REM ORACLE_SID
@set ORACLE_SID=  SID

@REM Oracle system login password
@set SYSTEMPWD=  PWD

@set USERID=ex_admin
@set USERPWD=ex_admin
-
Supply the appropriate values for TNS_NAME, ORACLE_SID, and SYSTEMPWD. For example:
@set TNS_NAME=eXchange_myOracleHostname
@set ORACLE_SID=ORCL
@set SYSTEMPWD=manager
@set USERID=ex_admin
@set USERPWD=ex_admin
-
If your Oracle location is not c:\oracle\oradata, or if your database instance name (SID) is other then eXchange, then open the createtablespaces.sql file and make the appropriate change or changes in the first line.
Note –The database user who runs the SQL scripts must have permission to create tables.
Running Database Scripts to Set Up the eXchange IntegratorDatabase
You install the eXchange Integrator schema on the database by doing one of the following:
-
Edit setenv.cmd so it reflects your system environment (see Table 2–2), and then run the two other command scripts (see Running Database Scripts to Set Up the eXchange IntegratorDatabase);— or—
-
Run the SQL scripts directly, supplying system information at run time; see Running Database Scripts to Set Up the eXchange IntegratorDatabase.
 To run the command scripts that call SQL scripts to install
the schema
-
Open a command prompt and change directories to the local directory where you saved the .cmd scripts in the previous procedure.
It is assumed you have already edited setenv.cmd appropriately, and createtablespaces.sql if necessary.
-
Enter the following command:
createtablespaces
The script starts SQL*Plus, invokes an SQL script to create table spaces, and ends.
-
Enter the following command:
createdb
The script starts SQL*Plus and invokes an SQL script to create a new user entry:
-
In response to the first prompt, supply an end username, such as: ex510A
-
In response to the prompt, supply a password for this end user, such as: ex510A
The script creates a new user/password combination, invokes other SQL scripts to update the database instance, and then ends.
-
-
Repeat step Running Database Scripts to Set Up the eXchange IntegratorDatabase as needed to create other user/password entries for eXchange Integrator users.
You have installed the eXchange schema onto the eXchange database instance and created user/password combinations. End users can create Oracle OTDs based on this database, and can use it for message tracking and other eXchange Integrator functions.
 To directly run the SQL scripts that install the schema
Note –
These steps are an alternative to the command scripts described in the previous procedure. Do not use both procedures.
-
Open a command prompt and change directories to the local directory where you saved the .sql scripts in the previous procedure.
Note –If your Oracle location is not c:\oracle\oradata, or if your database instance name (SID) is other then eXchange Integrator, then open the createtablespaces.sql file and make the appropriate change or changes in the first line.
-
Enter the following SQL*Plus command:
path\sqlplus system/SYSTEMPWD@TNSNAME@createtablespaces.sql
where:
SYSTEMPWD is the password for the system login ID
TNSNAME is the name of the Oracle database instance you created for eXchange Integrator.
Here are two examples of valid commands, depending on the password and name:
C:\oracle\ora92\bin\sqlplus system/manager1@eX50 @createtablespaces.sql
sqlplus system/oraclePW@eXchange @createtablespaces.sql
When this finishes, you have created new tablespaces.
-
In the command prompt, enter the following SQL*Plus command:
sqlplus system/SYSTEMPWD@TNSNAME@createuser.sql
where, as before, SYSTEMPWD is the password for the system login ID and TNSNAME is the name of the Oracle database instance you created for eXchange Integrator.
Here is an example of a valid command:
\oracle\ora92\bin\sqlplus system/myPassWd@eX505DB @createuser.sql
-
In response to the system prompt for value #1, enter the username. For example: ex_admin
-
In response to the system prompt for value #2, enter the password. For example: ex_admin
-
Repeat steps Running Database Scripts to Set Up the eXchange IntegratorDatabase and Running Database Scripts to Set Up the eXchange IntegratorDatabase as needed to create user/password entries for eXchange Integrator users.
-
After you run the createtablespaces and createuser SQL scripts, there is one more. In the command prompt, enter the following SQL*Plus command:
sqlplus ex_admin/ex_admin@TNSNAME @createdb.sql
where, as before, TNSNAME is the name of the eXchange Oracle database instance, and your eXchange Integrator administrator username and password are both ex_admin.
After the createdb.sql script ends, you are done — you do not need to run any further SQL scripts. The system populates the tables, and you are ready to use the database instance as your eXchange Integrator database. End users can create Oracle OTDs based on this database, and can use it for message tracking and other eXchange Integrator functions.
 To reinitialize the database
-
Open a command prompt, change directories to the location where you extracted the .sql scripts from oracle510.zip
See Extracting, Customizing, and Running Database Setup Scripts).
-
Enter the following SQL*Plus command:
sqlplus ex_admin/ex_admin@TNSNAME @createdb.sql
where, as before, TNSNAME is the name of the eXchange Oracle database instance, and your eXchange Integrator administrator username and password are both assumed to be ex_admin.
- © 2010, Oracle Corporation and/or its affiliates
