Mail Tool Custom Buttons
The first four buttons on the second row of the Mail Tool Header window are custom buttons. You can change the value of these buttons to be any of the items from the File, View, Edit, or Compose menus. If there are items on these menus that you use very frequently, you can change your custom buttons to activate those commands.
-
The Custom Buttons choices indicate the current value of the four custom buttons. You select one of these choices to change the value of that custom button.
-
The Command setting shows you the command of the currently selected button, that is, what the button does.
-
The Command menu button provides a menu of all of the available commands from the File, View, Edit, and Compose menus.
-
The Label text field determines what the custom button says. Usually this is the same as the command, but it doesn't have to be. Sometimes the command is too long to fit in the button, so the Label might be an abbreviation of the actual command.
To change the value of a custom button, follow the steps below.
-
Select the Custom Buttons choice that you want to change.
The first choice represents the first button on the second row of the Header window, the second choice represents the second button, and so on.
-
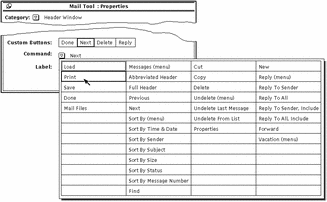
Choose the desired command from the Command menu shown in Figure 4-32.
The first column in the Command menu displays all the choices available from the Mail Tool File menu, the second column displays the choices from the View menu, the third displays the choices from the Edit menu, and the last column displays the choices from the Compose menu.
Figure 4-32 Header Window Properties Command menu

-
If you want to select a new label to go with the selected command, type a new label.
Try to keep the label as small as possible in order to keep the custom button to a reasonable size.
-
Click SELECT on Apply to change the custom button in the primary Mail Tool Header window.
The custom button on the Mail Tool Header window is changed to the new label and command. Figure 4-33shows the Header window with the second custom button changed to Print.
Figure 4-33 A New Custom Button (Print) on the Header Window

- © 2010, Oracle Corporation and/or its affiliates
