Compose Window Properties
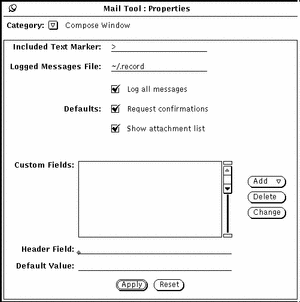
You use the Compose Window Properties category to customize items on the Compose window. To see the Compose Window Properties, shown in Figure 4-35, choose Compose Window from the Category menu at the top of the Properties popup window.
Figure 4-35 Compose Window Properties

Included Text Marker
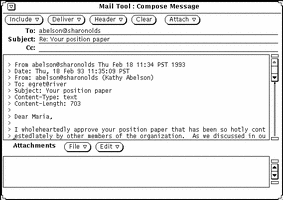
Use the Included Text Marker field to specify the characters that precede each line of an included text message. The default value is "> ". This puts the right-arrow character at the start of the included message when you choose Indented from the compose window Include menu. Tabs are not accepted as an indent character (but spaces are). Figure 4-36 shows the Compose window with an included message indented with ">".
Note -
The right angle bracket is at the start of the included message when you select Reply to Sender, Include or Reply to All, or Include from the compose menu in the Header window.
Figure 4-36 An Indented Included Message

Logged Messages File for Outgoing Mail
If you want to log outgoing mail messages in a file, type the name of the desired log file in the Logged Messages File text field of the Compose Window Properties Category. If a log file name is specified, a Log check box appears on the Compose window, as shown in Figure 4-36 above. When the Log option is checked on your Compose window, the message is logged in the log file when it is sent.
Use the Log all messages setting on the Compose Window Properties Category to determine whether the Log checkbox on the Compose window is checked by default.
Viewing the File of Logged Messages
To view the messages you have logged, do the following:
-
In the Mail Tool base window, type the name of the file in which you have logged your messages in the text field.
Using the example above, for instance, you would type ~/.record.
-
Click SELECT on the Load button.
The messages you have logged will appear in your Mail Tool Base window (in place of the current mail messages), and each has the message header.
Request Confirmations
If the Request Confirmations setting is checked, a Notice is displayed in the following cases:
-
When you have text or attachments in the Compose window, and you select Clear on the Compose window control panel, a message is displayed asking if you really want to clear the Compose window.
-
When you have text or attachments in the Compose window, and you quit the Compose window, a confirmation message is displayed asking if you really want to quit.
-
When you have made changes to a message in the View window, and you then display a new message, unpin the View window, or receive new incoming mail, a message is displayed asking if you want to save the changes.
If the Request Confirmations setting is not checked, any editing changes in the View window are automatically incorporated without notification. If you remove or change the From header of a message. The message that lost the From header will appear to be lost. You can find it appended to the previous message.
Show Attachment List
By default, a Compose window includes a pane at the bottom of the text area where you can add attachments to your message. If you never or rarely use attachments, you can turn off the Attachments pane for new Compose windows. Use the Show Attachment List setting of the Compose Window Properties Category to determine if the Attachments pane is shown by default.
If you turn off the default Show Attachments List setting, you can display the Attachments pane on an as-needed basis by choosing Show Attachments from the Include menu of the Compose window.
Compose Window Custom Header Fields
The header of your Compose window always has To, Subject, and Cc fields. In addition, Bcc is available via the Header menu. You can add custom headers to the Header menu by adding them to the Custom Fields scrolling list on the Compose Window Properties category.
Some useful headers that you might want to use are the following:
-
Precedence: junk -- If the mail system cannot send a message with this header, the message will not be "bounced" back to you. This is handy if you are sending out a message to a large alias, and you do not wish to receive notices whenever the message cannot be delivered to an individual.
-
Reply-To: email address -- When you reply to a message with this header, the reply is sent to the email address in the Reply-To: header field (instead of being sent to the sender of the message).
-
Return-Receipt-To: email address -- When you send a message with this header, you will receive a "Return Receipt" from the mail system when the message is successfully delivered.
To create a custom header field, follow these steps:
-
Type the label for the field in the Header Field line of the Properties window.
Do not type a colon following the label. The colon is automatically provided by Mail Tool.
-
If you want the field to be filled in with a default value, type this value in the Default Value field.
-
Choose either Before or After from the Add menu to add the new header field to the scrolling list.
-
To apply the change to Mail Tool, click SELECT on the Compose Window Properties Apply button.
-
To include the new header field in a mail message, choose the item from the Compose window Header menu, as shown in the menu at the left.
Figure 4-37 shows an example of a custom header field added to the Compose window.
Figure 4-37 Example of a Custom Field Added to the Compose Window

To delete a custom field, click SELECT on the item in the Custom Fields scrolling list, click SELECT on the Delete button, and click SELECT on Apply.
To change a custom field, click SELECT on the item in the Custom Fields scrolling list, type the new values in the Header Field and Default Value text fields, click SELECT on the Change button, then click SELECT on Apply.
- © 2010, Oracle Corporation and/or its affiliates
