How to Create a Striped Metadevice (DiskSuite Tool)
Do not create a striped metadevice from an existing file system or data. Doing so will destroy data. To create a striped metadevice from existing data, you must dump and restore the data to the metadevice.
-
Make sure you have met the prerequisites ("Prerequisites for Creating DiskSuite Objects"), and have read the preliminary information ("Preliminary Information for Creating Stripes and Concatenations").
-
Click the Concat/Stripe template to display an unassigned and uncommitted Concat/Stripe object on the canvas. The metadevice name is automatically assigned.
-
[Optional] Change the default metadevice name.
Display the object's pop-up menu and choose Info. Type the new metadevice name in the Device Name field and click the Attach button. Then click the Close button.
-
Click Slices to open the Slice Browser window.
-
Use Control-click to select multiple slices, and drag them into the Concat/Stripe object.
-
Click Stripe on the "Stripe or Concat" dialog box that appears.
Note -If you drag slices one at a time, the "Stripe or Concat" dialog box does not appear, so be careful where you drop them on the Concat/Stripe object. To create a stripe, drop the slices on the rectangle labeled "stripe 0 of dx."
-
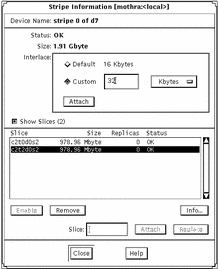
[Optional] To change the default interlace value of 16 Kbytes, point the cursor inside the rectangle where "stripe 0 of dx" is displayed, and display the pop-up Stripe Information window for this striped metadevice.

-
To change the interlace value, click Custom and type the new value in the field next to the Custom button. This value can be in Kbytes, Mbytes, or sectors. You can configure it by using the drop-down menu beside this field. Click Attach to set the value, then click Close.
For more information on setting the interlace value, refer to Solstice DiskSuite 4.2.1 Reference Guide.
Note -The interlace value cannot be changed after committing the metadevice.
-
Click the top rectangle of the Concat/Stripe object, then click Commit.
-
To verify that striped metadevice was committed, display the Configuration Log.
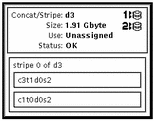
Example -- Committed Stripe
This example shows a newly created stripe made of two slices. The Stripe object displays the slices on top of each other in a single rectangle. Compare the presentation of a concatenated metadevice with "Example -- Committed Concatenation Object".

Where to Go From Here
To prepare the newly created stripe for a file system, refer to "How to Create a File System on a Metadevice (File System Manager)". An application, such as a database, that uses the raw metadevice must have its own way of recognizing the metadevice.
- © 2010, Oracle Corporation and/or its affiliates
