Prima di aggiornare la Flash PROM
Prima di iniziare la procedura di aggiornamento della Flash PROM, si noti quanto segue:
Non causare interruzioni alla corrente durante la procedura di aggiornamento della Flash PROM. Durante la routine di aggiornamento, non rimuovere o inserire schede di sistema.
Nota -
Se durante l'aggiornamento della Flash PROM si è verificata un'interruzione di corrente, seguire le procedure di ripristino indicate più avanti in questo capitolo.
Per aggiornare la Flash PROM
-
Se si arresta il sistema per impostare il jumper di protezione/abilitazione alla scrittura (sistemi Ultra 1 e Ultra 2), accendere il sistema in modo che esegua il boot.
-
Portare il sistema in modalità monoutente.
Digitare quanto segue:
%  su
Digitare la password di superutente
# init S
-
Eseguire lo script di aggiornamento della Flash PROM digitando:
/bin/sh /usr/platform/sun4u/lib/prom/`/usr/bin/uname -i`
All'inizio del processo di aggiornamento della Flash, vengono visualizzate le revisioni correnti e disponibili del firmware OpenBoot.
-
Digitare yes alla richiesta sull'aggiornamento del firmware nella Flash PROM del sistema.
Nota -Se la variabile di configurazione della NVRAM use-nvramrc? è impostata su true, lo script di aggiornamento la resetterà su false. Se invece la variabile use-nvramrc? è impostata su true, comparirà solo il messaggio sulla variabile use-nvramrc?. Questo accade raramente.
Current System Flash PROM Revision:
-----------------------------------
OBP 3.5.2 1997/01/06 17:40

Available System Flash PROM Revision:
-------------------------------------
OBP 3.11.1 1997/12/03 15:44

NOTE: The system will be rebooted (reset) after the firmware has been updated.

Do you wish to update the firmware in the system Flash PROM? yes/no :yes

The NVRAM variable 'use-nvramrc?' was 'true'. This program will reset it to the default value 'false'. This is being done because the contents of the NVRAM variable 'nvramrc' may or may not be appropriate for use with the new firmware. Do not change the value of 'use-nvramrc?' until you evaluate the contents of 'nvramrc'.
-
A questo punto lo script di aggiornamento richiederà se si desidera proseguire. Digitare yes.
Are you sure that you wish to continue? yes/no :yes

**IMPORTANT** If the power fails during the firmware update that is about to take place, it is possible that the customized values in the NVRAM configuration variables will revert back to their *default values* once the system power is restored. *If* this event occurs then it could have a significant effect on the behavior of the system after power is restored. Following is a list of the system's NVRAM configuration variables which have default values and have been customized. You may wish to write this information down so that the values may be restored after recovery from a power loss.

Name: sbus-probe-list
Default: 01
Current: 10
Name: nvramrc
Default: <null>
Current: ." This is a sample message which indicates that nvramrc has been modified." cr
In presenza di variabili di configurazione della NVRAM personalizzate, lo script di aggiornamento visualizzerà sia il valore predefinito che quello corrente.
Nota -Al termine dell'aggiornamento, valutare se i valori personalizzati visualizzati nella schermata precedente devono essere modificati.
Lo script avvia automaticamente il sistema e visualizza il messaggio seguente:
Erasing the top half of the Flash PROM.
Programming OBP into the top half of the Flash PROM.
Verifying OBP in the top half of the Flash PROM.

Erasing the bottom half of the Flash PROM.
Programming OBP into the bottom half of Flash PROM.
Verifying OBP in the bottom half of the Flash PROM.

Erasing the top half of the Flash PROM.
Programming POST into the top half of Flash PROM.
Verifying POST in the top half of the Flash PROM.

The system's Flash PROM firmware has been updated.

Please wait while the system is rebooted . . .
Vengono visualizzati i messaggi di riavvio del sistema.
........................................................
NOTICE: 64-bit OS installed, but the 32-bit OS is the default for the processor on this system.

See boot(1M) for more information.Booting the 32-bit OS/
-
Diventare root e passare dal kernel predefinito a 32 bit a quello a 64 bit modificando il file /platform/platform-name/boot.conf.
# cd /platform/sun4u/
# ls
boot.conf  cprboot    cprbooter  kadb       kernel     ufsboot
# vi boot.conf
Decommentare la riga ALLOW_64BIT_KERNEL_ON_UltraSPARC_1_CPU=true
-
Se si dispone di un sistema Ultra 1 o Ultra 2, riportare il jumper nella posizione di protezione dalla scrittura.
-
Avviare il sistema, quindi diventare superutente.
-
Arrestare il sistema digitando il comando init 0 al prompt di superutente.
-
Spegnere il sistema.
-
Aprire il sistema (fare riferimento al manuale di installazione o assistenza fornito per il proprio sistema).
-
Applicare correttamente la fascetta da polso antistatica (fare riferimento al manuale di installazione o assistenza fornito per il proprio sistema).
-
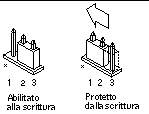
Riportare il jumper J2003 di protezione/abilitazione alla scrittura nella posizione di protezione dalla scrittura. Nella posizione di protezione dalla scrittura, il jumper si trova sui pin 1 e 2 (vedere la Figura 5-1, la Figura 5-2 e la Figura 5-5 e la Tabella 5-4). Prima di resettare il jumper, rimuovere dal sistema eventuali schede plug-in che ne impediscano l'accesso. Il pin 1 è contrassegnato da un asterisco vicino al jumper (*).
Figura 5-5 Impostazione del jumper di protezione/abilitazione alla scrittura in posizione protetta

-
Reinstallare eventuali schede plug-in rimosse dal sistema prima di intervenire sulla posizione del jumper.
-
Rimuovere la fascetta da polso e riapplicare la copertura del sistema sullo chassis.
-
Accendere il sistema.
-
-
Per i sistemi Sun Enterprise 450 e le workstation Sun Ultra 450, ruotare l'interruttore a chiave e portarlo nella posizione Standby, attendere alcuni secondi, quindi accendere nuovamente il sistema.
Questo ciclo di accensione/spegnimento permette di rimuovere il codice del vecchio firmware dalla memoria del sistema.
- © 2010, Oracle Corporation and/or its affiliates
