Antes de actualizar la Flash PROM
Antes de comenzar la actualización de la flash PROM, debe tener en cuenta lo siguiente.
No interrumpa la alimentación durante la actualización de la flash PROM. Al utilizar la rutina de actualización, no retire ni inserte placas de sistema.
Nota -
Si se produjera un corte en el suministro eléctrico durante la actualización de la flash PROM, siga los procedimientos de recuperación de una interrupción del suministro eléctrico descritos más adelante en este capítulo.
Para actualizar la Flash PROM
-
Si apagó el sistema para activar el puente de activación de la escritura (sistemas Ultra 1 y Ultra 2), encienda el sistema para arrancarlo.
-
Ponga el sistema en modo monousuario. Escriba lo siguiente:
% su
Introduzca la contraseña de superusuario
# init S
-
Ejecute la secuencia de actualización de la flash PROM escribiendo:
/bin/sh /usr/platform/sun4u/lib/prom/`/usr/bin/uname -i`
-
Cuando se inicia el proceso de actualización, aparecen las últimas revisiones disponibles del firmware de OpenBoot.
Escriba yes en contestación a la pregunta acerca de la actualización del firmware de la flash PROM del sistema.
Nota -Si la variable de configuración NVRAM use-nvramrc? está en true, la secuencia de actualización restablece use-nvramrc? a false. Sólo verá el mensaje sobre la variable use-nvramrc? si use-nvramrc? está en true, lo cual es inusual
Current System Flash PROM Revision:
-----------------------------------
OBP 3.5.2 1997/01/06 17:40

Available System Flash PROM Revision:
-------------------------------------
OBP 3.11.1 1997/12/03 15:44

NOTE: The system will be rebooted (reset) after the firmware has been updated.

Do you wish to update the firmware in the system Flash PROM? yes/no: yes

The NVRAM variable 'use-nvramrc?' was 'true'. This program will reset it to the default value 'false'. This is being done because the contents of the NVRAM variable 'nvramrc' may or may not be appropriate for use with the new firmware. Do not change the value of 'use-nvramrc?' until you evaluate the contents of 'nvramrc'.
-
A continuación, la secuencia de actualización le preguntará si desea continuar. Escriba yes.
Are you sure that you wish to continue? yes/no: yes

**IMPORTANT**  If the power fails during the firmware update that is about to take place, it is possible that the customized values in the NVRAM configuration variables will revert back to their *default values* once the system power is restored. *If* this event occurs then it could have a significant effect on the behavior of the system after power is restored. Following is a list of the system's NVRAM configuration variables which have default values and have been customized. You may wish to write this information down so that the values may be restored after recovery from a power loss.

Name: sbus-probe-list
Default: 01
Current: 10
Name: nvramrc
Default: <null>
Current: ." This is a sample message which indicates that nvramrc has been modified." cr
Si se ha personalizado cualquiera de las variables de configuración NVRAM, la actualización mostrará tanto el valor predeterminado como el valor actual.
Nota -Después de la actualización, es posible que desee evaluar si los valores personalizados mostrados en la pantalla anterior deben modificarse.
La secuencia arranca la máquina automáticamente y muestra el mensaje siguiente:
Erasing the top half of the Flash PROM.
Programming OBP into the top half of the Flash PROM.
Verifying OBP in the top half of the Flash PROM.

Erasing the bottom half of the Flash PROM.
Programming OBP into the bottom half of Flash PROM.
Verifying OBP in the bottom half of the Flash PROM.

Erasing the top half of the Flash PROM.
Programming POST into the top half of Flash PROM.
Verifying POST in the top half of the Flash PROM.

The system's Flash PROM firmware has been updated.

Please wait while the system is rebooted . . .
Aparecen los mensajes de rearranque del sistema.
........................................................
NOTICE: 64-bit OS installed, but the 32-bit OS is the default for the processor on this system.

See boot(1M) for more information. Booting the 32-bit OS/
-
Conviértase en usuario root y cambie el modo operativo de 32 bits a 64 bits editando el archivo /platform/platform-name/boot.conf.
# cd /platform/sun4u/
# ls
boot.conf  cprboot    cprbooter  kadb       kernel     ufsboot
# vi boot.conf
Suprima el signo de comentario de la línea ALLOW_64BIT_KERNEL_ON_UltraSPARC_1_CPU=true.
-
Si posee un sistema Sun Ultra 1 o Ultra 2, vuelva a situar el puente en su posición de escritura desactivada.
-
Deje que el sistema arranque y conviértase en superusuario.
-
Detenga el sistema escribiendo init 0 en el indicador de superusuario.
-
Apague el sistema.
-
Abra la unidad de sistema (consulte la guía de instalación o manual de servicio de su sistema).
-
Colóquese correctamente la tira de la muñeca (consulte la guía de instalación o manual de servicio de su sistema).
-
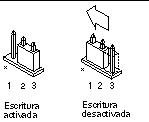
Vuelva a colocar el puente J2003 para activación/desactivación de escritura en la posición de desactivado. En la posición de escritura desactivada se conectan los pines 1 y 2 (consulte la Figura 5-1, Figura 5-2 y Figura 5-5, y la Tabla 5-4). Es posible que necesite retirar alguna tarjeta del sistema antes de restablecer el puente si la tarjeta lo cubriese. El pin 1 se identifica con un asterisco (*).
Figura 5-5 Colocación del puente de activación/desactivación de escritura de nuevo a la posición de desactivación de la escritura

-
Si retiró una tarjeta del sistema antes de cambiar el puente, vuelva a colocarla ahora.
-
Quítese la tira de la muñeca y vuelva a colocar la cubierta de acceso al sistema.
-
Encienda el sistema.
-
-
Si posee un sistema Sun Enterprise 450 o una estación de trabajo Sun Ultra 450, gire el selector a la posición Standby, espere unos segundos y vuelva a encender el sistema.
De esta forma se elimina de la memoria del sistema cualquier código antiguo del firmware.
- © 2010, Oracle Corporation and/or its affiliates
