Appendix B Adding and Removing Software After Installing Solaris 8
This appendix describes how to customize the Solaris software on your system after you install or upgrade to the Solaris 8 software.
You can add and remove software in the following ways:
|
You can use |
To add, remove, or change |
|---|---|
|
Solaris Web Start program |
Products, software groups, and additional software on the Solaris 8 DVD, Solaris 8 Software CDs, Solaris 8 Software Companion CD, Solaris 8 Languages CD, or Solaris 8 Documentation CD You cannot install individual software packages. |
|
Solaris Product Registry | All software installed using the Solaris Web Start program or the Solaris package management commands, for example, pkgadd |
|
Admintool |
Products, groups, and individual software packages on the Solaris 8 DVD, Solaris 8 Software CDs, Solaris 8 Software Companion CD, Solaris 8 Languages CD, or Solaris 8 Documentation CD You can use Admintool to add or remove software only on the system on which you are running Admintool. Admintool is not intended for use in a distributed environment. |
|
The pkgadd(1M) and pkgrm(1M) commands |
Individual software packages |
Note –
System Administration Guide, Volume I contains information about adding and removing software packages on client systems in a variety of computing environments.
Adding Software With the Solaris Web Start Program
This section describes how to use the Solaris Web Start program to add software to a system on which you have ve installed the Solaris operating environment.
To Add Software With the Solaris Web Start Program
Note –
This procedure assumes that the system is running the Volume Manager. If you are not using the Volume Manager to manage media, refer to System Administration Guide: Basic Administration for detailed information about managing removable media without the Volume Manager.
-
Log in to the installed or upgraded system.
-
Decide to install from the network, from a DVD, or from a CD and select one of the following.
-
If you are installing from the network, locate the net image of the software you want to install.
-
If you are installing from a DVD or a CD, insert the disc in the drive.
Note –If you insert the Solaris 8 Languages CD, the Solaris Web Start program starts automatically.
-
-
Change directories to find the Solaris Web Start installer for the software that you want to install.
Solaris Web Start installers are located in various directories on the DVD and on the CDs. For more information about DVD and CD directory structures, see Chapter 30, Organization of Solaris 8 Media.
-
Begin the Solaris Web Start installation program.
-
From a file manager, double click Installer or installer.
-
From the command line, type the following.
% ./installer [options]
-nodisplay
Run the installer without a graphical user interface.
-noconsole
Runs the installer without any interactive text console device. Use this option with the -nodisplay option when you include the installation command in a UNIX script that you want to use to install the software.
An Installer window is displayed, followed by a Solaris Web Start dialog box.
-
-
Follow the directions on the screen to install the software.
-
If you installed the software from a DVD or a CD, eject the disc.
Adding and Removing Software With the Product Registry
Purpose
The Solaris Product Registry is a tool to help you manage installed software. After the Solaris software is installed, Product Registry provides a list of all the software that was installed using the Solaris Web Start program or the Solaris package management commands, for example, pkgadd.
The Solaris Product Registry enables you to:
-
View a list of installed and registered software and some software attributes.
-
View all of the Solaris system products that you installed in their localized version in the System Software Localizations folder.
-
Find and launch an installer.
-
Install additional software products.
-
Uninstall software.
-
Uninstall individual system packages.
How the Product Registry Works
The Solaris Product Registry main window, shown in Figure B–1, consists of three areas of information:
-
Installed, registered, and removed software
-
Standard attributes of the currently selected software
-
Customized attributes and attributes internal to the registered software
Figure B–1 Solaris Product Registry Window
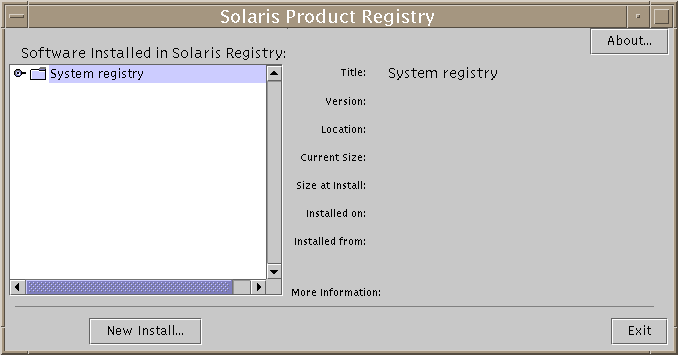
To view the items in the Product Registry, click the turner control to the left of the folder icon next to “System registry.” Notice that the turner control changes from pointing to the right to pointing down.
You can expand or collapse any item in the Registry except items that have a text file icon to its left.
“Solaris 8” under “Software Installed in Solaris Registry,” as shown in Figure B–2, always contains two items: the configuration software group you chose when installing Solaris and “additional system software.”
Software groups that can be displayed include Core, End User System Support, Developer System Support, Entire Distribution, or Entire Distribution Plus OEM Support.
The “additional system software” item contains Solaris products that are not part of the software group you chose. Additionally, “unclassified software” contains any package that you installed using the pkgadd command that is not a Solaris product or part of the software group.
Figure B–2 Solaris Product Registry Expanded
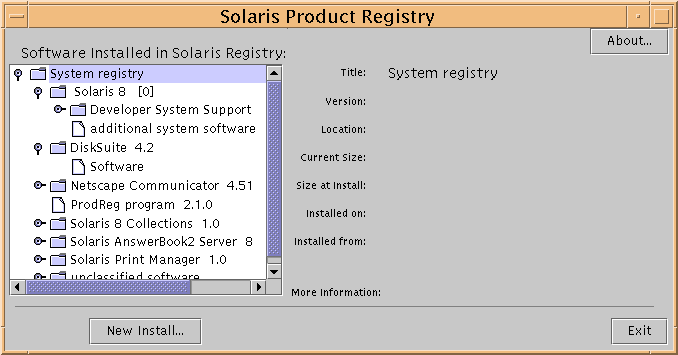
Product Registry attributes appear above the “More Information” box. For product items installed with Solaris Web Start, the Product Registry contains values for at least Title, Version, Location, and Installed on. Items in an expanded list under a product or software group inherit the version information of the product. You can click an item to view its attribute values.
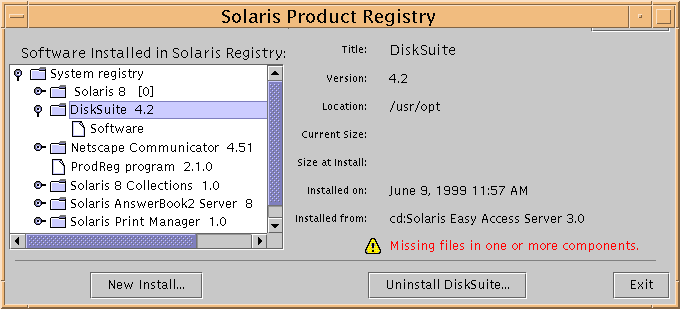
Sometimes an item appears in the Product Registry window but the corresponding software has been removed with the pkgrm command.
In this case, the message “Missing files in one or more components” is displayed after the “Installed from” attribute (see Figure B–3). You can either re-install the software by using the pkgadd command or you can remove it by using the Product Registry.
Figure B–3 Missing Files Message in the Solaris Product Registry
To List Information About All Installed Products
-
If the Solaris Product Registry is not already running, type:
/usr/bin/prodreg
Note –In most cases, you do not need to specify the path /usr/bin/.
The Solaris Product Registry window, which contains the System registry, is displayed.
-
To view the list of installed and registered software, click the turner control to its left.
-
Do you want to view software attributes?
-
If no, go to the next step.
-
If yes, select the software you want by clicking its name under “Software installed in Solaris Registry.”
The Product Registry displays attribute information for the selected software.
-
To Check the Integrity of an Installed Product
-
If the Solaris Product Registry is not already running, type:
/usr/bin/prodreg
Note –In most cases, you do not need to specify the path /usr/bin/.
The Solaris Product Registry window, which contains the System registry, is displayed.
-
To view the list of installed and registered software, click the turner control to its left.
-
Select the software you want by clicking its name in the window titled “Software installed in Solaris Registry.”
If all or part of the product was removed with the pkgrm command, the message “Missing files in one or more components” is displayed after the “Installed from” attribute.
To Install Software With the Product Registry
-
Log in to the installed or upgraded system.
-
Decide to install from the network, from a DVD, or from a CD and select one of the following.
-
If you are installing from the network, locate the net image of the software you want to install.
-
If you are installing from a DVD or a CD, insert the disc in the drive.
Note –If you insert the Solaris 8 Languages CD, the Solaris Web Start program starts automatically.
-
-
If the Solaris Product Registry is not already running, type:
/usr/bin/prodreg
Note –In most cases, you do not need to specify the path /usr/bin/.
The Solaris Product Registry window, which contains the System registry, is displayed.
-
To view the list of installed and registered software, click the turner control to the left of the System registry.
-
Click the New Install button at the bottom of the Solaris Product Registry window.
The Product Registry displays the Select Installer dialog box, which initially points to the /cdrom directory.
Note –You can install software from local media or from a network.
-
When you find the installer you want, click its name in the Files box.
Note –The Solaris Web Start installer is named Installer or installer.
-
Click OK.
The installer you selected is launched.
-
Follow the directions displayed by the installer you selected to install the software.
To Uninstall Products
-
If the Solaris Product Registry is not already running, type:
/usr/bin/prodreg
Note –In most cases, you do not need to specify the path /usr/bin/.
The Solaris Product Registry window, which contains the System registry, is displayed.
-
To view the list of installed and registered software, click the turner control to its left.
-
Select the software you want to uninstall by clicking its name in the window titled “Software installed in Solaris Registry.”
-
Read the software attributes to make sure this is the software you want to uninstall.
-
Click the Uninstall software_product_name button at the bottom of the Solaris Product Registry window.
The software product you selected is uninstalled.
Adding and Removing Packages With Admintool
This section describes how to add and remove software packages through the Admintool graphical user interface.
To Add Packages With Admintool
Note –
Unless you are a member of the UNIX® system administrator group (group 14), you must become superuser on your system to add or remove software packages with Admintool.
-
Log in to the installed or upgraded system and become superuser:
# su
-
Insert the DVD or CD that contains the software you want to add.
Volume Manager automatically mounts the disc.
-
Note the directory path to the software that you want to add.
-
Start Admintool:
# admintool &
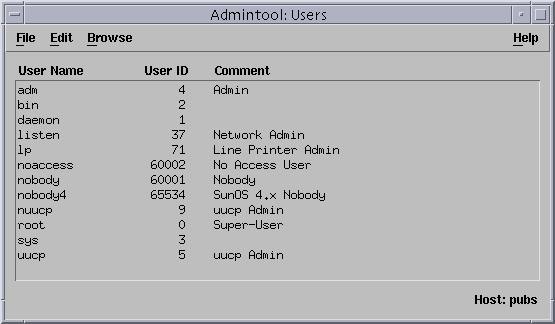
The Users window is displayed:
-
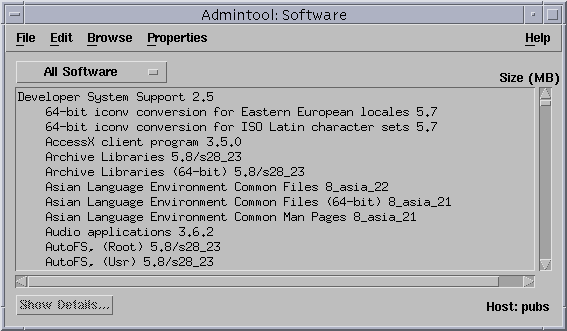
From the Browse menu, choose Software.
The Software window is displayed:
-
From the Edit menu, choose Add.
-
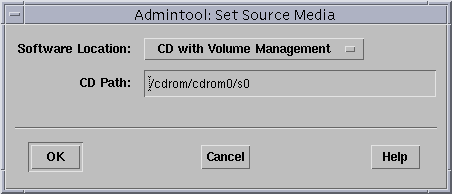
Did the Set Source Media window appear?
-
If no, go to the next step.
-
If yes, and if it is not already displayed in the CD Path box, specify the directory path to the CD or DVD that you noted in Step 3 and click OK.
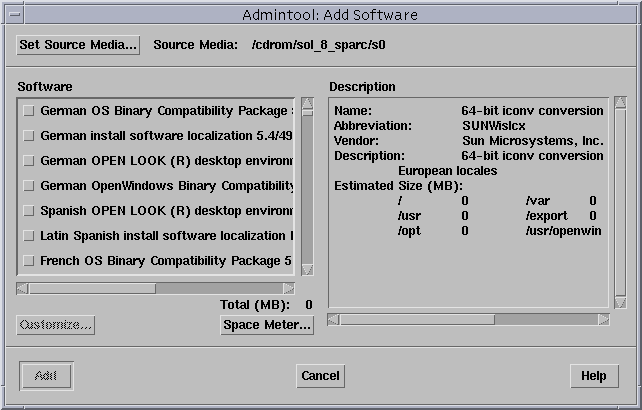
The Add Software window is displayed:
-
-
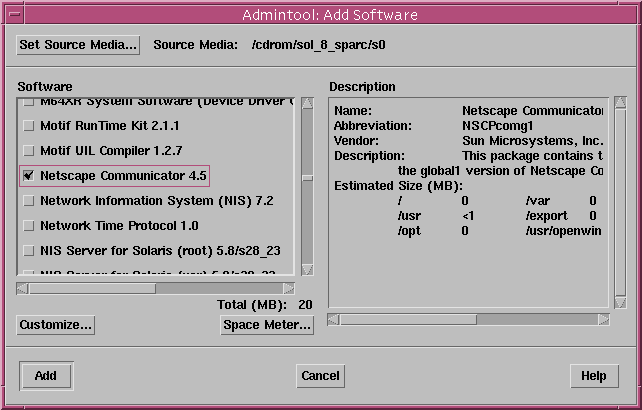
In the Software portion of the window, select the software you want to install on the local system:
-
Click Add.
The Add Software terminal window appears, in which a message is displayed as each component of the software is added:
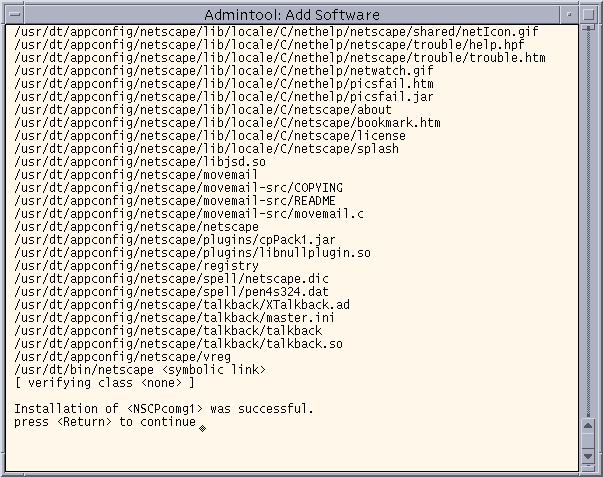
When all the components that make up the software you selected are added, the following message is displayed:
Installation of <software> was successful. press <Return> to continue
-
Press Return.
The Add Software terminal window is dismissed, and the Software window is displayed so you can continue to add software.
-
When you're done adding software, from the File menu, choose Exit.
To Remove Packages With Admintool
Note –
Unless you are a member of the UNIX system administrator group (group 14), you must become superuser on your system to add or remove software packages with Admintool.
-
Log in to the installed or updated system and become superuser:
# su
-
Start Admintool:
# admintool &
The Users window is displayed:

-
From the Browse menu, choose Software.
The Software window is displayed:

-
Select the software you want to delete by highlighting it.
-
From the Edit menu, choose Delete.
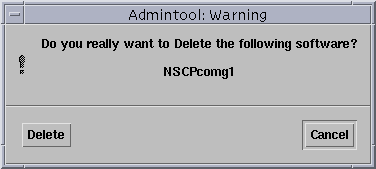
The Warning dialog box is displayed, and you are prompted to confirm that you want to delete the software:
-
On the Warning dialog box, click Delete.
The Delete Software terminal window is displayed with messages that are generated as the software is being deleted:
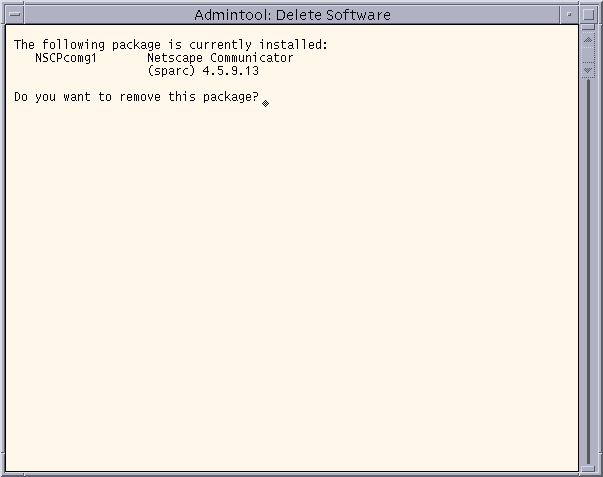
You are prompted to confirm that you want to delete each software package you selected.
-
At each prompt, type y, n, or q.
A message is displayed as each component of the software is deleted. When all the components that make up the software you selected are deleted, the following message is displayed:
Removal of <name_of_software> was successful. press <Return> to continue
-
Press Return.
The Delete Software terminal window is dismissed, and the Software window is displayed so you can select more software to delete.
-
When you're done deleting software, from the File menu, choose Exit.
Adding and Removing Packages With pkgadd and pkgrm
To Add Packages With pkgadd
-
Log in to the installed or updated system and become superuser:
# su
-
Insert the DVD or the CD that contains the software you want to add.
Volume Manager automatically mounts the disc.
-
Note the directory path to the software that you want to add.
-
Add one or more packages to the system:
# /usr/sbin/pkgadd -d device_name pkgid
where:
device_name
Is the directory path to the DVD or CD that contains the software you want to add to the installed system.
pkgid
Is the name of the software package to be added to the installed system. For example, SUNWaudio.
-
When you are finished, use the pkgchk(1M) command to verify that the package is installed correctly:
# /usr/sbin/pkgchk -v pkgid
If no errors are found, pkgchk returns a list of installed files. If an error is found, pkgchk returns a message that describes the problem.
SPARC: Example: Installing Software From a Mounted CD
The following example shows how to use pkgadd to install the SUNWaudio package from a mounted Solaris 8 Software 1 of 2 CD.
# /usr/sbin/pkgadd -d /cdrom/sol_8_sparc/Solaris_8/Product SUNWaudio . Installation of <SUNWaudio> was successful. # pkgchk -v SUNWaudio /usr /usr/bin /usr/bin/audioconvert /usr/bin/audioplay /usr/bin/audiorecord # |
x86: Example: Installing Software From a Mounted CD
The following example shows how to use pkgadd to install the SUNWaudio package from a mounted Solaris 8 Software 1 of 2 CD.
# /usr/sbin/pkgadd -d /cdrom/sol_8_ia/Solaris_8/Product SUNWaudio . . Installation of <SUNWaudio> was successful. # pkgchk -v SUNWaudio /usr /usr/bin /usr/bin/audioconvert /usr/bin/audioplay /usr/bin/audiorecord # |
To Remove Packages With pkgrm
-
Log in to the installed or updated system and become superuser:
# su
-
Remove one or more packages from the system:
# /usr/sbin/pkgrm pkgid
Where pkgid is the name of the software package you want to remove from the installed system. For example, SUNWaudio.
-
At each prompt, type y, n, or q to specify that you want to remove the package, not remove the package, or quit.
-
When you're done, use the pkgchk(1M) command to verify that the package was removed correctly:
# /usr/sbin/pkgchk -v pkgid
If the package was not removed correctly, pkgchk returns a warning message.
SPARC: Example: Removing Software From a System
The following example shows how to use pkgrm to remove the SUNWaudio package from a system.
# /usr/sbin/pkgrm SUNWaudio
The following package is currently installed:
   SUNWaudio       Audio applications
                   (SPARC) 3.6.20,REV=1.2000.11.7
Do you want to remove this package? y
.
.
.
Removal of <SUNWaudio> was successful.
# pkgchk -v SUNWaudio
WARNING: no pathnames were associated with <SUNWaudio>
#
|
x86: Example: Removing Software From a System
The following example shows how to use pkgrm to remove the SUNWaudio package from a system.
# /usr/sbin/pkgrm SUNWaudio
The following package is currently installed:
   SUNWaudio       Audio applications
                   (i386) 3.6.20,REV=1.2000.11.7

Do you want to remove this package? y
.
.
.
Removal of <SUNWaudio> was successful.
# pkgchk -v SUNWaudio
WARNING: no pathnames were associated with <SUNWaudio>
#
|
- © 2010, Oracle Corporation and/or its affiliates
