Chapter 5 Administering Principals and Policies
This chapter provides procedures for managing principals and the policies associated with them. It also shows how to manage a host's keytab.
This chapter should be used by anyone who needs to administer principals and policies. Before using this chapter, you should be familiar with principals and policies, including any planning considerations. Refer to Chapter 1, Introduction to SEAM and Chapter 2, Planning for SEAM respectively.
This is a list of step-by-step instructions in this chapter.
Ways to Administer Principals and Policies
The Kerberos database on the master KDC contains all of your realm's Kerberos principals, their passwords, policies, and other administrative information. To create and delete principals, and modify their attributes, you can use the kadmin(1M) or gkadmin(1M) commands.
The kadmin command provides an interactive command-line interface that enables you to maintain Kerberos principals, policies, and keytabs. There are two versions of the kadmin command: kadmin, which uses Kerberos authentication to operate securely from anywhere on the network, and kadmin.local, which must be run directly on the master KDC. Other than kadmin using Kerberos to authenticate the user, the functionality of the two versions is identical. The local version is necessary to enable you to set up enough of the database to be able to use the remote version.
Also, provided with the SEAM product is the SEAM Administration Tool, gkadmin, which is an interactive graphical user interface (GUI) that essentially provides the same functionality as the kadmin command. See "SEAM Administration Tool" for more information.
SEAM Administration Tool
The SEAM Administration Tool is an interactive graphical user interface (GUI) that enables you to maintain Kerberos principals and policies. It provides much the same functionality as the kadmin command; however, it does not support the management of keytabs. You must use the kadmin command to administer keytabs, which is described in "Administering Keytabs".
Like the kadmin command, the SEAM Tool uses Kerberos authentication and encrypted RPC to operate securely from anywhere on the network. The SEAM Tool enables you to:
-
Create new principals based on default values or existing principals
-
Create new policies based on existing policies
-
Add comments for principals
-
Set up default values for creating new principals
-
Log in as another principal without exiting the tool
-
Print or save principal and policy lists
-
View and search principal and policy lists
The SEAM Tool also provides context-sensitive and general online help.
The following task maps provide pointers to the various tasks you can do with the SEAM Tool:
Also, go to "SEAM Tool Panel Descriptions" for descriptions of all the principal and policy attributes you can either specify or view in the SEAM Tool.
Command-Line Equivalents of the SEAM Tool
This section lists the kadmin commands that provide the same functionality as the SEAM Tool and can be used without running an X Window system. Even though most of the procedures in this chapter use the SEAM Tool, many of the procedures also provide corresponding examples using the command-line equivalents.
Table 5-1 Command-Line Equivalents of the SEAM Tool|
Procedure |
kadmin Command |
|---|---|
|
Viewing the list of principals |
list_principals or get_principals |
|
Viewing a principal's attributes |
get_principal |
|
Creating a new principal |
add_principal |
|
Duplicating a principal |
No command-line equivalent |
|
Modifying a principal |
modify_principal and change_password |
|
Deleting a principal |
delete_principal |
|
Setting up defaults for creating new principals |
No command-line equivalent |
|
Viewing the list of policies |
list_policies or get_policies |
|
Viewing a policy's attributes |
get_policy |
|
Creating a new policy |
add_policy |
|
Modifying a policy |
modify_policy |
|
Duplicating a policy |
No command-line equivalent |
|
Deleting a policy |
delete_policy |
Files Modified by the SEAM Tool
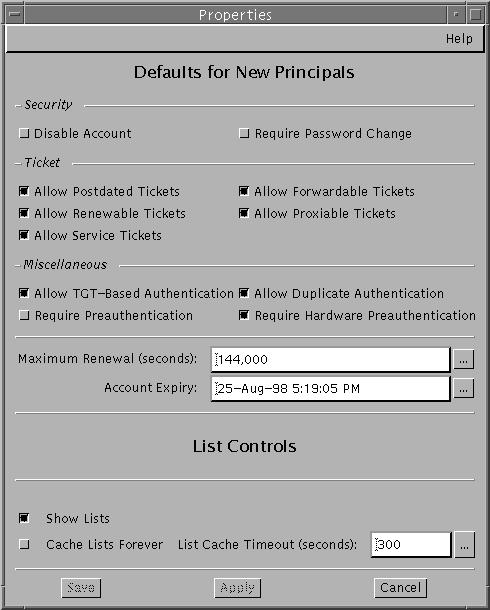
The only file that the SEAM Tool modifies is the $HOME/.gkadmin file. It contains the default values for creating new principals and can be updated by choosing Properties from the Edit menu.
Print and Online Help Features of the SEAM Tool
The SEAM Tool provides both print and online help features. From the Print menu, you can send the following to a printer or a file:
-
List of available principals on the specified master KDC
-
List of available policies on the specified master KDC
-
The currently selected or loaded principal
-
The currently selected or loaded policy
From the Help menu, you can obtain context-sensitive help and general help. When you choose Context-Sensitive Help from the Help menu, the Context-Sensitive Help window is displayed and the tool is switched to help mode. In help mode, when you click on any of the fields, labels, or buttons on the window, help on that item is displayed in the Help window. To switch back to the tool's normal mode, click Dismiss in the Help window.
You can also choose Help Contents, which opens an HTML browser that provides pointers to the general overview and task information that is provided in this chapter.
Working With Large Lists in the SEAM Tool
As your site starts accumulating a large number of principals and policies, the time it takes the SEAM Tool to load and display the principal and policy lists will become increasingly longer and will slow down your productivity with the tool. There are several ways to work around this.
First, you can completely eliminate the time to load the lists by not having the SEAM Tool load the lists. You can set this option by choosing Properties from the Edit menu and unchecking the Show Lists field. Of course, when the tool doesn't load the lists, it can't display the lists and you can no longer use the list panels to select principals or policies. Instead, you must enter a principal or policy name in the new Name field that is provided, then select the operation you want to perform on it. Basically, entering a name becomes equivalent to selecting an item from the list.
Another way to work with large lists is to cache them. In fact, caching the lists for a limited time is set as the default behavior for the SEAM Tool. The SEAM Tool must still initially load the lists into the cache, but after that, the tool can use the cache rather than retrieving the lists again. This eliminates the need to keep loading the lists from the server, which is what takes so long.
You can set list caching by also choosing Properties from the Edit menu. There are two cache settings. You can choose to cache the list forever, or you can specify a time limit when the tool must reload the lists from the server into the cache.
Caching the lists still enables you to use the list panels to select principals and policies, so it doesn't affect how you use the SEAM Tool like the first option does. Also, even though caching doesn't enable you to see the changes of others, you are still able to see the latest list information based on your changes, since your changes update the lists both on the server and in the cache. And, if you want to update the cache to see the changes of others and get the lastest copy of the lists, you can use the Refresh menu whenever you want to refresh the cache from the server.
How to Start the SEAM Tool
-
Start the SEAM Tool by using the gkadmin command.
$ /usr/krb5/sbin/gkadmin
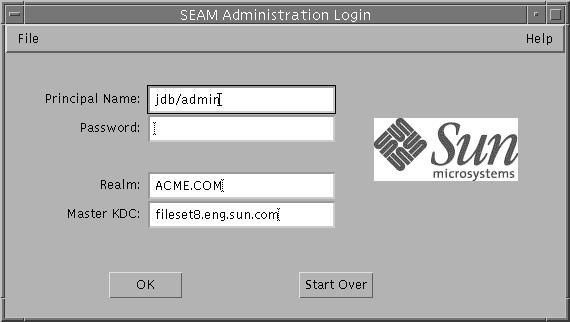
The Login window is displayed.
-
If you don't want to use the default values, specify new ones.
The Login window automatically fills in with default values. The default principal name is determined by taking your current identity from the USER environment variable and appending /admin to it (username/admin). The default Realm and Master KDC fields are selected from the /etc/krb5/krb5.conf file. If you ever want to go back to the default values, click Start Over.
Note -The administration operations that the principal name can perform are dictated by the Kerberos ACL file, /etc/krb5/kadm5.acl. See "Using the SEAM Tool With Limited Kerberos Administration Privileges" for information about limited privileges.
-
Enter a password for the specified principal name.
-
Click OK.
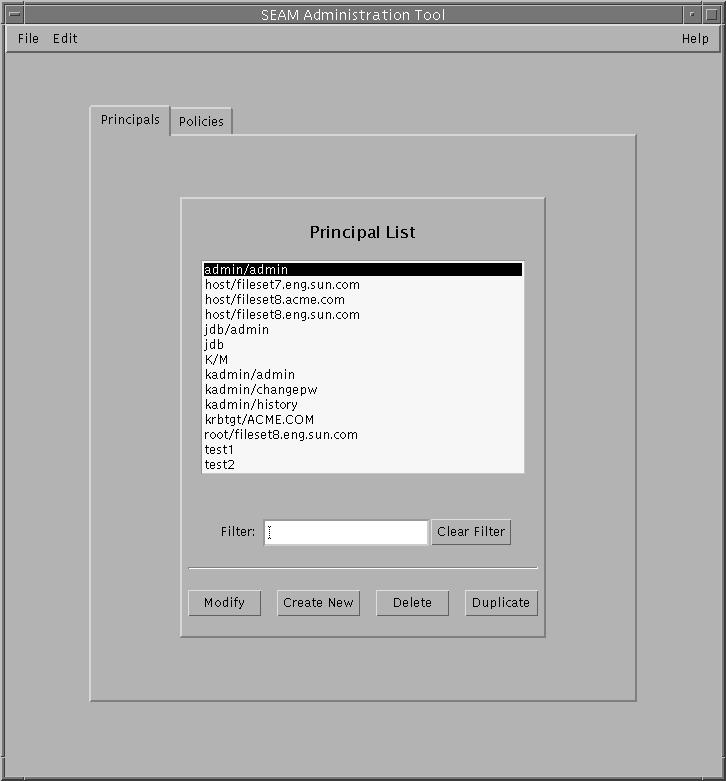
The following window is displayed.
Administering Principals
This section provides the step-by-step instructions to administer principals using the SEAM Tool. It also provides command-line equivalent examples, when available, using the kadmin command after each procedure.
Administering Principals Task Map
Table 5-2 Administering Principals Task Map|
Task |
Description |
For Instructions, Go To ... |
|---|---|---|
|
View the List of Principals |
View the list of principals by clicking the Principals tab. | |
|
View a Principal's Attributes |
View a principal's attributes by selecting the Principal in the Principal List and clicking the Modify button. | |
|
Create a New Principal |
Create a new principal by clicking the Create New button in the Principal List panel. | |
|
Duplicate a Principal |
Duplicate a principal by selecting the principal to duplicate in the Principal List and clicking the Duplicate button. | |
|
Modify a Principal |
Modify a principal by selecting the principal to modify in the Principal List and clicking the Modify button. Note that you cannot modify a principal's name. To rename a principal, you must duplicate the principal, specify a new name for it, save it, and then delete the old principal. | |
|
Delete a Principal |
Delete a principal by selecting the principal to delete in the Principal List and clicking the Delete button. | |
|
Set Up Defaults for Creating New Principals |
Set up defaults for creating new principals by choosing Properties from the Edit menu. | |
|
Modify the Kerberos Administration Privileges (kadm5.acl File) |
Command line only. The Kerberos administration privileges determine what operations a principal can perform on the Kerberos database, such as add and modify. You need to edit the /etc/krb5/kadm5.acl file to modify the Kerberos administration privileges for each principal. |
Automating the Creation of New Principals
Even though the SEAM Tool provides ease-of-use, it doesn't provide a way to automate the creation of new principals. Automation is especially useful if you need to add ten or even 100 new principals in a short amount of time. However, by using the kadmin.local command in a Bourne shell script, you can do just that.
The following shell script line is an example of how to do this:
sed -e 's/^\(.*\)$/ank +needchange -pw \1 \1/' < princnames |
        time /usr/krb5/sbin/kadmin.local> /dev/null
This example has been split over two lines to make it more readable. The script reads in a file called princnames that contains principal names and their passwords and adds them to the Kerberos database. You would have to create the princnames file to contain a principal name and its password on each line, separated by one or more spaces. The +needchange option configures the principal so the user is prompted for a new password when logging in with the principal for the first time, which helps ensure that the passwords in the princnames file are not a security risk.
This is just one example. You can build more elaborate scripts, such as using the information in the name service to obtain the list of user names for the principal names. What you do and how you do it is up to your site needs and your scripting expertise.
How to View the List of Principals
An example of the corresponding command-line equivalent follows this procedure.
-
If neccessary, start the SEAM Tool.
See "How to Start the SEAM Tool" for details.
-
Click the Principals tab.
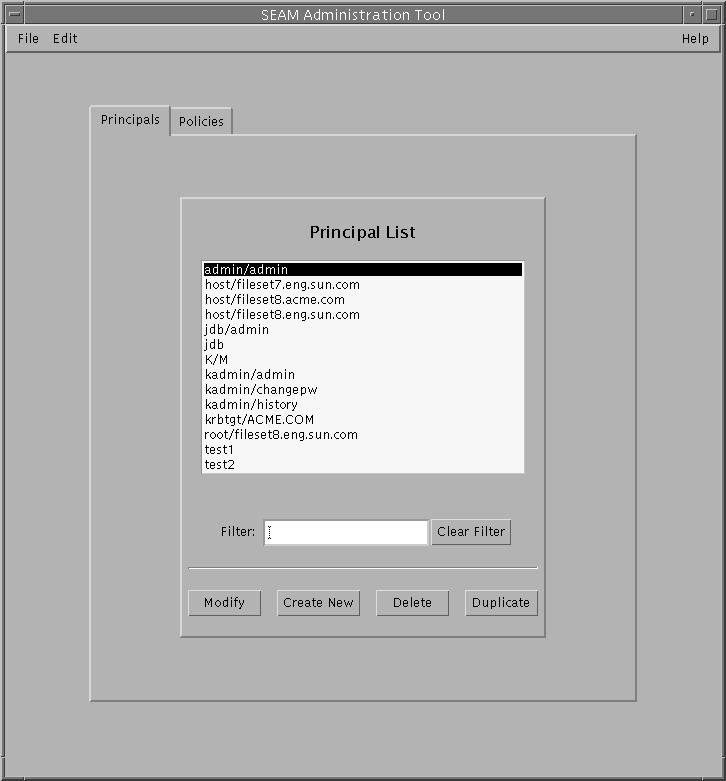
The list of principals is displayed.
-
To display a specific principal or sublist of principals, enter a filter string in the Filter Pattern field and press return. If the filter succeeds, the list of principals matching the filter is displayed.
The filter string must consist of one or more characters. Because the filter mechanism is case sensitive, you need to use the appropriate uppercase and lowercase letters for the filter. For example, if you enter the filter string ge, the filter mechanism will display only the principals with the ge string in them (for example, george or edge).
If you want to display the entire list of principals, click Clear Filter.
Example--Viewing the List of Principals (Command Line)
The following example uses the list_principals command of kadmin to list all the principals that match test*. Wildcards can be used with the list_principals command.
kadmin: list_principals test* test1@ACME.COM test2@ACME.COM kadmin: quit |
How to View a Principal's Attributes
An example of the corresponding command-line equivalent follows this procedure.
-
If neccessary, start the SEAM Tool.
See "How to Start the SEAM Tool" for details.
-
Click the Principals tab.
-
Select the principal in the list that you want to view and click Modify.
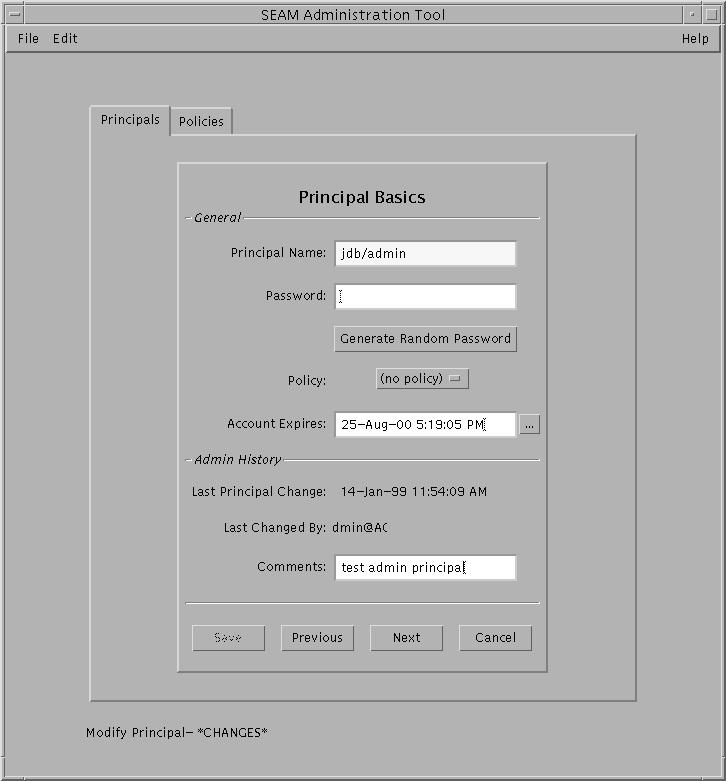
The Principal Basics panel containing some of the principal's attributes is displayed.
-
Continue to click Next to look at all the principal's attributes.
Three windows contain attribute information. Choose Context-Sensitive Help from the Help menu to get information about the various attributes in each window. Or, go to "SEAM Tool Panel Descriptions" for all the principal attribute descriptions.
-
When you are finished viewing, click Cancel.
Example--Viewing a Principal's Attributes
The following example shows the first window when viewing the jdb/admin principal.
Example--Viewing a Principal's Attributes (Command Line)
The following example uses the get_principal command of kadmin to view the attributes of the jdb/admin principal.
kadmin: getprinc jdb/admin Principal: jdb/admin@ACME.COM Expiration date: Fri Aug 25 17:19:05 PDT 2000 Last password change: [never] Password expiration date: Wed Apr 14 11:53:10 PDT 1999 Maximum ticket life: 1 day 16:00:00 Maximum renewable life: 1 day 16:00:00 Last modified: Thu Jan 14 11:54:09 PST 1999 (admin/admin@ACME.COM) Last successful authentication: [never] Last failed authentication: [never] Failed password attempts: 0 Number of keys: 1 Key: vno 1, DES cbc mode with CRC-32, no salt Attributes: REQUIRES_HW_AUTH Policy: [none] kadmin: quit |
How to Create a New Principal
An example of the corresponding command-line equivalent follows this procedure.
-
If neccessary, start the SEAM Tool.
See "How to Start the SEAM Tool" for details.
Note -If you are creating a new principal that may need a new policy, you should create the new policy before creating the new principal. Go to "How to Create a New Policy".
-
Click the Principals tab.
-
Click New.
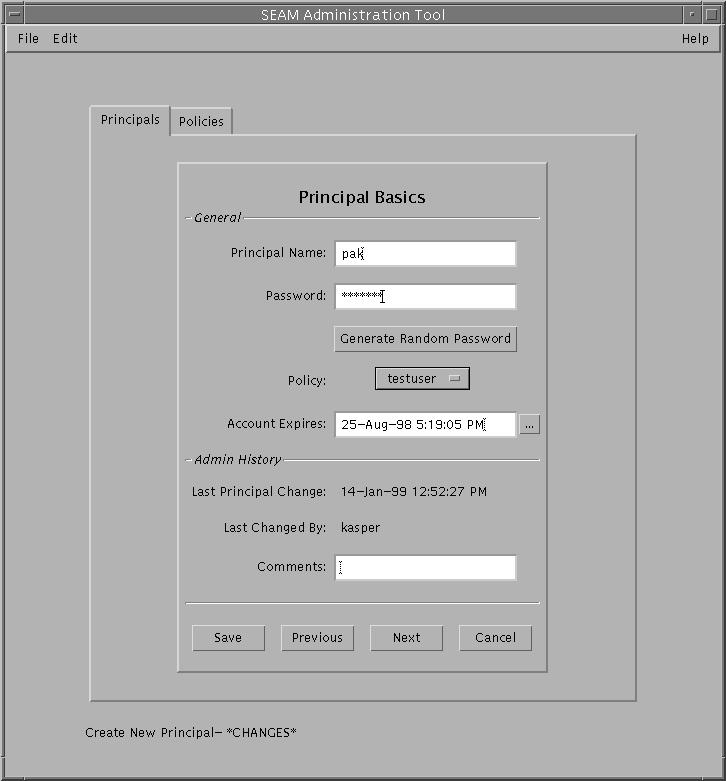
The Principal Basics panel containing some of the attributes for a principal is displayed.
-
Specify a principal name and password.
Both the principal name and password are mandatory.
-
Specify values for the principal's attributes and continue to click Next to specify more attributes.
Three windows contain attribute information. Choose Context-Sensitive Help from the Help menu to get information about the various attributes in each window. Or, go to "SEAM Tool Panel Descriptions" for all the principal attribute descriptions.
-
Click Save to save the principal, or click Done on the last panel.
-
If needed, set up Kerberos administration privileges for the new principal in the /etc/krb5/kadm5.acl file.
See "How to Modify the Kerberos Administration Privileges" for more details.
Example--Creating a New Principal
The following example shows the Principal Basics panel when creating a new principal called pak. So far, the policy has been set to testuser.
Example--Creating a New Principal (Command Line)
The following example uses the add_principal command of kadmin to create a new principal called pak. The principal's policy is set to testuser.
kadmin: add_principal -policy testuser pak Enter password for principal "pak@ACME.COM": <type the password> Re-enter password for principal "pak@ACME.COM": <type the password again> Principal "pak@ACME.COM" created. kadmin: quit |
How to Duplicate a Principal
This procedure explains how to use all or some of the attributes of an existing principal to create a new principal. There is no command-line equivalent for this procedure.
-
If neccessary, start the SEAM Tool.
See "How to Start the SEAM Tool" for details.
-
Click the Principals tab.
-
Select the principal in the list that you want to duplicate and click Duplicate.
The Principal Basics panel is displayed. All the attributes of the selected principal are duplicated except for the Principal Name and Password fields, which are empty.
-
Specify a principal name and password.
Both the principal name and password are mandatory. If you want to make an exact duplicate of the principal you selected, click Save and skip to the last step.
-
Specify different values for the principal's attributes and continue to click Next to specify more attributes.
Three windows contain attribute information. Choose Context-Sensitive Help from the Help menu to get information about the various attributes in each window. Or, go to "SEAM Tool Panel Descriptions" for all the principal attribute descriptions.
-
Click Save to save the principal, or click Done on the last panel.
-
If needed, set up Kerberos administration privileges for the principal in /etc/krb5/kadm5.acl file.
See "How to Modify the Kerberos Administration Privileges" for more details.
How to Modify a Principal
An example of the corresponding command-line equivalent follows this procedure.
-
If neccessary, start the SEAM Tool.
See "How to Start the SEAM Tool" for details.
-
Click the Principals tab.
-
Select the principal in the list that you want to modify and click Modify.
The Principal Basics panel containing some of the attributes for the principal is displayed.
-
Modify the principal's attributes and continue to click Next to modify more attributes.
Three windows contain attribute information. Choose Context-Sensitive Help from the Help menu to get information about the various attributes in each window. Or, go to "SEAM Tool Panel Descriptions" for all the principal attribute descriptions.
Note -You cannot modify a principal's name. To rename a principal, you must duplicate the principal, specify a new name for it, save it, and then delete the old principal.
-
Click Save to save the principal, or click Done on the last panel.
-
Modify the Kerberos administration privileges for the principal in the /etc/krb5/kadm5.acl file.
See "How to Modify the Kerberos Administration Privileges" for more details.
Example--Modifying a Principal's Password (Command Line)
The following example uses the change_password command of kadmin to modify the password for the jdb principal. change_password does not let you change the password to one that is in the principal's password history.
kadmin: change_password jdb Enter password for principal "jdb": <type the new password> Re-enter password for principal "jdb": <type the password again> Password for "jdb@ACME.COM" changed. kadmin: quit |
To modify other attributes for a principal, you must use the modify_principal command of kadmin.
How to Delete a Principal
An example of the corresponding command-line equivalent follows this procedure.
-
If neccessary, start the SEAM Tool.
See "How to Start the SEAM Tool" for details.
-
Click the Principals tab.
-
Specify the principal in the list that you want to delete and click Delete.
After you confirm the deletion, the principal is deleted.
-
Remove the principal from the Kerberos ACLs file, /etc/krb5/kadm5.acl.
See "How to Modify the Kerberos Administration Privileges" for more details.
Example--Deleting a Principal (Command Line)
The following example uses the delete_principal command of kadmin to delete the jdb principal.
kadmin: delete_principal pak Are you sure you want to delete the principal "pak@ACME.COM"? (yes/no): yes Principal "pak@ACME.COM" deleted. Make sure that you have removed this principal from all ACLs before reusing. kadmin: quit |
How to Set Up Defaults for Creating New Principals
There is no command-line equivalent for this procedure.
-
If neccessary, start the SEAM Tool.
See "How to Start the SEAM Tool" for details.
-
Choose Properties from the Edit Menu.
The Properties window is displayed.
-
Select the defaults you want when you create new principals.
Choose Context-Sensitive Help from the Help menu to get information about the various attributes in each window.
-
Click Save.
How to Modify the Kerberos Administration Privileges
Even though your site probably has a lot of user principals, you usually want only a few users to be able to administer the Kerberos database. Privileges to administer the Kerberos database are determined by the Kerberos Access Control List (ACL) file, kadm5.acl(4). The kadm5.acl file enables you to allow or disallow privileges for individual principals, or you can use the '*' wildcard in the principal name to specify privileges for groups of principals.
-
Become superuser on the master KDC.
-
Edit the /etc/krb5/kadm5.acl file.
An entry in the kadm5.acl file must have the following format:
principal privileges [principal_target]
principal
The principal to which the privileges are granted. Any part of the principal name can include the '*' wildcard, which is useful for providing the same privileges for a group of principals. For example, if you wanted to specify all principals with the admin instance, you would use */admin@realm. Note that a common use of an admin instance is to grant separate privileges (such as administration access to the Kerberos database) to a separate Kerberos principal. For example, the user jdb might have a principal for his administrative use, called jdb/admin. This way, jdb obtains jdb/admin tickets only when he actually needs to use those privileges.
privileges
Specifies what operations can or cannot be performed by the principal. This is a string of one or more of the following list of characters or their uppercase counterparts. If the character is uppercase (or not specified), then the operation is disallowed. If the character is lowercase, then the operation is permitted.
a
[Dis]allows the addition of principals or policies.
d
[Dis]allows the deletion of principals or policies.
m
[Dis]allows the modification of principals or polices.
c
[Dis]allows the changing of passwords for principals.
i
[Dis]allows inquiries to the database.
l
[Dis]allows the listing of principals or policies in the database.
x or *
Allows all privileges (admcil).
principal_target
When a principal is specified in this field, the privileges apply to principal only when it operates on the principal_target. Any part of the principal name can include the '*' wildcard, which is useful to group principals.
Example--Modifying the Kerberos Administration Privileges
The following entry in the kadm5.acl file gives any principal in the ACME.COM realm with the admin instance all the privileges on the database.
*/admin@ACME.COM * |
The following entry in the kadm5.acl file gives the jdb@ACME.COM principal the priviledge to add, list, and inquire about any principal that has the root instance.
jdb@ACME.COM ali */root@ACME.COM |
Administering Policies
This section provides step-by-step instructions to administer policies using the SEAM Tool. It also provides command-line equivalent examples, when available, using the kadmin command after each procedure.
Administering Policies Task Map
Table 5-3 Administering Policies Task Map|
Task |
Description |
For Instructions, Go To ... |
|---|---|---|
|
View the List of Policies |
View the list of policies by clicking the Policies tab. | |
|
View a Policy's Attributes |
View a policy's attributes by selecting the Policy in the Policy List and clicking the Modify button. | |
|
Create a New Policy |
Create a new policy by clicking the Create New button in the Policy List panel. | |
|
Duplicate a Policy |
Duplicate a policy by selecting the policy to duplicate in the Policy List and clicking the Duplicate button. | |
|
Modify a Policy |
Modify a policy by selecting the policy to modify in the Policy List and clicking the Modify button. Note that you cannot modify a policy's name. To rename a policy, you must duplicate the policy, specify a new name for it, save it, and then delete the old policy. | |
|
Delete a Policy |
Delete a policy by selecting the policy to delete in the Policy List and clicking the Delete button. |
How to View the List of Policies
An example of the corresponding command-line equivalent follows this procedure.
-
If neccessary, start the SEAM Tool.
See "How to Start the SEAM Tool" for details.
-
Click the Policies tab.
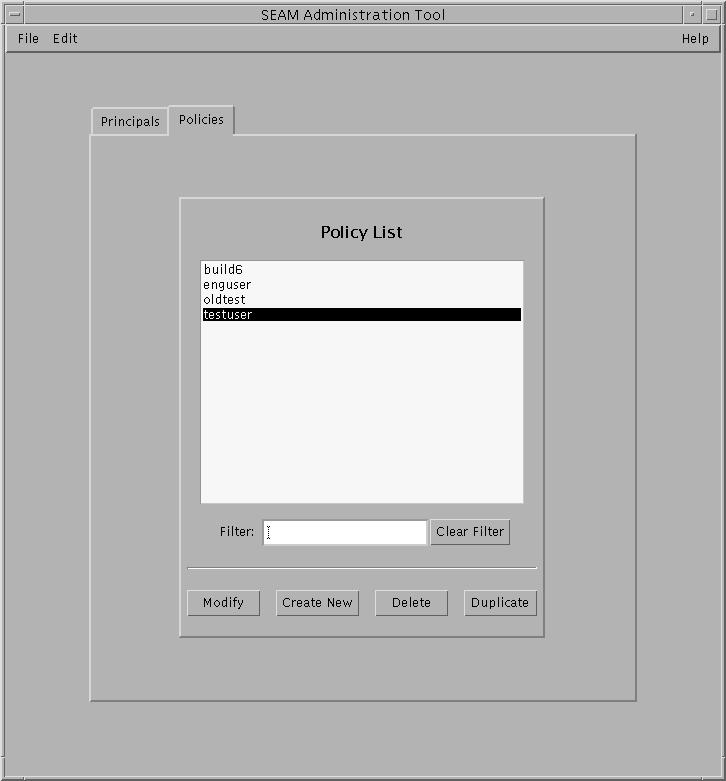
The list of policies is displayed.
-
To display a specific principal or sublist of policies, enter a filter string in the Filter Pattern field and press return. If the filter succeeds, the list of policies matching the filter is displayed.
The filter string must consist of one or more characters. And, because the filter mechanism is case sensitive, you need to use the appropriate uppercase and lowercase letters for the filter. For example, if you enter the filter string ge, the filter mechanism will display only the policies with the ge string in them (for example, george or edge).
If you want to display the entire list of policies, click Clear Filter.
Example--Viewing the List of Policies (Command Line)
The following example uses the list_policies command of kadmin to list all the policies that match *user*. Wildcards can be used with the list_policies command.
kadmin: list_policies *user* testuser enguser kadmin: quit |
How to View a Policy's Attributes
An example of the corresponding command-line equivalent follows this procedure.
-
If neccessary, start the SEAM Tool.
See "How to Start the SEAM Tool" for details.
-
Click the Policies tab.
-
Select the policy in the list that you want to view and click Modify.
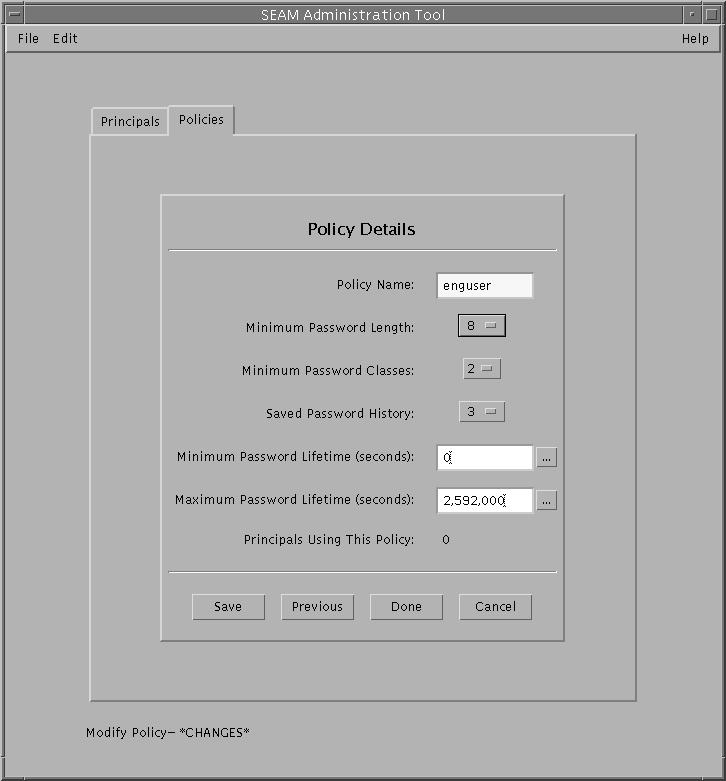
The Policy Details panel is displayed.
-
When you are finished viewing, click Cancel.
Example--Viewing a Policy's Attributes
The following example shows the Policy Details panel when viewing the test policy.
Example--Viewing a Policy's Attributes (Command Line)
The following example uses the get_policy command of kadmin to view the attributes of the enguser policy.
kadmin: get_policy enguser Policy: enguser Maximum password life: 2592000 Minimum password life: 0 Minimum password length: 8 Minimum number of password character classes: 2 Number of old keys kept: 3 Reference count: 0 kadmin: quit |
The reference count is the number of principals using that policy.
How to Create a New Policy
An example of the corresponding command-line equivalent follows this procedure.
-
If neccessary, start the SEAM Tool.
See "How to Start the SEAM Tool" for details.
-
Click the Policies tab.
-
Click New.
The Policy Details panel is displayed.
-
Specify a name for the policy in the Policy Name field.
The policy name is mandatory.
-
Specify values for the policy's attributes.
Choose Context-Sensitive Help from the Help menu to get information about the various attributes in each window. Or, go to Table 5-7 for all the policy attribute descriptions.
-
Click Save to save the policy, or click Done.
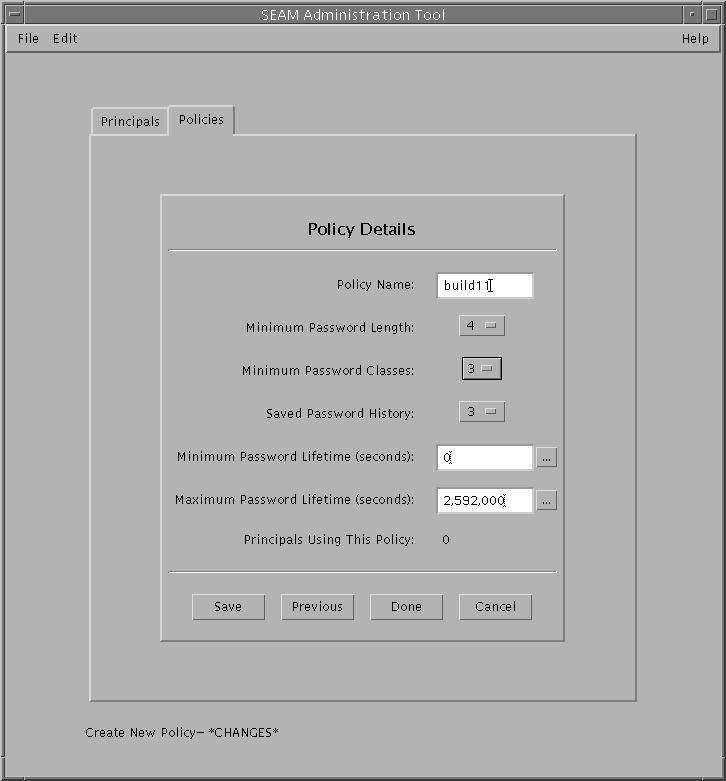
Example--Creating a New Policy
The following example shows creating a new policy called build11. So far, the Minimum Password Classes has been changed to 3.
Example--Creating a New Policy (Command Line)
The following example uses the add_policy command of kadmin to create the build11 policy that requires at least 3 character classes in a password.
$ kadmin kadmin: add_policy -minclasses 3 build11 kadmin: quit |
How to Duplicate a Policy
This procedure explains how to use all or some of the attributes of an existing policy to create a new policy. There is no command-line equivalent for this procedure.
-
If neccessary, start the SEAM Tool.
See "How to Start the SEAM Tool" for details.
-
Click the Policies tab.
-
Select the policy in the list that you want to duplicate and click Duplicate.
The Policy Details panel is displayed. All the attributes of the selected policy are duplicated except for the Policy Name field, which is empty.
-
Specify a name for the duplicated policy in the Policy Name field.
The policy name is mandatory. If you want to make an exact duplicate of the policy you selected, click Save and skip to the last step.
-
Specify different values for the policy's attributes.
Choose Context-Sensitive Help from the Help menu to get information about the various attributes in each window. Or, go to Table 5-7 for all the policy attribute descriptions.
-
Click Save to save the policy, or click Done.
How to Modify a Policy
An example of the corresponding command-line equivalent follows this procedure.
-
If neccessary, start the SEAM Tool.
See "How to Start the SEAM Tool" for details.
-
Click the Policies tab.
-
Select the policy in the list that you want to modify and click Modify.
The Policy Details panel is displayed.
-
Modify the policy's attributes.
Choose Context-Sensitive Help from the Help menu to get information about the various attributes in each window. Or, go to Table 5-7 for all the policy attribute descriptions.
Note -You cannot modify a policy's name. To rename a policy, you must duplicate the policy, specify a new name for it, save it, and then delete the old policy.
-
Click Save to save the policy, or click Done.
Example--Modifying a Policy (Command Line)
The following example uses the modify_policy command of kadmin to modify the minimum length of a password to five characters for the build11 policy.
$ kadmin kadmin: modify_policy -minlength 5 build11 kadmin: quit |
How to Delete a Policy
An example of the corresponding command-line equivalent follows this procedure.
-
If neccessary, start the SEAM Tool.
See "How to Start the SEAM Tool" for details.
-
Click the Policies tab.
Note -Before deleting a policy, you must cancel the policy from all principals currently using it (you need to modify the principals' Policy attribute). The policy cannot be deleted if it is in use by any principal.
-
Specify the policy in the list that you want to delete and click Delete.
After you confirm the deletion, the policy is deleted.
Example--Deleting a Policy (Command Line)
The following example uses the delete_policy command of kadmin command to delete the build11 policy.
kadmin: delete_policy build11 Are you sure you want to delete the policy "build11"? (yes/no): yes kadmin: quit |
Before deleting a policy, you must cancel the policy from all principals currently using it (you need to use the modify_principal -policy command of kadmin on the principals). The delete_policy command will fail if it is in use by a principal.
SEAM Tool Reference
This section provides reference information for the SEAM Tool.
SEAM Tool Panel Descriptions
This section provides descriptions for each of the principal and policy attributes that you can either specify or view in the SEAM Tool. The attributes are organized by the panel in which they are displayed.
Table 5-4 Principal Basic Panel Attributes|
Attribute |
Description |
|---|---|
|
Principal Name |
The name of the principal (the primary/instance part of a fully-qualified principal name). A principal is a unique identity to which the KDC can assign tickets. If you are modifying a principal, you cannot edit a principal's name. |
|
Password |
The password for the principal. You can use the Generate Random Password button to create a random password for the principal. |
|
Policy |
A menu of available policies for the principal. |
|
Account Expires |
The date and time on which the principal's account expires. When the account expires, the principal can no longer get a ticket-granting ticket (TGT) and may not be able to log in. |
|
Last Principal Change |
The date on which information for the principal was last modified. (Read-only) |
|
Last Changed By |
The name of the principal that last modified the account for this principal. (Read-only) |
|
Comments |
Comments related to the principal (for example, 'Temporary Account') |
Table 5-5 Principal Details Panel Attributes
|
Attribute |
Description |
|---|---|
|
Last Success |
The date and time when the principal last logged in successfully. (Read-only) |
|
Last Failure |
The date and time when the last login failure for the principal occurred. (Read-only) |
|
Failure Count |
The number of times that there has been a login failure for the principal. (Read-only) |
|
Last Password Change |
The date and time when the principal's password was last changed. (Read-only) |
|
Password Expires |
The date and time when the principal's current password will expire. |
|
Key Version |
The key version number for the principal; this is normally changed only when a password has been compromised. |
|
Maximum Lifetime (seconds) |
The maximum length of time for which a ticket can be granted for the principal (without renewal). |
|
Maximum Renewal (seconds) |
The maximum length of time for which an existing ticket can be renewed for the principal. |
Table 5-6 Principal Flags Panel Attributes
|
Attribute (Radio Buttons) |
Description |
|---|---|
|
Disable Account |
When checked, prevents the principal from logging in. This is an easy way to freeze a principal account temporarily for any reason. |
|
Require Password Change |
When checked, expires the principal's current password, forcing the user to use the kpasswd command to create a new password. This is useful if there is a security breach and you need to make sure that old passwords are replaced. |
|
Allow Postdated Tickets |
When checked, allows the principal to obtain postdated tickets. For example, you may need to use postdated tickets for cron jobs that must run after hours and can't obtain tickets in advance because of short ticket lifetimes. |
|
Allow Forwardable Tickets |
When checked, allows the principal to obtain forwardable tickets. Forwardable tickets are tickets that are forwarded to the remote host to provide a single-sign-on session. For example, if you are using forwardable tickets and you authenticate yourself through ftp or rsh, other services, such as NFS services, are available without your being prompted for another password. |
|
Allow Renewable Tickets |
When checked, allows the principal to obtain renewable tickets. A principal can automatically extend the expiration date or time of a ticket that is renewable (rather than having to get a new ticket after the first one expires). Currently, the NFS service is the only service that can renew tickets. |
|
Allow Proxiable Tickets |
When checked, allows the principal to obtain proxiable tickets. A proxiable ticket is a ticket that can be used by a service on behalf of a client to perform an operation for the client. With a proxiable ticket, a service can take on the identity of a client and obtain a ticket for another service, but it cannot obtain a ticket-granting ticket. |
|
Allow Service Tickets |
When checked, allows service tickets to be issued for the principal. You should not allow service tickets to be issued for the kadmin/hostname and changepw/hostname principals. This ensures that these principals can only update the KDC database. |
|
Allow TGT-Based Authentication |
When checked, allows the service principal to provide services to another principal. More specifically, it allows the KDC to issue a service ticket for the service principal. This attribute is valid only for service principals. When not checked, service tickets cannot be issued for the service principal. |
|
Allow Duplicate Autentication |
When checked, allows the user principal to obtain service tickets for other user principals. This attribute is valid only for user principals. When not checked, the user principal can still obtain service tickets for service principals, but not for other user principals. |
|
Required Preauthentication |
When checked, the KDC will not send a requested ticket-granting ticket (TGT) to the principal until it can authenticate (through software) that it is really the principal requesting the TGT. This preauthentication is usually done through an extra password, for example, from a DES card. When not checked, the KDC does not need to preauthenticate the principal before it sends a requested TGT to it. |
|
Required Hardward Authentication |
When checked, the KDC will not send a requested ticket-granting ticket (TGT) to the principal until it can authenticate (through hardware) that it is really the principal requesting the TGT. Hardware preauthentication can be something like a Java ring reader. When not checked, the KDC does not need to preauthenticate the principal before it sends a requested TGT to it. |
Table 5-7 Policy Basics Panel Attributes
|
Attribute |
Description |
|---|---|
|
Policy Name |
The name of the policy. A policy is a set of rules governing a principal's password and tickets. If you are modifying a policy, you cannot edit a policy's name. |
|
Minimum Password Length |
The minimum length for the principal's password. |
|
Minimum Password Classes |
The minimum number of different character types required in the principal's password. For example, a minimum classes value of 2 means that the password must have at least two different character types, such as letters and numbers (hi2mom). A value of 3 means that the password must have at least three different character types, such as letters, numbers, and punctuation (hi2mom!). And so on. A value of 1 basically sets no restriction on the number of password character types. |
|
Saved Password History |
The number of previous passwords that have been used by the principal and cannot be reused. |
|
Minimum Password Lifetime (seconds) |
The minimum time that the password must be used before it can be changed. |
|
Maximum Password Lifetime (seconds) |
The maximum time that the password can be used before it must be changed. |
|
Principals Using This Policy |
The number of principals to which this policy currently applies. (Read-only) |
Using the SEAM Tool With Limited Kerberos Administration Privileges
All the features of the SEAM Administration Tool are available if your admin principal has all the privileges to administer the Kerberos database. But it is possible to have limited privileges, such as being allowed to view only the list of principals or to change a principal's password. With limited Kerberos administration privileges, you can still use the SEAM Administration Tool; however, various parts of the SEAM Tool will change based on what Kerberos administration privileges you do not have. Table 5-8 shows how the SEAM Tool changes based on your Kerberos administration privileges.
The most visual change to the SEAM Tool is when you don't have the list privilege. Without the list privilege, the List panels do not display the list of principals and polices for you to manipulate. Instead, you must use the Name field in the List panels to specify a principal or policy you want to work on.
If you log on to the SEAM Tool and you don't have sufficient privileges to perform useful tasks with it, the following message will display and you will be sent back to the Login window:
Insufficient privileges to use gkadmin: ADMCIL. Please try using another principal. |
To change the privileges for a principal to administer the Kerberos database, go to "How to Modify the Kerberos Administration Privileges".
Table 5-8 Using SEAM Tool With Limited Kerberos Administration Privileges|
If You Don't Have This Privilege ... |
Then the SEAM Tool Changes as Follows ... |
|---|---|
|
a (add) |
The Create New and Duplicate buttons are not available in the Principal and Policy List panels. Without the add privilege, you can't create new or duplicate principal or policies. |
|
d (delete) |
The Delete button is not available in the Principal and Policy List panels. Without the delete privilege, you can't delete principal or policies. |
|
m (modify) |
The Modify button is not available in the Principal and Policy List panels. Without the modify privilege, you can't modify principal or policies. Also, with the Modify button unavailable, you can't modify a principal's password, even if you have the change password privilege. |
|
c (change password) |
The Password field in the Principal Basics panel is read-only and cannot be changed. Without the change password privilege, you can't modify a principal's password. Note that even if you have the change password privilege, you must also have the modify privilege to change a principal's password. |
|
i (inquiry to database) |
The Modify and Duplicate buttons are not available in the Principal and Policy List panels. Without the inquiry privilege, you can't modify or duplicate a principal or policy. Also, with the Modify button unavailable, you can't modify a principal's password, even if you have the change password privilege. |
|
l (list) |
The list of principals and policies in the List panels are unavailable. Without the list privilege, you must use the Name field in the List panels to specify the principal or policy you want to work on. |
Administering Keytabs
Every host providing a service must have a local file, called a keytab (short for key table), containing the principal for the appropriate service, called a service key. A service key is used by a service to authenticate itself to the KDC and is known only by Kerberos and the service itself. For example, if you have a Kerberized NFS server, that server must have a keytab that contains its nfs service principal.
To add a service key to a keytab, you add the appropriate service principal to a host's keytab by using the ktadd command of kadmin. And, because you are adding a service principal to a keytab, the principal must already exist in the Kerberos database so kadmin can verify its existence. On the master KDC, the keytab file is located at /etc/krb5/kadm5.keytab, by default. On application servers providing Kerberized services, the keytab file is located at /etc/krb5/krb5.keytab, by default.
A keytab is analogous to a user's password. Just as it is important for users to protect their passwords, it is equally important for application servers to protect their keytabs. You should always store keytabs on a local disk, and make them readable only by root, and you should never send a keytab over an unsecured network.
There is also a special instance to add a root principal to a host's keytab. Basically, if you want a user on the SEAM client to mount Kerberized NFS file systems using Kerberos authentication automatically, you must add the client's root principal to the client's keytab. Otherwise, users must use the kinit command as root to obtain credentials for the client's root principal whenever they want to mount a Kerberized NFS file system, even when using the automounter. See "Setting Up Root Authentication to Mount NFS File Systems" for detailed information.
Note -
When setting up a master KDC, you need to add the kadmind and changepw principals to the kadm5.keytab file, so the KDC can decrypt administrators' Kerberos tickets to determine whether or not it should give them access to the database.
Another command that you can use to administer keytabs with is the ktutil command. ktutil is an interactive command-line interface utility that enables you to manage a local host's keytab without having Kerberos administration privileges, because ktutil doesn't interact with the Kerberos database like kadmin does. So, after a principal is added to a keytab, you can use ktutil to view the keylist in a keytab or to temporarily disable authentication for a service.
Administering Keytabs Task Map
Table 5-9 Administering Keytabs Task Map|
Task |
Description |
For Instructions, Go To ... |
|---|---|---|
|
Add a Service Principal to a Keytab |
Use the ktadd command of kadmin to add a service principal to a keytab. | |
|
Remove a Service Principal from a Keytab |
Use the ktremove command of kadmin to remove a service from a keytab. | |
|
Display the Keylist (Principals) in a Keytab |
Use the ktutil command to display the keylist in a keytab. | |
|
Temporarily Disable Authentication for a Service on a Host |
This procedure is a quick way to temporarily disable authentication for a service on a host without having to have kadmin privileges. Before using ktutil to delete the service principal from the server's keytab, copy the original keytab to a temporary location. When you want to enable the service again, copy the original keytab back. |
"How to Temporarily Disable Authentication for a Service on a Host" |
How to Add a Service Principal to a Keytab
-
Make sure the principal already exists in the Kerberos database.
See "How to View the List of Principals" for more information.
-
Become superuser on the host that needs a principal added to its keytab.
-
Start the kadmin command.
# /usr/krb5/sbin/kadmin
-
Add a principal to a keytab by using the ktadd command.
kadmin: ktadd [-k keytab] [-q] [principal | -glob principal_exp]
-k keytab
Specifies the keytab file. By default, /etc/krb5/krb5.keytab is used.
-q
Displays less verbose information.
principal
Principal to be added to the keytab. You can add the following service principals: host, root, nfs, and ftp.
-glob principal_exp
All principals matching the principal expression are added to the keytab. The rules for principal expression are the same as for the list_principals command of kadmin.
-
Quit the kadmin command.
kadmin: quit
Example--Adding a Service Principal to a Keytab
The following example adds the kadmin/admin and kadmin/changepw principals to a master KDC's keytab. For this example, the keytab file must be the one specified in the kdc.conf file.
kdc1 # /usr/krb5/bin/kadmin.local kadmin.local: ktadd -k /etc/krb5/kadm5.keytab kadmin/admin kadmin/changepw Entry for principal kadmin/admin@ACME.COM with kvno 3, encryption type DES-CBC-CRC added to keytab WRFILE:/etc/krb5/kadm5.keytab. Entry for principal kadmin/changepw@ACME.COM with kvno 3, encryption type DES-CBC-CRC added to keytab WRFILE:/etc/krb5/kadm5.keytab. kadmin.local: quit |
The following example adds denver's host principal to denver's keytab file, so denver's network services can be authenticated by the KDC.
denver # /usr/krb5/bin/kadmin kadmin: ktadd host/denver@acme.com@ACME.COM kadmin: Entry for principal host/denver@acme.com@ACME.COM with kvno 2, encryption type DES-CBC-CRC added to keytab WRFILE:/etc/krb5/krb5.keytab. kadmin: quit |
How to Remove a Service Principal From a Keytab
-
Become superuser on the host with a service principal that must be removed from its keytab.
-
Start the kadmin command.
# /usr/krb5/bin/kadmin
-
Optional. To display the current list of principals (keys) in the keytab, use the ktutil command.
See "How to Display the Keylist (Principals) in a Keytab" for detailed instructions.
-
Remove a principal from a keytab by using the ktremove command.
kadmin: ktremove [-k keytab] [-q] principal [kvno | all | old ]
-k keytab
Specifies the keytab file. By default, /etc/krb5/krb5.keytab is used.
-q
Displays less verbose information.
principal
Principal to be removed from the keytab.
kvno
Removes all entries for the specified principal whose kvno (key version number) matches kvno.
all
Removes all entries for the specified principal.
old
Removes all entries for the specified principal except those with the highest kvno.
-
Quit the kadmin command.
kadmin: quit
Example--Removing a Service Principal From a Keytab
The following example removes denver's host principal from denver's keytab file.
denver # /usr/krb5/bin/kadmin kadmin: ktremove host/denver.acme.com@ACME.COM kadmin: Entry for principal host/denver.acme.com@ACME.COM with kvno 3 removed from keytab WRFILE:/etc/krb5/krb5.keytab. kadmin: quit |
How to Display the Keylist (Principals) in a Keytab
-
Become superuser on the host with the keytab.
Note -Although you can create keytabs owned by other users, the default location for the keytab requires root ownership.
-
Start the ktutil command.
# /usr/bin/ktutil
-
Read the keytab into the keylist buffer by using the read_kt command.
ktutil: read_kt keytab
-
Display the keylist buffer by using the list command.
ktutil: list
The current keylist buffer is displayed.
-
Quit the ktutil command.
ktutil: quit
Example--Displaying the Keylist (Principals) in a Keytab
The following example displays the keylist in the /etc/krb5/krb5.keytab file on the denver host.
denver # /usr/bin/ktutil
    ktutil: read_kt /etc/krb5/krb5.keytab
    ktutil: list
slot KVNO Principal
---- ---- ---------------------------------------
   1    5 host/denver@ACME.COM
    ktutil: quit
|
How to Temporarily Disable Authentication for a Service on a Host
You may find instances when you need to temporarily disable the authentication mechanism for a service, such as rlogin or ftp, on a network application server. For example, you may want to stop users from logging into a system while performing maintenance procedures. The ktutil command enables you to do this by removing the service principal from the server's keytab, without requiring kadmin privileges. To enable authentication again, all you need to do is copy the original keytab that you saved back to its original location.
Note -
Most services are set up by default to require authentication to work. If this is not the case, the service will still work even if you disable authentication for the service.
-
Become superuser on the host with the keytab.
Note -Although you can create keytabs owned by other users, the default location for the keytab requires root ownership.
-
Save the current keytab to a temporary file.
-
Start the ktutil command.
# /usr/bin/ktutil
-
Read the keytab into the keylist buffer by using the read_kt command.
ktutil: read_kt keytab
-
Display the keylist buffer by using the list command.
ktutil: list
The current keylist buffer is displayed. Note the slot number for the service you want to disable.
-
To temporarily disable a host's service, remove the specific service principal from the keylist buffer by using the delete_entry command.
ktutil: delete_entry slot_number
slot_number
The slot number of the service principal to be deleted, which is displayed by the list command.
-
Write the keylist buffer to the keytab by using the write_kt command.
ktutil: write_kt keytab
-
Quit the ktutil command.
ktutil: quit
-
When you want to enable the service again, copy the temporary (original) keytab back to its original location.
Example--Temporarily Disabling a Service on a Host
The following example temporarily disables the host service on the denver host. To enable the host service back on denver, you would copy the krb5.keytab.temp file to the /etc/krb5/krb5.keytab file.
denver # cp /etc/krb5/krb5.keytab /etc/krb5/krb5.keytab.temp
denver # /usr/bin/ktutil
    ktutil:read_kt /etc/krb5/krb5.keytab
    ktutil:list
slot KVNO Principal
---- ---- ---------------------------------------
   1    8 root/denver@ACME.COM
   2    5 host/denver@ACME.COM
    ktutil:delete_entry 2
    ktutil:list
slot KVNO Principal
---- ---- --------------------------------------
   1    8 root/denver@ACME.COM
    ktutil:write_kt /etc/krb5/krb5.keytab
    ktutil: quit
|
- © 2010, Oracle Corporation and/or its affiliates
