Using the Connectivity Map Editor
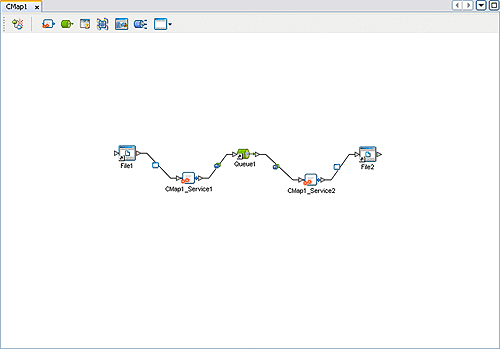
When you create a new Connectivity Map in the Enterprise Explorer, the editor panel displays the Connectivity Map Editor, as shown in the following figure. To define your Project, you simply drag icons from the toolbar to the workspace, or canvas, to populate the Connectivity Map with the necessary components. You can also create objects under the Projects window using the Project context menu, and drag them onto the Connectivity Map canvas.
You subsequently link the components by dragging the cursor from the output arrowhead of one to the input arrowhead of the other. The cursor turns into a hand during this operation.
Figure 2 Connectivity Map Editor

The drag-and-drop components include services, queues, topics, schedulers, and external applications. Additional components, such as Adapters and JMS Clients, are placed automatically when you link the components you have placed manually.
It is important to understand that the logical components appearing in the Connectivity Map are essentially placeholders that refer to the “actual” components that exist in the Repository and appear under the Projects window. Deleting a queue or topic in the Connectivity Map only affects the placeholder, not the object in the Repository. Deleting a queue or topic in the Repository, however, does delete its placeholder counterpart in the Connectivity Map. Renaming either the object or the placeholder automatically renames both.
When you link two components on a Connectivity Map, the NetBeans IDE places a connection icon on the link; the entity represented by the icon depends upon the type of components you are linking.
-
When you link an external application with a Collaboration, the NetBeans IDE automatically adds the appropriate adapter to the link. The adapter enables communication and movement of data between the external application and the other Project components. The adapter configuration specifies the logical connection properties for the link. See the individual adapter user guides for specific information.
-
When you link a Web Services External Application with a Collaboration, the NetBeans IDE automatically adds a Web Service External Application Connector to the link. This connector enables communication and movement of data between the web services application and the other Project components. The binding configuration specifies the logical connection properties for the link.
-
When you link a Service with a Message Destination (queue or topic), the NetBeans IDE adds a JMS Client connection to the link. The JMS Client configuration specifies the logical connection properties for the linked Service.
- © 2010, Oracle Corporation and/or its affiliates
