Creating a Deployment Profile
Before creating a Deployment Profile, you must have created an appropriate runtime Environment to support the Project.
Note –
If the Project includes web services, then each of a Project’s active Deployment Profiles must target a separate SOAP/HTTP External System; otherwise, the web containers can cause duplicate servlet names to appear in the domain.
Note –
Deployment Profile names should contain only alphanumeric characters (letters and numbers), dashes, and underscores.
 To create a Deployment Profile
-
In the NetBeans Project window, right-click on the Project to display its context menu.
-
From the menu, select New > Deployment Profile to display the Create Deployment Profile dialog.
-
Enter the Deployment Profile Name you want to use (or accept the default).
Note –The resulting application ( .ear ) file will default to a concatenation of the Deployment Profile name and the Project name (see Naming the Application File).
-
Select the Environment to which you want to deploy the Project.
-
Select the Connectivity Map(s) to include in the deployment.
-
The Deployment Profile Editor now appears, showing all deployable Project components.
-
Drag the Project components from the left panel and drop them into the appropriate Environment components in the right panel.
-
Drag the topics and queues to the appropriate message server, being careful not to split inbound and outbound message destinations between separate servers.
-
Drag the Collaborations to the appropriate application servers.
-
Drag the Adapter components to the appropriate external systems.
Note –You can select multiple components of the same type that are destined for a single external system, dragging them to that external system in one operation.
-
-
When the Environment components are fully populated, the left panel will be blank. You should now Save the profile.
Note –You can deploy two services that are not directly dependent upon each other across two domains; however, two processes that need to have direct access to one another must be deployed to the same domain.
Naming the Application File
You have the option of specifying the filename for the .ear file that is created from the Deployment Profile, which can make it easier to identify the file at a later time. By default, the .ear filename is a concatenation of the Deployment Profile name and the Project name. However, if the resulting name is too long or does not fit into your file-naming scheme, you can rename the file.
You can also name an .ear file from the command line, without having the NetBeans IDE running. See also Building an Application File From the Command Line.
Note –
If you want to change the name of an .ear file that already has been deployed, you must undeploy it before changing its name.
Note –
If you use the same custom .ear file name in multiple Deployment Profiles within the same Project and Environment, previously-built .ear files will be overwritten by more recently-built files, since custom .ear file names are stored in a common directory. In this situation, you must ensure that the file names you assign are unique.
Note –
Filenames can contain only alphanumeric characters, hyphens, and underscores. Spaces are not allowed.
 To specify the filename of the EAR file in the NetBeans IDE
-
In the NetBeans Project window, right-click the Deployment Profile to display its context menu.
-
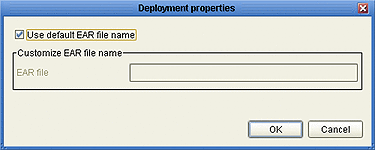
Select Properties to display the Deployment Properties dialog.

-
Clear the check box for Use default EAR file name (it is checked by default).
-
Enter the name you want into the EAR file text box, and click OK.
 To specify the filename of the EAR file from the command line
(Windows)
-
Locate the following file, and select Edit from its context menu:
<CAPS_install_dir>\commandlinecodegen\ant.bat
-
Locate the line beginning with SET ANT_OPTS, and append the following entry:
-Ddeployment.ear.file.name=filename
where filename is the name you want for the .ear file; for example,
SET ANT_OPTS=-Dantlrmaxaltblklines=3000 -Dcompile=injar -Xms512M -Xmx768m
-XX:PermSize=256m -XX:MaxPermSize=256m -Ddeployment.ear.file.name=test_ear
-
Save the file.
 To specify the filename of the EAR file from the command line
(AIX/Linux/MacOS/Solaris)
-
Locate the following file, and open it in a text editor:
<CAPS_install_dir>/commandlinecodegen/ant
-
Locate the following if-then-else statement:
if [ "$UNAME_SYSTEM" = "AIX" ] || [ "$UNAME_SYSTEM" = "aix" ];
then ANT_OPTS=’-Dantlrmaxaltblklines=3000 -Xms512M -Xmx768m’
else ANT_OPTS=’-Dantlrmaxaltblklines=3000 -Xms512M -Xmx768m
-XX:PermSize=256m -XX:MaxPermSize=256m’
-
Insert the following entry:
-Ddeployment.ear.file.name=filename
where filename is the name you want for the .ear file, as shown in the following example:
if [ "$UNAME_SYSTEM" = "AIX" ] || [ "$UNAME_SYSTEM" = "aix" ];
then ANT_OPTS=’-Dantlrmaxaltblklines=3000 -Xms512M -Xmx768m
-Ddeployment.ear.file.name=test_ear’
else ANT_OPTS=’-Dantlrmaxaltblklines=3000 -Xms512M -Xmx768m -XX:PermSize=256m
-XX:MaxPermSize=256m -Ddeployment.ear.file.name=test_ear’
-
Save the file.
Automapping
When a one-to-one correspondence exists between the available objects and the containers in the Environment to which you want to deploy them, clicking the Automap icon automatically deploys the components to their matching containers. (This feature only works with external systems for which it is enabled.)
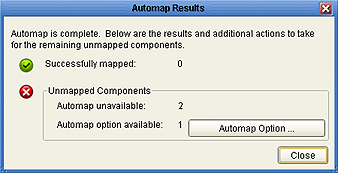
After the Automap feature executes, a dialog box is displayed showing the results. The lack of an appropriate container, or ambiguity between potential containers, will cause a component to remain unmapped.

In the case of an ambiguity, for example, mapping options are presented in an Automap Options dialog box that is displayed when you click Automap Option. You may click OK to accept the Automapping option, or click Cancel and map the deployable components manually.

Mapping Variables
Project variables function as placeholders, having values that are determined when you create a specific Deployment Profile. These values can be literals or Environmental constants. Clicking the Map Variables button displays the Deployment Profile Mappings panel, where you can assign names and values.
Version Control
The Deployment Profile Editor allows you to control which version of the various Project components get mapped in the Deployment Profile. The editor provides a spreadsheet-like view to display the Project components and their versions. This view includes the component name, project path, current version in the users’ workspace, tag assigned to the version (if there is one), and to what external system the component is mapped. This view is enabled by clicking the Spreadsheet View icon in the Deployment Profile Editor toolbar.
The spreadsheet view has an option that is checked by default to show only those components that are displayed when mapping components to external systems. If not checked, those components not ordinarily seen in the Deployment Profile (for example, Connectivity Maps and OTDs) will be listed as well. Listing them allows you to also specify the version of those components.

The spreadsheet view allows you to specify the version for each component by selecting a version or tag from a drop-down list. Selecting versions or tags does not affect your workspace, but is only for setting up the versions to appear in a snapshot; only when the snapshot is retrieved will your workspace be modified.
Creating Snapshots
The Deployment Profile Editor allows you to take a snapshot of the configuration currently in your workspace, as shown in the spreadsheet view. Clicking the Snapshot button presents a dialog in which you enter a name for the snapshot. Clicking OK then saves the snapshot.

Retrieving Snapshots
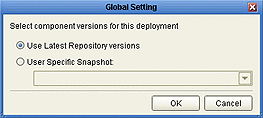
The Deployment Profile Editor gives you the option of deploying the latest component versions from the Repository or those versions recorded in a snapshot of your workspace at a previous time. Clicking the Global Settings button presents a dialog in which you can specify your choice and, if appropriate, name the desired snapshot. Clicking OK then carries out the operation.

In either case, if your chosen configuration is different from what is currently in your workspace, you will receive another dialog informing you that the action will modify what is in your workspace and offering you the opportunity to not perform the operation.
-
If you select a specific snapshot which is different from what is currently in your workspace, the versions of those components used by the Deployment Profile that are part of the specified snapshot will be retrieved into your workspace as read-only versions.
-
If you select to use the latest Repository versions while another configuration is currently in your workspace, those components used by the Deployment Profile that are currently in your workspace will be removed and replaced by the latest versions from the Repository.
- © 2010, Oracle Corporation and/or its affiliates
