Loading the Matched Data Into the Master Index Database
The IBML Tool provides three methods to load the master data images generated by the Bulk Matcher. A Data Integrator command line tool is provided to generate and then run the ETL collaborations that load the data. Data Integrator also provides a wizard that guides you through the creation of the ETL collaborations. You can then generate a command-line program to run the collaborations. Finally, you can use SQL*Loader to load the data if the master index database is running on Oracle.
Perform one of the following procedures to load the matched data into your master index database:
-
Loading Matched Data Using the Data Integrator Wizard Bulk Loader
-
Loading Matched Data Using the Data Integrator Command-Line Bulk Loader
Loading Matched Data Using SQL*Loader
Note –
This procedure includes steps that were updated for Java CAPS Release 6 Update 1. The variable JDBC_JAR_PATH was previously ORACLE_JDBC_JAR, and wasn't present in all files.
If the master index database runs on an Oracle platform, you can use either SQL*Loader or the Data Integrator Bulk Loader to load the matched data into the database. SQL*Loader cannot be used for a SQL Server or MySQL database.
 To Load Matched Data Using SQL*Loader
-
Complete the steps under Performing the Bulk Match.
-
From the master IBML Tool home directory, run cluster-truncate.sql against the cluster synchronizer database.
-
For each IBML Tool, open loader-config.xml (located in the IBML Tool home directory in the conf subdirectory).
-
Define the SQL*Loader property as described in SQL*Loader Configuration.
-
Change the value of the BulkLoad property to true.
-
Save and close the file.
-
-
To generate the loader, do one of the following.
-
If the master loader is running on Windows:
-
Navigate to the master IBML Tool home directory and open generate-sql-loader.bat for editing.
-
Change the value of the JDBC_JAR_PATH variable in the first line to the location and name of the database driver for the master index database platform; for example, set JDBC_JAR_PATH=C:\oracle\jdbc\lib\ojdbc14.jar.
-
Close and save the file.
-
Double-click generate-sql-loader.bat or type generate-sql-loader from a command line.
-
-
If the master loader is running on UNIX:
-
Navigate to the master IBML Tool home directory and open sh generate-sql-loader.sh for editing.
-
Change the value of the JDBC_JAR_PATH variable in the first line to the location and name of the database driver for the master index database platform; for example, export JDBC_JAR_PATH=${oracle_home}/jdbc/lib/ojdbc14.jar.
-
Close and save the file.
-
Type sh generate-sql-loader.sh at the command line.
A new directory named sqlldr is created in the working directory.
-
-
-
In the master IBML Tool home directory, run cluster-truncate.sql against the master index database to clear the cluster synchronizer tables.
-
In the sqlldr folder in the working directory, run drop.sql against the master index database to drop constraints and indexes.
-
In the sqlldr directory, do one of the following:
-
After the data is loaded, close any command prompts that were left open by the process and examine the SQL*Loader log files located in the sqlldr/log directory to ensure there were no errors during processing.
Note –Any records that contained bad data and were not inserted into the master index database are written to the sqlldr/bad directory. Any records that contained bad data and were discarded are written to the sqlldr/discard directory.
-
In the sqlldr directory, run create.sql against the master index database to reinstate the dropped indexes and constraints.
Loading Matched Data Using the Data Integrator Wizard Bulk Loader
Note –
This process is new for Java CAPS 6 Update 1 and is unavailable in Release 6.
You can use the Data Integrator Wizard to generate the Bulk Loader for a master index application. The wizard generates the collaborations that define the load process. Once you build the Data Integrator project, you can generate a command-line tool that runs the collaborations in the correct order.
 To Load Matched Data Using the Data Integrator Wizard
Bulk Loader
Before You Begin
-
Make sure the master index database is running, and that your NetBeans IDE is connected to the master index database. To connect to the database, right-click Drivers under Databases on the Services window, select Connect Using, and enter the database connection information. One the connection is created, right-click the new database entry under Databases and select Connect.
-
Start the application server.
-
Start the ETL Service Engine (located on the Services window of Net Beans under the application server > JBI > Service Engines).
-
On the NetBeans Projects window, expand the new Data Integrator project and right-click Collaborations.
-
Point to New, and then select ETL.
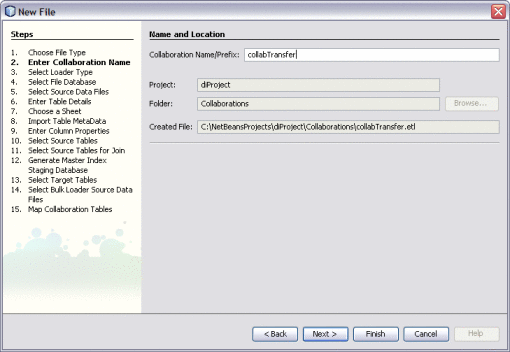
The Data Integrator Wizard appears with the Name and Location window displayed.
-
Enter name for the collaboration.
-
Click Next.
-
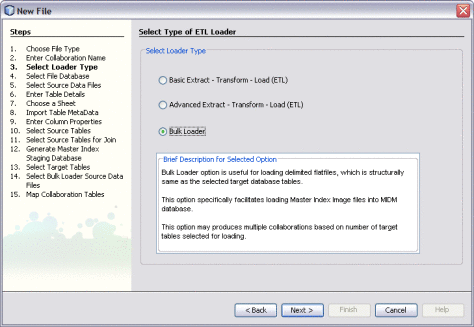
On the Select Type of ETL Loader window, select Bulk Loader.
-
Click Next.
The Select or Create Database window appears.
-
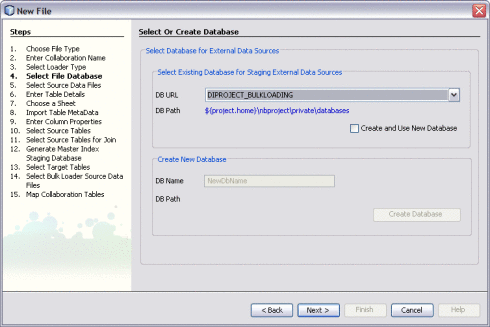
To specify a staging database to use for external data sources (for this project only), do one of the following:
-
Click Next.
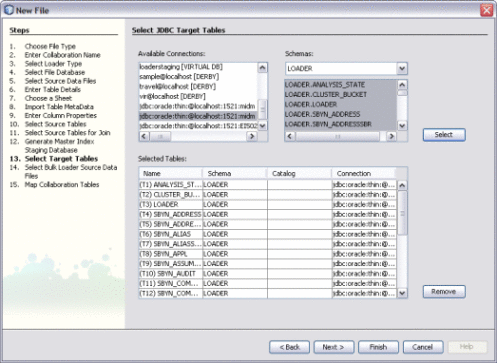
The Select JDBC Target Tables window appears.
-
To choose the target tables to load the extracted data into, do the following:
-
Under Available Connections, select the master index database.
-
Under Schemas, select the schema that contains the tables to load the data into.
-
Under Schema, select only the tables that correspond to the data files produced by the Bulk Matcher, and then click Select.
Tip –You can use the Shift and Control keys to select multiple tables at once. If you select target tables that do not correspond to the Bulk Matcher files, collaborations without source table are generated and the project fails to build.
-
Click Next.
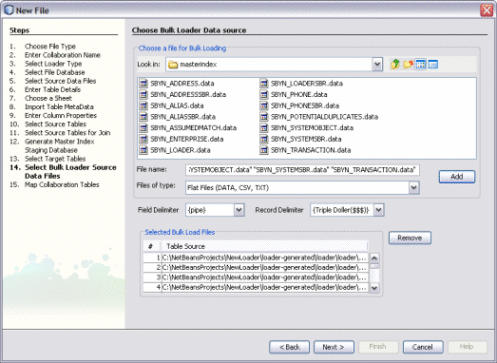
The Choose Bulk Loader Data Source window appears.
-
-
To specify the source data for the Bulk Loader, do the following:
-
In the upper portion of the window, browse to the location of the of the output files from the Bulk Matcher.
Note –These files are located in NetBeansProjects_Home/Project_Name/loader-generated/loader/work/masterindex, where work is the location you specified for the working directory in loader-config.xml.
-
Select all of the data files in the masterindex directory, and then click Add.
-
Click Next.
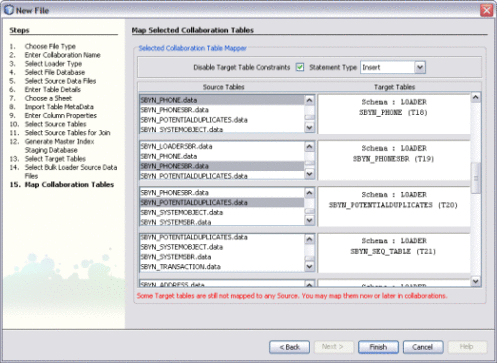
The Map Selected Collaboration Tables window appears.
-
-
To map source and target data, do the following:
-
To disable constraints on the target tables, select Disable Target Table Constraints.
-
Select the SQL statement type to use for the transfer. You can select insert, update, or both.
-
The wizard automatically maps the source and target tables for you. Review the mapping to verify its accuracy.
Note –Not every table on the left will be mapped. For example, system tables such as SBYN_COMMON_HEADER, SBYN_COMMON_DETAIL, SBYN_APPL, and SBYN_SYSTEMS do not need to be mapped.
-
Click Finish.
An ETL collaboration is created for each target table. This might take a few minutes to generate.
-
-
Verify that all the required collaborations were created, and then right-click the Data Integrator project and select Clean and Build.
-
Right-click the Data Integrator project again, and select Generate Command Line ETL.
-
To configure the load process, do the following:
-
On the Files window, expand the Data Integrator project and then expand ETLLoader.
-
Open startLoad.bat or startLoad.sh for editing.
-
In the JAVA_HOME variable, enter the path to your JRE installation; for example, C:\Java\jre1.5.0_12.
-
In the DATABASE_DRIVERS variable, enter the paths to the master index database driver and the Axion database driver.
Tip –The master index driver should be located in app_server/lib and the Axion database driver can be found in ETLLoader/lib.
-
Save and close the file.
-
-
On your computer, navigate to your NetBeans projects home directory and then to bulk_loader_project/ETLLoader.
-
To perform the load, do one of the following:
-
If your master index application is deployed, you can use the Master Index Data Manager to verify that the data was loaded successfully. Also review the log files under ETLLoader/logs.
Loading Matched Data Using the Data Integrator Command-Line Bulk Loader
You can use the Data Integrator command-line Bulk Loader to load data into an Oracle, MySQL, or SQL Server database. Using the command-line tool does not require the use of NetBeans, but it does require that NetBeans be installed on the master loader machine.
 To Load Matched Data Using the Data Integrator
Bulk Loader
-
Complete the steps under Performing the Bulk Match.
-
In the master IBML Tool home directory, open genCollab.bat (or genCollab.sh for UNIX) and configure the properties described in Data Integrator Bulk Loader Properties.
-
Save and close the file.
-
In the master IBML Tool home directory, do one of the following:
-
Extract the contents of etl-loader.zip to the current directory.
This generates an ETL collaboration and creates a new directory, ETLloader, in the IBML Tool home directory.
-
In the master IBML Tool home directory, run cluster-truncate.sql against the master index database to clear the cluster synchronizer tables.
-
In the ETLloader/config directory, open logger.properties and modify any logging properties if needed.
-
In the ETLloader directory, do one of the following:
-
After the data is loaded, check the log files to ensure there were no errors during processing.
Data Integrator Bulk Loader Properties
The Data Integrator collaboration is generated by a file that includes configurable properties you need to define. The file is named genCollab.bat for Windows and genCollab.sh for UNIX. It is located in the directory where you extracted the IBML Tool files on the master processor. The following table lists and describes the default properties for the file.
Tip –
If you get a usage error when running the Bulk Loader after configuring the properties below, remove the double-quotes from around the paths and filenames (but not from the delimiters).
Table 7 Data Integrator Bulk Loader Properties
|
Property Name |
Description |
|---|---|
|
NetBeans and Java Properties |
|
|
NB_HOME |
The absolute path to the NetBeans home directory on the master processor. |
|
JAVAPATH |
The absolute path to the bin directory in the Java installation; for example, C:\\Java\jre1.5.0_11\bin. |
|
DB_DRIVER_PATH |
The absolute path to the database driver for the database platform of the master index database. |
|
DB_DRIVER_NAME |
The name of the database driver in the path specified above; for example, ojdbc14.jar. |
|
Source Data Properties |
|
|
SOURCE_LOC |
The absolute path to the data files to be loaded into the master index database. These are located in the masterindex folder in the working directory you created for the Bulk Matcher. |
|
FIELD_DELIMITER |
The character that separates the fields in the master data image files. By default, fields are delimited by a pipe character (|). |
|
RECORD_DELIMITER |
The characters that separate the records in the master data image files. By default, the records are delimited by three dollar signs ($$$). |
|
Target Database Properties |
|
|
TARGET_DB_TYPE |
The database platform used for the master index database. Specify 1 for Oracle, 2 for MySQL, or 3 for SQL Server. |
|
TARGET_LOC |
The name or IP address of the server on which the master index database resides. |
|
TARGET_PORT |
The port number on which the master index database is listening. The default port is 1521 for Oracle, 1433 for SQL Server, and 3306 for MySQL. |
|
TARGET_ID |
The SID or database name of the master index database. |
|
TARGET_SCHEMA |
The name of the database schema that defines the tables, fields, and relationships for the master index database. The default schema for SQL Server databases is “dbo”; for Oracle, the default is the same as the SID name of the database. |
|
TARGET_CATALOG |
The name of the database catalog containing the master index database metadata. This property can be left empty. |
|
TARGET_LOGIN |
The login ID of the user with administrator abilities for the master index database. |
|
TARGET_PW |
The password for the above login ID. |
- © 2010, Oracle Corporation and/or its affiliates

