Using SOAP Message Handlers
As defined in the JAX-RPC specification, message handlers provide a mechanism for adding, reading, and manipulating header blocks in SOAP messages that are sent and received by JAX-RPC clients and web service endpoints. By providing access to SOAP headers, you can import custom code to support SOAP standards that are not supported in basic versions of Java CAPS.
Although message handlers are Project-specific, they are added in Java CAPS Environments to allow easy reuse across multiple Projects. Multiple handlers can be installed or removed as needed, and they also may be chained, which allows staged execution of different types of processing modules.
Java CAPS version control is applied to all Environment sub-nodes and associated artifacts in the NetBeans IDE. You also may employ your own version control system for the handler code you import into Java CAPS.
JAX-RPC message handlers for use with Java CAPS are packaged in handler archives. A Handler Archive consists of a .zip file containing the following components:
-
One or more JAX-RPC handlers
-
An archive manifest file
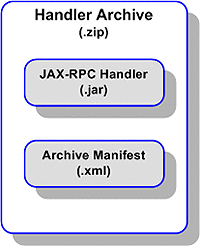
JAX-RPC message handlers are incorporated into Java CAPS Projects by means of a three-stage process:
-
Importing a handler archive, which can contain one or more individual handlers.
-
Creating one or more handler chains, each of which can contain one or more individual handlers in a specific order.
-
Associating the handler chains with specific SOAP/HTTP Web Service External Services.
The following topics provide instructions on how to proceed through this process.
If you have any questions or problems, see the Java CAPS web site at http://goldstar.stc.com/support.
Importing a JAX-RPC Handler Archive
Figure 1 Message Handler Archive Icon
To begin, you need to have a JAX-RPC handler archive available on your system.
 To import an existing message handler archive
-
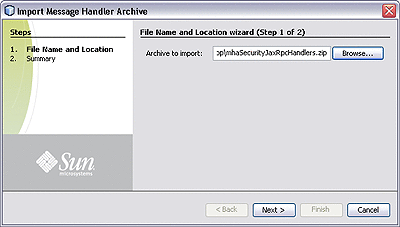
From the Environment node’s context menu, select Import > Message Handler Archive to invoke the Import Message Handler Archive wizard as shown in the following figure.
Figure 2 Import Message Handler Archive Wizard: File Name and Location Dialog
-
Type in or browse to the archive file you want to import, and click Next.
-
If the selected archive file imports correctly, you will see an Import Message Handler Archive wizard Summary page similar to that shown in the following figure.
Figure 3 Import Message Handler Archive Wizard: Summary Window
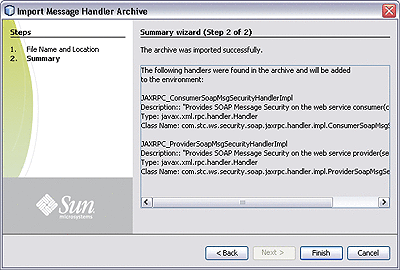
The message handler archive now appears in the Services window as a child node of the Environment, and the message handler itself (in this case, a pair of them) as a child node of the archive, as shown in the following figure.
Figure 4 Message Handler Nodes

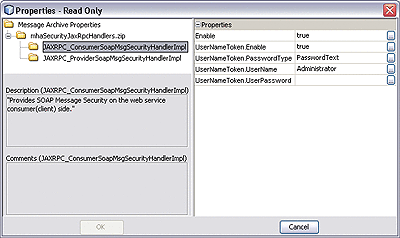
From the Message Handler Archive’s context menu, you can select Properties to display the Message Handler Properties.
Figure 5 Example Message Handler Properties Dialog
-
If the archive file did not import properly, you will see an error message on the Import Message Handler Archive wizard Summary page. You will then need to determine the reason for the failure to import.
Creating a JAX-RPC Handler Chain
Figure 6 Message Handler Chain Icon
To begin, you need to have imported one or more JAX-RPC message handlers as described in Importing a JAX-RPC Handler Archive.
 To create a new chain of message handlers
-
Select the Services tab to display the NetBeans Services window.
-
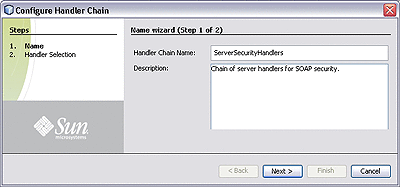
From the Environment node’s context menu, select New > Message Handler Chain to invoke the Configure Handler Chain wizard as shown in the following figure.
Figure 7 Configure Handler Chain Wizard: Name Dialog
-
Type in a name and a description for the handler chain you are creating.
-
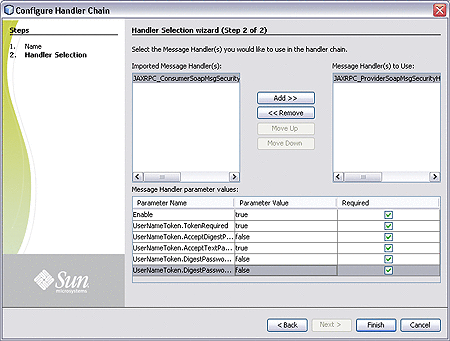
Click Next to display the Handler Selection dialog, as shown in the following figure.
Figure 8 Configure Handler Chain Wizard: Handler Selection Dialog
-
A list of all imported message handlers appears in the left pane. Select the ones you want to include in the new chain, using the Add and Remove buttons to populate the right pane.
-
Use the Move Up and Move Down buttons to modify the order of the handlers in the chain. Handlers are applied in the sequence you specify.
Note –You can return to this wizard dialog to modify the settings at a later time by selecting Edit in the handler chain’s context menu.
The message handler chain now appears in the Services window as a child node of the Environment, as shown in the following figure.
Figure 9 Message Handler Nodes
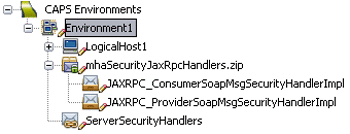
Note –You can define multiple handler chains containing different combinations of handlers, or different sequences of the same handlers.
Assigning Handler Chains to External Systems
To begin, you need to have created one or more handler chains as described in Creating a JAX-RPC Handler Chain
 To assign the handler chain to a SOAP/HTTP Web Services
External System
-
Select the SOAP/HTTP Web Services External System to which you want to assign this handler.
-
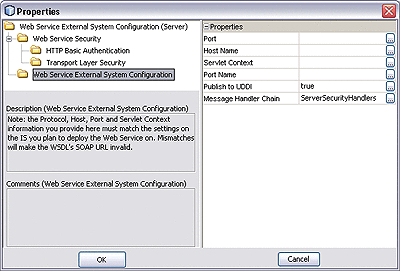
Right-click the External System to display its context menu and select Properties, which displays its Properties dialog, as shown in the following figure.
Figure 10 Web Services External System Properties Dialog
-
Click the button in the Message Handler Chain value field to open the drop-down dialog, and select the desired handler chain.
-
Click OK to assign the selected handler chain to this external system.
- © 2010, Oracle Corporation and/or its affiliates
