Creating a SAP ALE OTDs Wizard
The chapter describes how to use the SAP ALE OTD Wizard to create IDoc Object Type Definitions (OTDs). OTDs are used in the business logic in Java Collaboration Definitions and eInsight Business Processes. The SAP IDoc wizard is used to create IDoc OTDs.
You can create IDoc OTDs in one of two ways:
-
Let the IDoc wizard connect and retrieve the IDoc message format directly from the SAP system.
-
Provide the location for a saved IDoc description file.
To export an IDoc description file from an SAP system to be used by the IDoc wizard, see Exporting the IDOC File from SAP. Due to the significant SAPGUI changes that distinguish versions 4.6 and earlier and 4.7 and later, separate instructions are included in Saving the IDoc Description File (After 4.6).
SAP JCo and SAP IDoc Class Library Installation
Certain JAR files are required by the SAP ALE OTD Wizard to create IDoc OTDs.
-
From the SAP Java Connector:sapjco.jar
-
From the SAP Java Base IDoc Class Library:sapidoc.jar
-
From the SAP Java Connector IDoc Class Library:sapidocjco.jar
The SAP Java Connector
The SAP Java Connector file, sapjco.jar, is a middleware component that enables the development of SAP-compatible components and applications in Java. This component is required to support inbound and outbound SAP server communication during runtime.
Since you are installing the SAP Java Connector as standalone component, certain installation files are required. Download the installation files from SAPNet at http://service.sap.com/connectors/. Once logged in, this link redirects you to SAP Service Marketplace. Click the following links to access the SAP Java Connector (SAP JCo) tools and services page:
SAP NetWeaver > SAP NetWeaver in Detail > Application Platform > Connectivity > Connectors > SAP Java Connector > Tools & Services |
 To Install the SAP Java Connector on Windows
32
-
Create a directory. For example:
C:\SAPJCo
-
Extract the JCo ZIP file into the directory you just created.
-
Copy the librfc32.dll and sapjcorfc.dll files from the SAP JCo main directory. If the files are more recent than the target location, paste them into the following directory:
C:\WINNT\SYSTEM32
-
Copy the file sapjco.jar from your SAP JCo main directory to the following directory:
<JavaCAPS51>\edesigner\lib\ext
Where <JavaCAPS51> is the Sun Java Composite Application Platform Suite install directory.
-
The sapjco.jar file is also required during runtime. For this, add the JAR file to the following location:
<JavaCAPS51>\glassfish\is\lib
-
Download the following DLL files:
-
msvcp71.dll
-
msvcr71.dll
Note –These files are available, free of charge, from various sources on the Internet.
-
-
Manually add these files to the following location:
c:\WINNT\system32
-
Restart both the Netbeans IDE and the domain after installing the JAR file.
Procedures for UNIX
The instructions for the installation of SAP JCo on other operating systems are included in the corresponding download files. On UNIX operating systems, add the OS specific shared lib files to the library path. Check the SAP BAPI Adapter readme to confirm the supported operating systems.
SAP Java IDoc Class Library
The SAP Java IDoc Class Library consists of two parts, the SAP Java Base IDoc Class Library and the SAP Java Connector IDoc Class Library.
The packages of the SAP Java IDoc Class Library include the software as well as documentation. The SAP Java Base IDoc Class Library provides an API which helps navigating, reading, filling, and modifying IDocs. This base package is middleware independent. Creating, sending, and receiving IDocs is middleware dependent.
 To Download the SAP Java IDoc Class Library
Like the SAP Java Connector, download the required installation files from SAPNet at http://service.sap.com/connectors/.
-
Navigate to the following directory to access the SAP Java Connector (SAP JCo) tools and services page:
SAP NetWeaver > SAP NetWeaver in Detail > Application Platform > Connectivity >
 Connectors > SAP Java Connector > Tools & Services > SAP Java IDOC Class Library
This page contains links to the SAP Java Connector IDoc Class Library 1.0.6, and the SAP Java Base IDoc Class Library 1.0.3.
-
Uncompress and extract the archives into the same directory as the SAP Java Connector installation path <sapidocjco-install-path>.
-
Load <sapidocjco-install-path>/docs/idoc/jco/intro.html into your browser and follow the instructions under the link Installation.
Note –The SAP Java Connector file, JCo version 2.1.6 is not backwards compatible with previous versions, such as 2.1.3. Confirm backwards compatibility issues with SAP before attempting to switch between different JCo versions on different machines.
Note –We recommend only using the directory path when setting your library path, not the directory path and file name.
Note –JCo 2.1.6 does not support mixed case, users may need to convert passwords to upper case for all design time and runtime SAP connection configurations.
Note –You need to copy the JCo JAR file to the \compile\lib\ext folder before deploying and running command line codegen. You also need to copy the JCo JAR file to the c:\Sun\ApplicationServer\lib folder before deploying and running via the Sun Java™ System Application Server Enterprise Edition 8.1.
Note –You also need to copy the sapjco.jar, sapidoc.jar, and sapidocjco.jar files to the c:\bea\weblogic91\samples\domains\wl_server\lib folder before deploying and running via the WebLogic Application Server, version 9.1. When using CommandLineCodegen, please place sapjco.jar in <JavaCAPS6>commandlinecodegen\compile\lib\ext.
Creating IDoc OTDs
You create IDoc OTDs with the SAP IDoc wizard in the Netbeans IDE. You can choose to have the wizard connect to the SAP system and retrieve the IDoc message format automatically, or you can have the wizard use an IDoc definition file from a specified location. The IDoc definition file would be saved or downloaded from the SAP system as described in Exporting the IDOC File from SAP.
 To Create IDoc OTDs Directly From SAP
-
In the Explorer tab of the Netbeans IDE, right click a Project, then click New > Object Type Definition. The New Object Type Definition Wizard appears.
-
Click SAP IDoc and click Next. The Select metadata page appears.
-
To retrieve the IDocs message format directly from the connected SAP system, select the From SAP Directly, then click Next.
Note –Refer to SAP JCo and SAP IDoc Class Library Installation for a list of required files that must be installed in order to connect to SAP directly.
-
Click Next. The System Parameters page appears.
-
Enter the information for the SAP system for the IDoc wizard to connect to:
-
Click Next. The Login Parameters page appears.
-
Enter the information to log into the SAP system:
For This Option
Enter
Client Number
Client number of the SAP system.
User name
User name.
Password
Login password.
-
Click Next. The IDoc Metadata Parameters page appears.
-
Enter the following information about the IDoc:
For This Option
Enter
System Release
The SAP System release for this IDoc. All IDocs up to this release number are displayed in the list of available IDocs.
IDoc type
IDoc type, for example, CREMAS03. You cannot use a wild card.
IDoc type extension
Extension for this IDoc type (optional).
Record Type Version
Select the version of the IDoc record type. The default value is 3.
Message format
Blank padded for ALE format or CR-LF for EDI format.
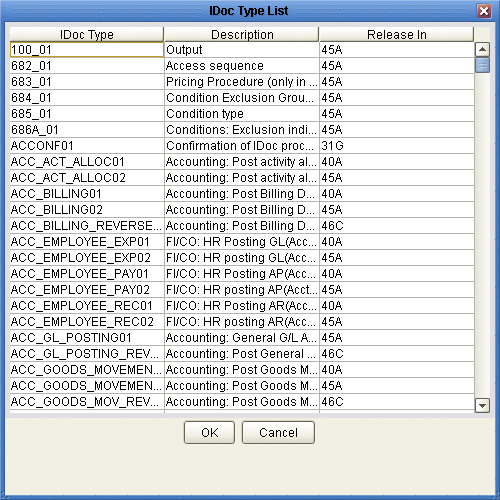
For IDoc type, click the List IDocs button to display a list of available IDocs supported by SAP, as seen in the figure below.
Figure 1–1 IDoc Type List
-
Select your needed IDoc type and click OK.
-
Click Next. The Review Selection page appears.
-
Review your selections and click Finish. The OTD Editor window appears, displaying the OTD.
Figure 1–2 CREMAS IDOC OTD
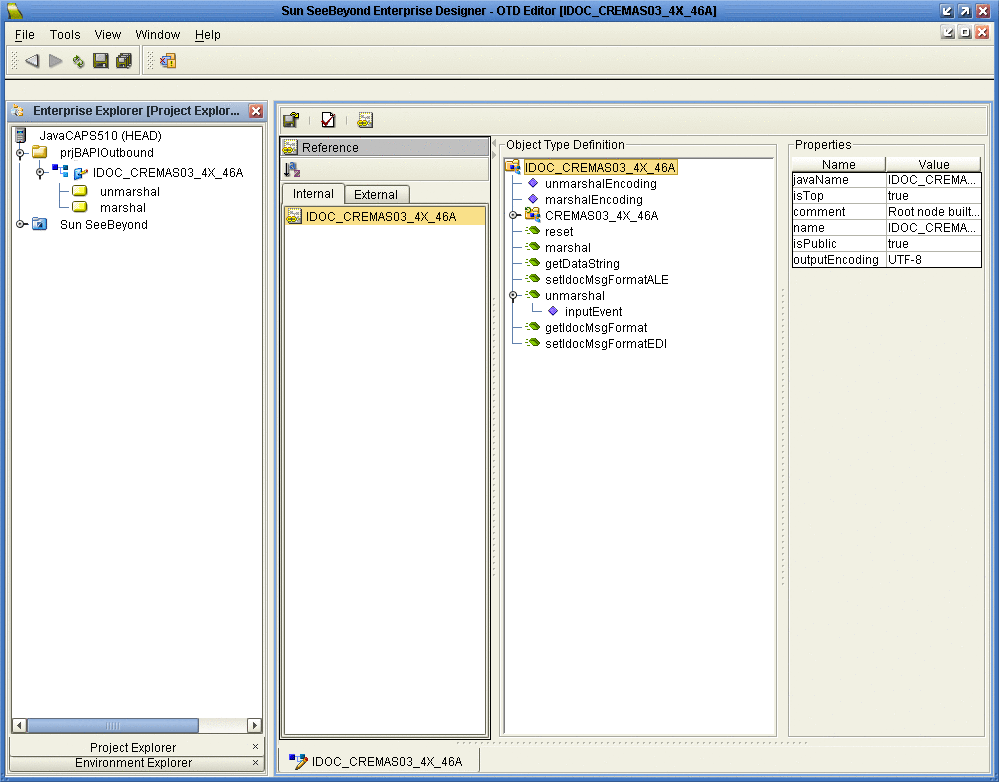
The figure above shows a CREMAS IDoc OTD in the OTD editor. The OTD has various methods which you can use in Java Collaborations for processing IDoc data.
The CREMAS IDoc OTD also has marshal and unmarshal Web Service operations as seen in the Project tree. You can use these operations when using the OTD in eInsight business processes.
The figure below shows the unmarshal operation in the eInsight Business Process editor. You can unmarshal byte or string data onto the IDoc OTDs bytes and contents nodes respectively. The bytes node takes in only UTF-8 encoded data. That is, if you want to perform an unmarshal operation using bytes as the input source, then you must ensure that the data is in UTF-8 before utilizing this node.
In this example we are unmarshaling byte data which is not UTF-8 encoded; therefore, you must perform a bytes to text conversion in editor, and then unmarshal string data to the contents node.
Figure 1–3 CREMAS unmarshal

If required, you can also use the Relaunch option of the OTD to relaunch the IDoc OTD wizard and rebuild the IDoc OTD for the same IDoc Type built with a particular system release.
On relaunch, the OTD is rebuilt again with the changed meta data. Any Java Collaborations and Business Processes using this IDoc OTD are also synchronized with the new changes.
If your Java Collaborations or business Processes are using OTD nodes that are now absent in the relaunched OTD, you will be prompted to correct the business rules by validation errors.
 To Create IDOC OTDs From a Description File
-
In the Explorer tab of the Netbeans IDE, right click the Project, click New, and click Object Type Definition.
The New Object Type Definition dialog box appears.
-
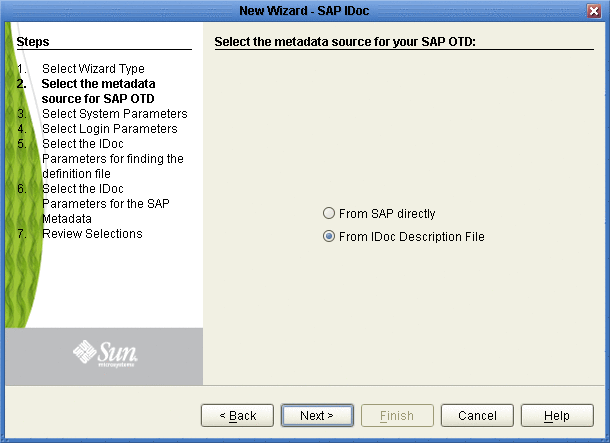
Click SAP IDoc and click Next. The Select metadata source page appears.
Figure 1–4 IDoc Wizard—Metadata Selection
-
To retrieve the IDocs from a description file, select the From Description File.
-
Click Next.
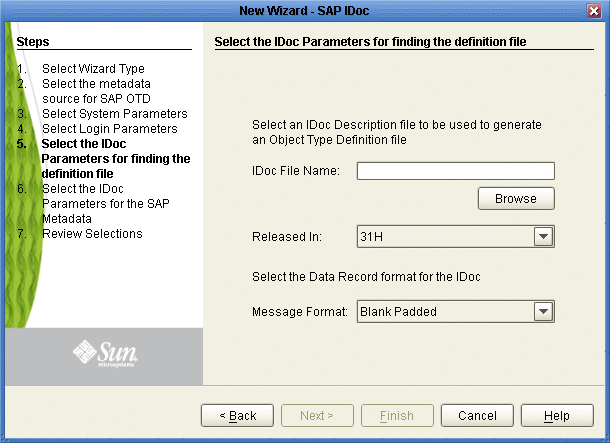
The Definition File Parameters page appears.
Figure 1–5 IDoc Wizard—Definition File Parameters
-
Enter the following information about the IDoc definition file:
For This Option
Enter
IDoc File Name
The path and filename for the IDoc description file to be used.
Released In
SAP IDoc release for this IDoc, for example, 4.6C.
Message format
Blank padded for ALE format or CR-LF for EDI format.
-
Click Next. The Review Selection page appears.
-
Review your selections and click Finish. The OTD Editor window appears, displaying the OTD.
Exporting the IDOC File from SAP
The following sections describe how to create and export the IDOC file from SAP. The procedures provided may vary depending on version and/or platform of SAP. Refer to the current documentation for your version of SAP. The procedures described in this section create the IDOC file an SAP system version 4.6 and earlier:
 To Download the IDoc Description File From
SAP
-
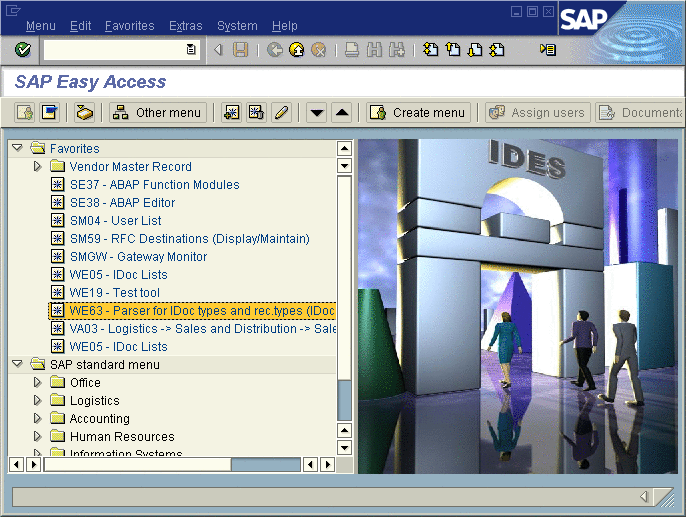
Log into the SAPGUI, and close the system messages. The SAP Easy Access window appears.
If the SAP Easy Access window does not display, click Exit.
Figure 1–6 SAP Easy Access Window
-
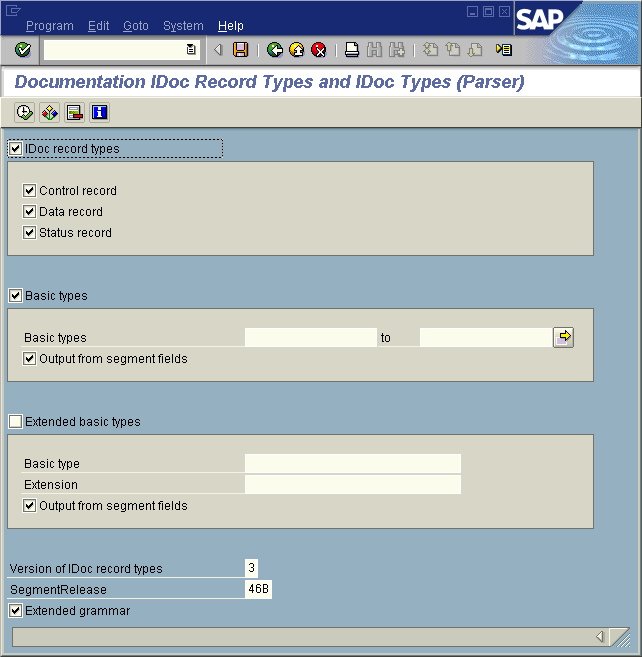
Double-click WE63.
The Documentation IDoc Record Types window appears.
Figure 1–7 Documentation IDoc Record Types Window
-
In the Basic Types box, type or select the IDoc to be parsed.
-
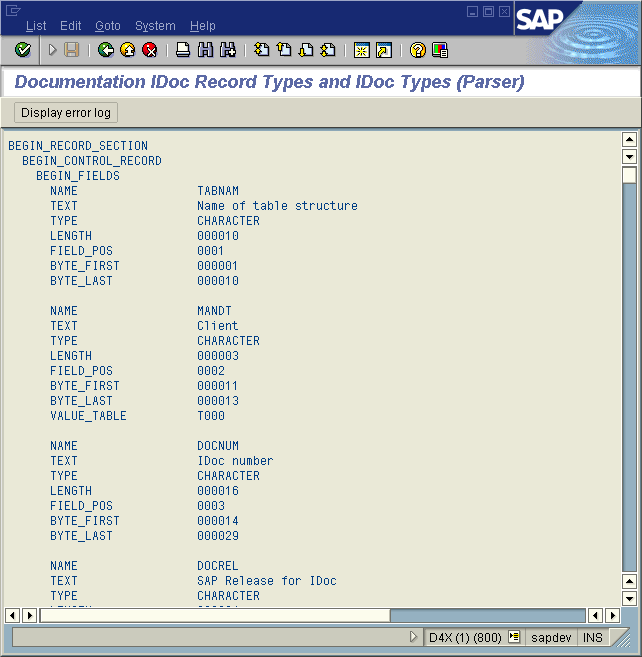
Select any other options needed, and click Execute.
The Documentation IDoc Record Types window shows the parsed definition file.
Figure 1–8 Documentation IDoc Record Types Window—Parsed Definition File
-
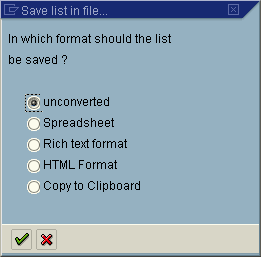
On the System menu, click List, Save, and then Local File.
The Save List in File dialog box appears.
Figure 1–9 Save List in File Dialog box
-
If necessary, select Unconverted.
-
Click Save.
The Save As dialog box appears.
-
Navigate to the folder where you want to save the description file and click Save.
The Transfer List to a Local File dialog box displays.
Figure 1–10 Transfer List to a Local File Dialog Box

-
Enter the name and path of the local file to receive the IDoc description file.
-
Click Transfer.
This downloads the file.
Once you have downloaded the IDoc description file, create the IDoc OTD using the IDoc wizard as described in Creating IDoc OTDs. Use the From Description File option so that you can select the description file you downloaded.
Saving the IDoc Description File (After 4.6)
Follow the instructions below to download an IDoc description file from an SAP system version 4.7 and later.
Note –
The screenshots in the procedure below show the SAPGUI version 6.2 connecting to segment version 4.7.
 To Save the IDoc Description File From SAP
-
Log into the SAPGUI, and close the system messages window.
The SAP Easy Access window appears.
If the SAP Easy Access window does not display, click Exit.
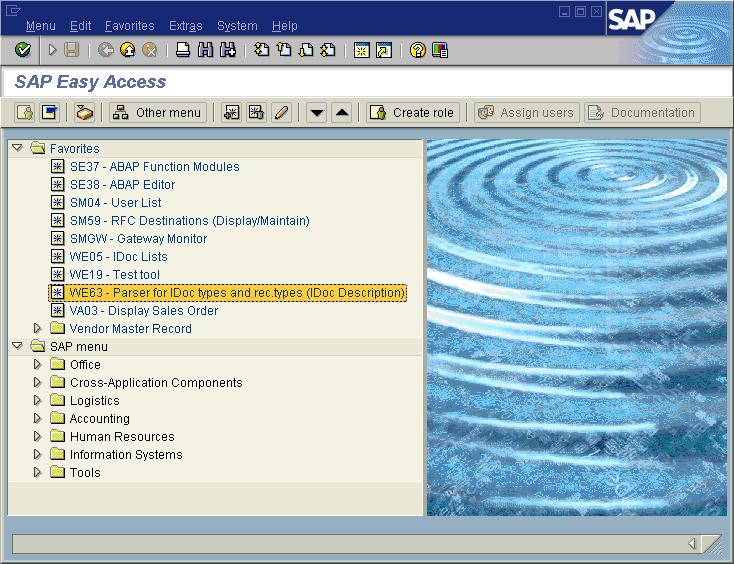
Figure 1–11 SAP Easy Access Window
-
Double-click WE63.
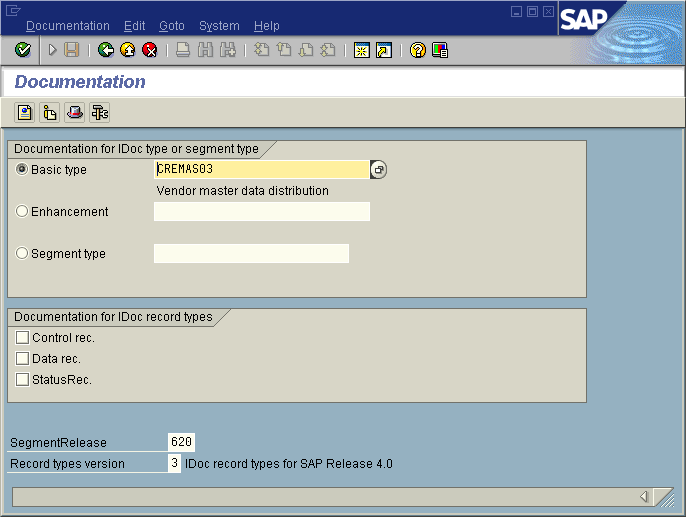
The Documentation window appears as shown below.
Figure 1–12 Documentation Window
-
Enter the basic type, enhancement, and segment type information.
-
Select the IDoc record types to be included.
-
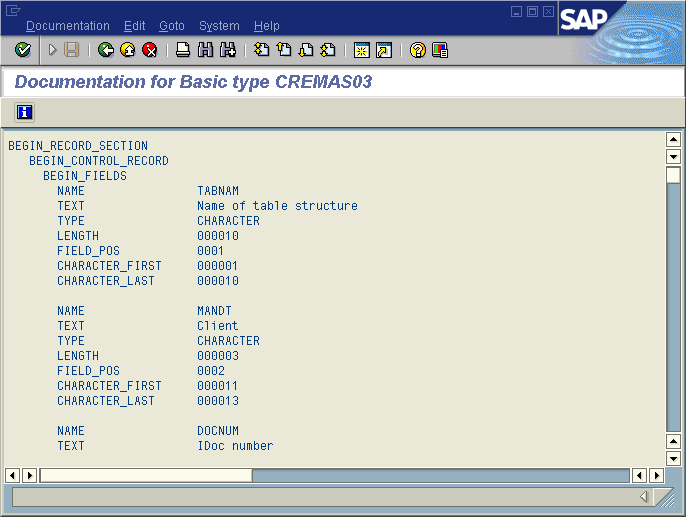
Click Parser. The Documentation window displays the parsed data.
Figure 1–13 Documentation Window—Parsed Definition File
-
On the System menu, click List, Save, and then Local File.
The Save List in File dialog box appears.
Figure 1–14 Save List in File Dialog box

-
If necessary, select Unconverted.
-
Click Save.
The Save As dialog box appears.
-
Navigate to the folder where you want to save the description file and click Save.
Once you have saved the IDoc description file, create the IDoc OTD using the IDoc wizard. Use the From Description File option so that you can select the description file you saved.
- © 2010, Oracle Corporation and/or its affiliates
