Configuring PeopleTools 8.42
This section describes how to configure PeopleTools 8.42 to integrate using the Sun Java Composite Application Platform Suite. When you use this version of PeopleTools, you can create the PeopleSoft adapter Projects that use inbound and outbound JMS data flows, and inbound HTTP data flows. Inbound HTTP data flows are only supported when you use an eInsight implementation of the adapter.
Configuring PeopleSoft for Enterprise Service Bus Posting
The following section describes how to create PeopleSoft nodes to receive and post messages with the Sun Java Composite Application Platform Suite.
Creating Source Nodes to Receive Enterprise Service Bus Posts
The procedure describes how to set up the PeopleSoft node to receive Enterprise Service Bus messages.
-
Log into the PeopleSoft server.
-
Follow the PeopleSoft documentation to create a new node and configure it.
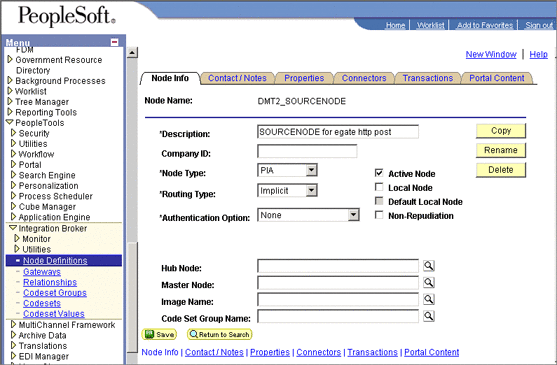
-
Add a transaction for the Enterprise Service Bus post using your own naming convention and configure it.
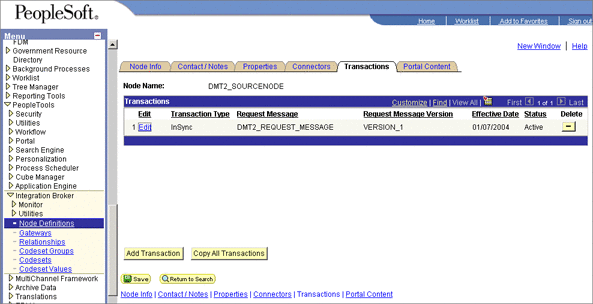
-
Click Edit. The Transaction Detail tab appears.
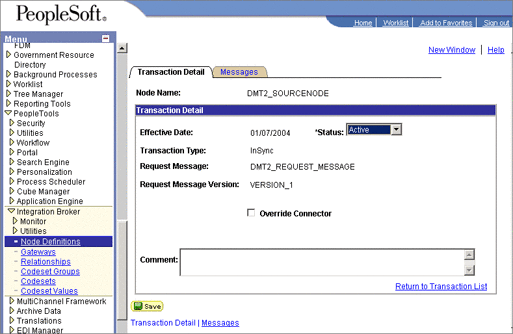
-
Configure the transaction.
-
Click Messages. From the Messages tab, configure the messages for the Enterprise Service Bus post.
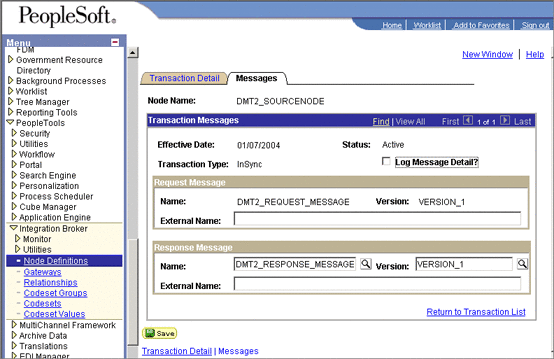
Activating Message Channels to Receive Enterprise Service Bus Messages
Each channel must be defined and activated before the adapter can post any data. The procedure describes how to activate the message channels for subscription to the PeopleSoft adapter.
 To Activate Message Channels to Receive Enterprise
Service Bus HTTP Posts
-
From the PeopleSoft Application Designer, create a channel. You can use the default properties.
-
Create the request and response message definitions. These message do not require PeopleCode.
-
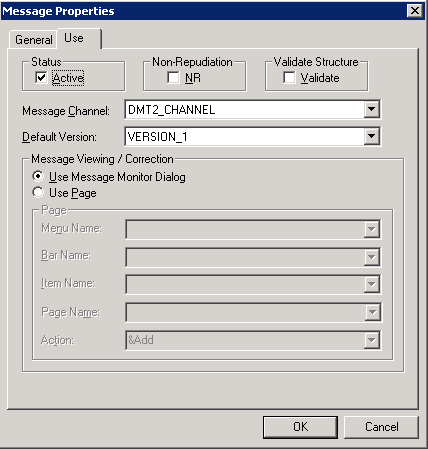
Click Message Properties. The Message Properties dialog box appears.
-
Select the Active option and click OK.
Figure 1–1 Activating Message Channels
Creating Target Nodes to Post Messages to Enterprise Service Bus Using HTTP
The procedure describes how to create and configure PeopleSoft nodes to post messages to Enterprise Service Bus using HTTP.
 To Create Target Nodes to Post Messages to Enterprise
Service Bus Using HTTP
-
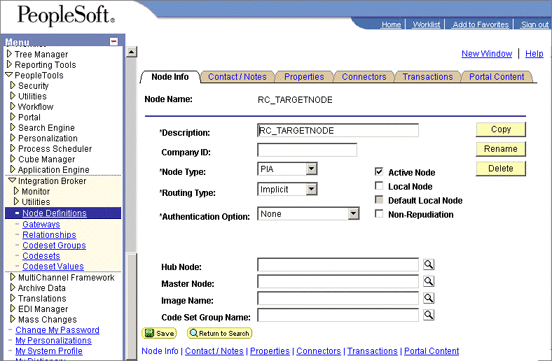
Follow the PeopleSoft documentation to create a new node using your own naming convention and configure it.
Figure 1–2 Creating Nodes to Post to Enterprise Service Bus
-
Select the target connector ID. From the Connectors tab, enter the values displayed in Figure 1–3.
Figure 1–3 Configuring the Connector to Post to Enterprise Service Bus using HTTP
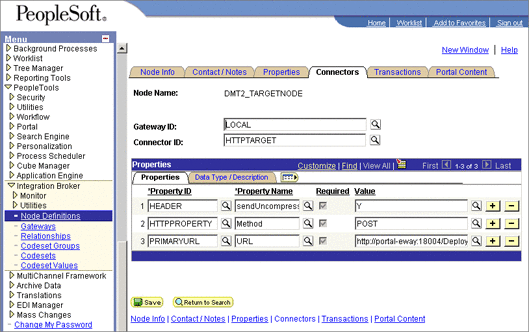
Use the following format for the PRIMARYURL property:
http://<yourmachinename>:18001/<yourdeploymentname>_servlet_<servletname>
/<servletname>
This property must match the logical eWay Servlet-url property defined in the Netbeans IDE . The port number must match the default Web server port number specified in the Integration Server properties in the Enterprise Designer. The Deployment Profile is the name of the Project’s Deployment Profile defined in the Enterprise Designer. The Deployment Profile name must be followed by _servlet_servletname.
-
Configure the transaction.
-
Click Edit.
-
Click Messages. The Messages tab is displayed.
Creating Target Nodes to Post to Enterprise Service Bus Using JMS
After creating the source node in PeopleTools, follow the procedure to create the JMS target node.
 To Create the Target Node to Post to Enterprise Service
Bus Using JMS
-
Follow the PeopleSoft documentation to create a new node using your own naming convention and configure it.
Figure 1–4 Creating Nodes to Post to Enterprise Service Bus Using JMS

-
Select the target connector ID, and enter the values shown.
Figure 1–5 Configuring the Connectors to Post to Enterprise Service Bus Using JMS
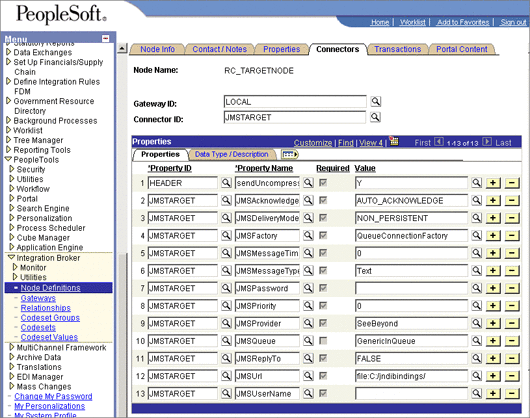
The JMS properties, such as persistence and acknowledgement modes, must match the settings for the JMS client as defined from the Connectivity Map. For information about JMS properties, refer to the Java CAPS JMS Reference .
The JMSQueue or JMSTopic property must match the name of the queue/topic in the Connectivity Map. The target destination must match the incoming queue/topic, and the source destination must match the outgoing queue/topic.
The JMSFactory property must point to the topic or queue ConnectionFactory for the topic or queue properties in the JNDI bindings file.
The JMSUrl property must point to your JNDI bindings file (see Creating the JNDI Bindings File for JMS PostingCreating the JNDI Bindings File for JMS Posting).
Make sure that the node that uses JMSTargetConnector as the connector is setup correctly in regard to the, JMSUserName, JMSPassword.
Additional HTTP Configurations
Verifying the HTTP Listening Connector
Two types of HTTP connectors are used with PeopleSoft adapter Projects that use HTTP to communicate to PeopleSoft: the HTTP listening connector and the HTTP target connector.
The PeopleSoft server uses the HTTP listening connector to receive messages from. The PeopleSoft adapter HTTP client external application is used to post to the HTTP listening connector. You do not have to configure the HTTP listening connector; the connector is started automatically by the PeopleSoft Integration Application.
However, you must set the location for the HTTP listening connector in the Environment properties of the PeopleSoft Adapter. The routing of messages in the PeopleSoft server is decided by the content of the message in the header section.
The HTTP target connector is used to send HTTP messages to Enterprise Service Bus. The Enterprise Service Bus component receiving the HTTP message is a servlet. The servlet name is specified in the Connectivity Map.
 To Verify HTTP Listening Connector
-
In a text editor, open the web.xml file in the following directory:
bea\wlserv6.1\config\peoplesoft\applications\PSIGN\WEB-INF
where, bea is the WebLogic installation directory.
-
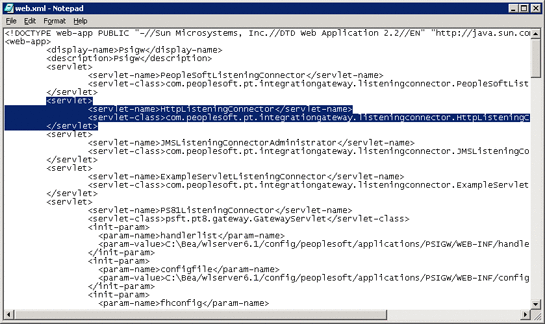
Verify that the following section is included, and add it if it is absent.
Figure 1–6 Verifying the HTTP Listening Connector
Additional JMS Configurations
Configuring Inbound JMS Connections
To configure inbound JMS connections, you must edit the IntegrationGateway.properties file as described in the procedure.
 To Configure Inbound JMS Connections
-
Open the IntegrationGateWay.properties file from the following directory:
bea\wlserver6.1\config\peoplesoft\applications\PSIGW\WEB-INF
where, bea is the WebLogic installation directory.
-
Edit the file for the JMS queue listener properties.
You can configure multiple queues by using the convention ig.jms.queue1, ig.jms.queue2, ig.jms.queue3, and so on. Configuring Inbound JMS Connections shows how the JMS listener is configured for the GenericOutQueue.
ig.jms.Queues=1
“1” indicates only one queue.
ig.jms.Queue1=GenericOutQueue
The first queue name “GenericOutQueue”, must be the same in the .bindings file. The Java code used to generate the entry in the .bindings is:
queue = new STCQueue("GenericOutQueue");
q = null;
  try {
          q = (Queue)
         jndifContext.lookup("GenericOutQueue");
System.out.println(q.getClass().getName());
            } catch (Exception e) {
                 System.out.println("fcontext
GenericOutQueue lookup exception");
                e.printStackTrace();
            }
            if (q == null) {
                System.out.println("q is null...bind
GenericOutQueue as GenericOutQueue");
                jndifContext.bind("GenericOutQueue",
queue);            }
ig.jms.Queue1.Provider=SunSeeBeyond
The “SunSeeBeyond” entry must match the configuration entry in the integrationgateway.properties file:
ig.jms.JMSProvider.JNDIFactory.SeeBeyond=com.sun.jndi.fscontext.RefFSContextFactory
ig.jms.Queue1.JMSFactory=QueueConnectionFactory
“QueueConnectionFactory” is the JNDI name in the .bindings file. Use the following Java code to generate the entry:
QueueConnectionFactory tgtqcf  = null;
            try {
                /*you can change the jndi name here,
the jndi name use here must
be exactly same
                 *as in the websphere’s Generic JMS
Provider’s configuration
External JNDI Name
                 */
                tgtqcf = (QueueConnectionFactory)
jndifContext.lookup("Queue
ConnectionFactory");
            } catch (Throwable e) {
                System.out.println("fcontext Queue
ConnectionFactory lookup exception");
                e.printStackTrace();
            }
            if (tgtqcf == null) {
                System.out.println("fcontext Queue
ConnectionFactory lookup is null...");

                jndifContext.bind("QueueConnection
Factory", srcqcf);
            } else {
                System.out.println("fcontext Queue
ConnectionFactory is NOT
null...unbind then re-bind QueueConnectionFactory");

                jndifContext.unbind("Queue
ConnectionFactory");
                jndifContext.rebind("Queue
ConnectionFactory", srcqcf);
            }
ig.jms.Queue1.MessageSelector=
ig.jms.Queue1.Url=file:c:/jndibindings/
The URL of the .bindings file. Because PeopleSoft only supports fcontext, this is a directory name.
ig.jms.Queue1.User=Administrator
User name to Enterprise Service Bus JMS server.
ig.jms.Queue1.Password=SwBAuVVABok=
Encrypted value of the password to Enterprise Service Bus JMS server. Use the PeopleSoft utility pscipher to get the encrypted value.
-
Edit the file for the JMS queue listener properties.
You can configure multiple queues by using the convention ig.topic1, ig.topic2, ig.topic3, and so on. The table shows how to configure the JMS topic to use the GenericOutTopic.
ig.jms.Topics=1
“1” indicates only one topic.
ig.jms.Topic1=GenericOutTopic
The first topic name “GenericOutTopic”, must be the same in the .bindings file. The Java code to generate this entry in the .bindings is:
topic = new STCTopic("GenericOutTopic");
            t = null;
            try {
                /*you can change the jndi name here,
the jndi name use here
must be exactly same
                 *as in the websphere’s Generic JMS
Provider’s configuration
External JNDI Name
                 */
                t = (Topic) jndifContext.lookup
("GenericOutTopic");
                System.out.println(t.getClass().
getName());
            } catch (Exception e) {
                 System.out.println("fcontext
GenericOutTopic lookup exception");
                e.printStackTrace();
            }
            if (t == null) {
                System.out.println("t is null...bind
GenericOutTopic as
GenericOutTopic");
                jndifContext.bind("GenericOutTopic",
topic);            }
ig.jms.Topic1.Provider=SunSeeBeyond
The “SunSeeBeyond” entry must match the configuration entry in the integrationgateway.properties file:
ig.jms.JMSProvider.JNDIFactory.SeeBeyond=com.sun.jndi.fscontext.RefFSContextFactory
ig.jms.Topic1.JMSFactory=TopicConnectionFactory
“TopicConnectionFactory” is the JNDI name in the .bindings file. Use the following Java code to generate the entry:
TopicConnectionFactory tgttcf = null;
            try {
                /*you can change the JNDI name here,
the JNDI name use here must be exactly same
                 *as in WebSphere’s Generic JMS
Provider’s configuration External JNDI Name
                 */
                tgttcf = (TopicConnectionFactory)
jndifContext.lookup("TopicConnectionFactory");
            } catch (Throwable e) {
                System.out.println("fcontext
TopicConnectionFactory lookup exception");
                e.printStackTrace();
            }
            if (tgttcf == null) {
                System.out.println("fcontext
TopicConnectionFactory lookup is null...");
                jndifContext.bind(
"TopicConnectionFactory", srctcf);
            } else {
                System.out.println("fcontext
TopicConnectionFactory is NOT null...unbind
then re-bind TopicConnectionFactory");
                jndifContext.unbind(
"TopicConnectionFactory");
                jndifContext.rebind(
"TopicConnectionFactory", srctcf);
            }
ig.jms.Topic1.MessageSelector=
Refer to the queue table.
ig.jms.Topic1.Url=file:c:/jndibindings/
Refer to the queue table.
ig.jms.Topic1.User=Administrator
Refer to the queue table.
ig.jms.Topic1.Password=SwBAuVVABok=
Refer to the queue table.
Creating the JNDI Bindings File for JMS Posting
To enable the PeopleSoft Adapter to post to PeopleSoft using JMS, you must have a JNDI bindings file in place. You can generate the bindings file with any standard JNDI generation application. Sun provides a sample generation application called PSFTBindJMS.java. This program and two associate applications, compile.bat and run.bat, are included in the sample Project file.
You must edit and recompile the PSFTBindJMS.java file before generating the bindings file.
 To Create the JNDI Bindings File
-
Create the directory, C:\testprogram. Copy the PSFTBindJMS.java, compile.bat, and run.bat files to this directory.
Note –The latest version of the Enterprise Service Bus API Kit JAR files must be added to the WebLogic PeopleSoft-PIS server classpath. To confirm this, check the JAR files in the server’s setENV.cmd file located in the following location (or equivalent): C:\bea\wlserver6.1\config\peoplesoft\setEnv.cmd If you have installed the PeopleSoft-PIA service as a Windows Service, you must uninstall and reinstall the service by executing unInstallNTServicePIA.cmd first, then executing installNTServicePIA.cmd. This is a runtime classpath requirement to confirm the new classpath.
-
Open the PSFTBindJMS.java file in a text editor and follow the directions presented in the text of the file. Edit the JNDI bindings generation application with the Enterprise Service Bus host name and location. Verify that the Enterprise Service Bus JMS server port number is correct. This port number must match the Server port property for the JMS IQ Manager in the Enterprise Designer. For information, refer to the Java CAPS JMS Reference .
-
Modify the following line to point to your own directory:
fcontextprops.put(Context.PROVIDER_URL, "file:C:\\eGateExports\\PeopleSoft\\JMS");
Note –If you are installing the Sun Java Composite Application Platform Suite and the PeopleSoft Adapter on a computer that previously included ICAN 5.0.5, be sure to delete all of the previously installed API JAR files, and follow the directions in the Sun Enterprise Service Bus API Kit Developer’s Guide to modify your classpath to include the new API JAR files.
-
Double-click compile.bat to compile the program. A class file is generated.
-
Double-click run.bat to run the program. This creates a .bindings file.
-
Copy the .bindings file to the location of the JMSUrl property described in the section above (see Creating Target Nodes to Post to Enterprise Service Bus Using JMS.
When you run the bindings generation application for the first time, the following message is displayed:
fcontext TopicConnectionFactory lookup exception, you never had this jndi entry
fcontext TopicConnectionFactory lookup is null... will bind to the jndi name
fcontext GenericInTopic lookup exception, it doesn’t exist
GenericInTopic is null...bind GenericInTopic as GenericInTopic
fcontext GenericOutTopic lookup exception, it doesn’t exist
GenericOutTopic is null...bind GenericOutTopic as GenericOutTopic
fcontext ErrorTopic lookup exception, it doesn’t exist
t is null...bind ErrorTopic as ErrorTopic
fcontext QueueConnectionFactory lookup exception it doesn’t exist
fcontext QueueConnectionFactory lookup is null...bind with new value
fcontext GenericInQueue lookup exception, it doesn’t exist
GenericInQueue is null...bind GenericInQueue as GenericInQueue
fcontext GenericOutQueue lookup exception
GenericOutQueue is null...bind GenericOutQueue as GenericOutQueue
In the subsequent runs, the following message is displayed:
fcontext TopicConnectionFactory is NOT null...unbind then re-bind
TopicConnectionFactory will overwrite old value
com.stc.jms.client.STCTopic
fcontext GenericInTopic is NOT null...unbind then re-bind GenericInTopic
will overwrite old valuecom.stc.jms.client.STCTopic
fcontext GenericOutTopic is NOT null...unbind then re-bind GenericOutTopic
will overwrite old valuecom.stc.jms.client.STCTopic
fcontext ErrorTopic is NOT null...unbind then re-bind ErrorTopic
will overwrite old value
fcontext QueueConnectionFactory is NOT null...unbind then re-bind
QueueConnectionFactorycom.stc.jms.client.STCQueue
fcontext GenericInQueue is NOT null...unbind then re-bind GenericInQueue
will overwrite old valuecom.stc.jms.client.STCQueue
fcontext GenericOutQueue is NOT null...unbind then re-bind GenericOutQueue
will overwrite old value
-
Once you have completed all of these steps, restart the PeopleSoft-PIA services. You can restart the PIA services from the Windows Services console, or you can restart the service from a Command Line using the following command:
startIA.cmd
After you execute this command, monitor the PIA_weblogic.log file until you see the following output:
#### <> <000329>
This indicates that the PIA Service is started. If you use this method of starting the PIA service, be aware that the Windows Services console will not accurately reflect that the service has been started.
-
Stop and restart the JMSListeningConnector using the URL (see Starting and Stopping the JMS Listening Connector). After you start the JMS Listening Connector, monitor the PIA_weblogic.log. The following message indicates that the JMS Listening Connector has started correctly:
#### <> <> <101047> <[WebAppServletContext(2244929,PSIGW,
/PSIGW)] JMSListeningConnectorAdministrator: init>
#### <> <> <101047> <[WebAppServletContext(2244929,PSIGW,
/PSIGW)] PeopleSoftListeningConnector: init>
If you perform step Creating the JNDI Bindings File for JMS Posting before the PIA service is ready, the JMS Listening Connector will not be active, so it will not receive messages from Enterprise Service Bus.
Starting and Stopping the JMS Listening Connector
To Start the JMS Listening Connector, use the following command:
http://hostname:port/PSIGW/JMSListeningConnectorAdministrator?Activity=START |
To Stop the JMS Listening Connector, use the following command:
http://hostname:port/PSIGW/JMSListeningConnectorAdministrator?Activity=STOP |
Verifying the JMS Connection
To verify if your JMS connection works, you can use the StartSendMaster.bat provided by PeopleSoft in the following location:
c:\bea\wlserver6.1\config\peoplesoft\applications\PSIGW |
Verifying PeopleSoft Server Logs
You can verify log information for the PeopleSoft server in the following directory:
bea\wlserver6.1\config\peoplesoft\applications\PSIGW |
where bea is the installation directory where WebLogic is installed.
Notes on PeopleSoft Server Disconnections for JMS
If the Logical Host is shut down during a JMS session with PeopleSoft, the PeopleSoft server looses the session. You must reestablish the connection on the PeopleSoft server.
- © 2010, Oracle Corporation and/or its affiliates
