Configuring PeopleTools 8.13
This section describes how to configure PeopleTools 8.13 to integrate using the Enterprise Service Bus. When you use this version of PeopleTools, you can create PeopleSoft Adapter Projects that use inbound HTTP Collaborations. Outbound HTTP Collaborations are only supported when you use eInsight together with Enterprise Service Bus.
Creating the PeopleSoft Node to Receive Enterprise Service Bus HTTP Posts
The procedure describes how to create and configure PeopleSoft nodes for Enterprise Service Bus HTTP posting.
 To Create PeopleSoft Nodes to Receive Enterprise Service
Bus HTTP Posts
-
In the PeopleTools Application Designer, click New on the File menu. The New dialog box appears.
-
Click Message Node and click OK to display the Message Node dialog box for Node 1.
-
Right-click the Locations pane and click Insert Location. The Location dialog box appears.
-
Enter the URL for the PeopleSoft Gateway Servlet and click OK.
For Apache:
http://PSFTHOST/servlets/psft.pt8.gateway.GatewayServlet
For WebLogic:
http://PSFTHOST/servlets/gateway
where PSFTHOST is the name of the host computer where PeopleSoft runs.
The URL name displays in the Message Node dialog box similar to Figure 1–7.
Figure 1–7 PeopleSoft Node for Receiving Enterprise Service Bus HTTP Posts

-
Click Save As on the File menu.
-
Enter the name of the message node.
-
From the File menu, click Open. The Open Object window appears.
-
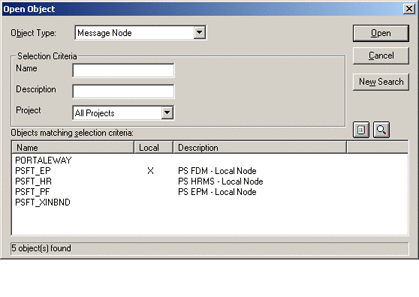
To verify that the message node is ready for use, select Message Node from the Object Type list and click Open.
A list of all message nodes displays.. The name of the new message node appears in the Objects matching selection criteria pane.
Message nodes with PSFT prefixes are created by the PeopleSoft installation. PSFT_EP is the PeopleSoft local node for the Financials application. It is specified as a subscriber to messages sent from the PeopleSoft Adapter, and a publisher of messages to the HTTP server.
Figure 1–8 Viewing Message Nodes
Activating the Message Definition to Receive Enterprise Service Bus Posts
PeopleSoft comes with a set of predefined message definitions. The desired message definition is configurable in the adapter with the Subject property. The following instructions describe how to activate the message definition for subscription to the PeopleSoft Adapter.
Note –
For purposes of this publication the ADVANCED_SHIPPING_RECEIPT Message Definition is activated for publish / subscribe.
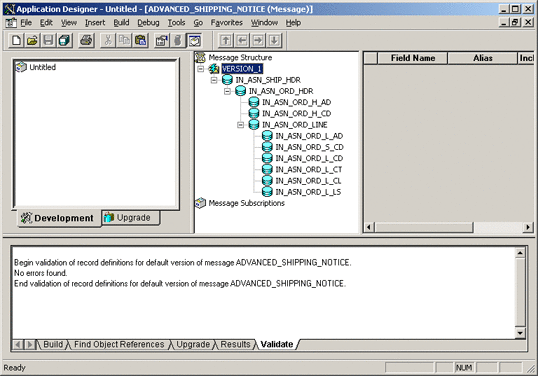
Each message used for publication must be defined. This definition corresponds to the XML message the adapter publishes, and contains the elements of the data to be published. However, before the Adapter can publish any data, the message definition must be activated. The Application Designer includes a list of these definitions.
 To Activate the Message Definition to Receive Enterprise
Service Bus Posts
-
In PeopleTools Application Designer, click Open on File menu. The Open Object dialog box appears.
-
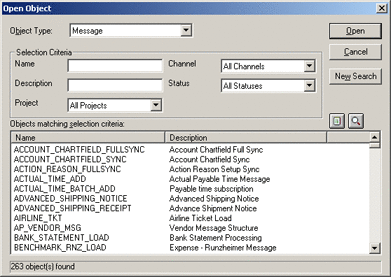
Click Message from the Object Type list. This displays all available PeopleSoft message definitions.
Figure 1–9 Viewing Available Message Destinations
-
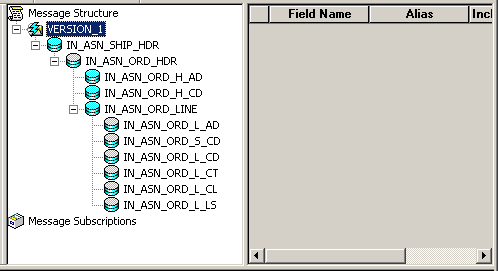
Double-click the message definition. The Message window appears, displaying the record details of the chosen message structure.
Figure 1–10 Message Structure Details
-
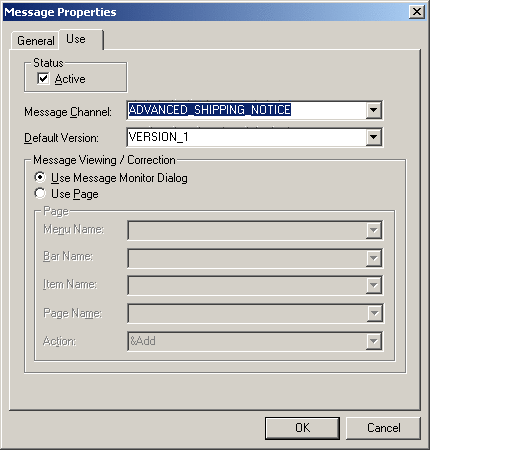
Click Object Properties on the File menu,. The Message Properties dialog box appears.
-
Click the Use tab.
-
Select the Active option and click OK.
Figure 1–11 Activating the Message Definition to Receive Enterprise Service Bus Posts
-
Save your current changes. You have now activated the message definition for publishing or subscribing.
Defining Message Channel Routing Rules
This procedure describes how to configure message channels. Before you start, determine which message channel you will use. You can configure the PeopleSoft Adapter for this message channel with the Channel property.
Configuring the Message Channel
Each message channel logically groups messages together. For purposes of the procedure, the ADVANCED_SHIPPING_RECEIPT message is grouped into the ADVANCED_SHIPPING_NOTICE message channel.
 To Configure the Message Channel
-
Log into the PeopleTools Application Designer.
-
Click Open on the File menu. The Open Object dialog box appears.
-
Select Message Channel from the Object Type list and click Open. This displays all available message channels.
-
Double-click the message channel to be used. The Message Channel window appears for that channel.
-
Click Routing Rules, right-click the pane, and from the shortcut menu, click Insert message node. The Insert Message Node dialog box appears, displaying the available message nodes.
-
Select PSFT_EP and click Insert. This inserts the message into the routing rules table.
-
Select STCPUBLISHER and click Insert.
-
Click Cancel to close the dialog box.
The message nodes are now defined on the Routing Rules tab of the Message Channel window.
Figure 1–12 Viewing the Message Nodes
Defining Routing Directions for Message Nodes
Routing directions provide you with the ability to assign destinations (Publish To/Subscribe From) to a message node. This section describes the procedure for defining the routing directions for the adapter message node, Subscribe From.
 To Define the Routing Directions
-
In the Routing Rules Tab of Message Channel window in the Application Designer, right-click Both (Publish and Subscribe) for STCPUBLISHER, click Routing Direction, then Subscribe From.
-
Right-click Both (Publish and Subscribe) for PSFT_EP, click Routing Direction, and click Publish To.
The Routing Rules tab now shows that the adapter message node is subscribing to messages from PSFT_EP and is publishing to STCHTTP.
Figure 1–13 Viewing Routing Directions

-
Click Save on the File menu. You have now defined the routing rule that allows the appropriate message to be published from the adapter to PeopleSoft.
Adding the PeopleSoft Subscription Handler
The procedure describes how to add the PeopleSoft subscription handler. Before you start the procedure, make a note of the following PeopleSoft configurations:
-
Jolt listener host
-
Jolt listener port
-
PeopleTools version
-
Operator ID
-
Operator ID password
 To Add the PeopleSoft Handler Directory
-
Navigate to the following URL in a browser to open the handler directory:
For Apache:
http://PSFTHOST/servlets/psft.pt8config.ConfigServlet
For WebLogic:
http://PSFTHOST/servlets/gateway.administration
where PSFTHOST is the host where the PeopleSoft Application Messaging Gateway is installed.
The Handler Directory page appears.
Figure 1–14 Adding the PeopleSoft Handler Directory

-
Click Add handler. The Add Handler page appears.
-
Enter the PeopleSoft handler class:
psft.pt8.psfthandler.PeopleSoftHandler
and click Save.
Figure 1–15 Viewing the New Handler

-
Click Load to load the PeopleSoft handler class you just added. The status changes to Loaded successfully.
-
Click Configure to configure the handler. The Manage Lookup Table page for the PeopleSoft handler appears.
Figure 1–16 Managing the Lookup Table

-
Click Add a new node to associate the node with this subscription handler. The Add an address window appears.
Figure 1–17 Adding an Address

-
Enter the values for the new node, PSFT_EP, associated with the subscription handler. These values are mandatory.
-
Click Save address. The Manage Lookup Table page now displays the new node.
Figure 1–18 Viewing the New Node

The Application Messaging Gateway is now ready to receive XML messages from the adapter and publish the XML messages to PeopleSoft.
Configuring for Subscription
To configure PeopleSoft to publish XML messages to the PeopleSoft Adapter involves the following steps:
Creating an HTTP Adapter Message Node
Refer to Creating the PeopleSoft Node to Receive Enterprise Service Bus HTTP Posts to create a message node associated with the PeopleSoft Adapter. A message node called STCHTTP is used as an example.
Activating the Message Definition for Subscription
Refer to Activating the Message Definition to Receive Enterprise Service Bus Posts to activate the message to be published to the PeopleSoft Adapter. In this case, activate the PO-EXPECTED_RECEIPT_SHIPTO message.
Defining the Message Channel Routing Rules
Refer to Defining Message Channel Routing Rules to define the routing rules for the message channel to be used.
-
Insert the PSFT_EP message node and the HTTP message node previously created.
-
Define the routing direction. Select Subscribe From for PSFT_EP and Publish To for the HTTP message node (STCHTTP).
Adding the HTTP Publication Handler
This procedure describes how to add the HTTP publication handler. Before you start, verify that the HTTP publication handler is installed. Also, obtain the HTTP configuration values for the adapter which is to receive the XML message(s) from PeopleSoft. These are required when configuring the message node corresponding to the subscription handler.
 To Obtain the HTTP Configuration Values
-
Navigate to the following URL in a browser to open the handler directory:
For Apache:
http://<yourmachinename>:18001/<yourdeploymentname>
_servlet_<servletname>/<servletname>.
For WebLogic:
http://<PSFTHOST>/servlets/gateway.administration
where, <PSFTHOST> is the host where the PeopleSoft Application Messaging Gateway is installed.
The Handler Directory page appears.
Figure 1–19 Adding the PeopleSoft Handler Directory

-
Click Add handler. The Add Handler page appears.
-
Enter the HTTP publication handler class and click Save.
com.stc.ewpsoft8.stchttphandler.HTTPHandler
-
Click Save. The Handler Directory page displays the new handler.

-
Click Load. The status changes to Loaded successfully.
-
Click Configure for the HTTP handler. The HTTP Handler Directory page appears.
-
Click Add an HTTP node to associate a node with this subscription handler.
-
Enter the values for the new node associated with the subscription handler. Scroll to the right to access additional columns.
-
In the Include Headers column, indicate whether or not you want header information to be retained in the received messages. All values are mandatory.
-
Selecting the check box preserves the header information.
-
Deselecting the check box strips the header information.
-
Click Save. This displays the STCHTTP node entries. If the entries are correct, the Application Messaging Gateway now can receive XML messages from PeopleSoft and publish the XML messages to the PeopleSoft Adapter (in HTTP mode).
You can now ping the HTTP host from the system where the com.stc.eWays.psofthandler.jar file is installed. You may need to use the system’s full host name.
- © 2010, Oracle Corporation and/or its affiliates
